I still remember the first time I attempted gingerbread cookies. It was a disaster worthy of a cooking-show blooper reel. The dough stuck to everything like industrial-strength glue, the spices tasted like someone had emptied the entire pantry into one bowl, and the final cookies could have doubled as hockey pucks. My kitchen looked like a flour bomb had exploded, and I swore off gingerbread forever. Fast forward three years, and here I am, practically evangelizing about what might be the most addictive cookie I've ever created. These Gingerbread Kiss Cookies aren't just good — they're the kind of good that makes you question every other gingerbread recipe you've ever tried. The secret? It's not just one thing. It's a perfect storm of technique, timing, and that little chocolate kiss on top that transforms everything.
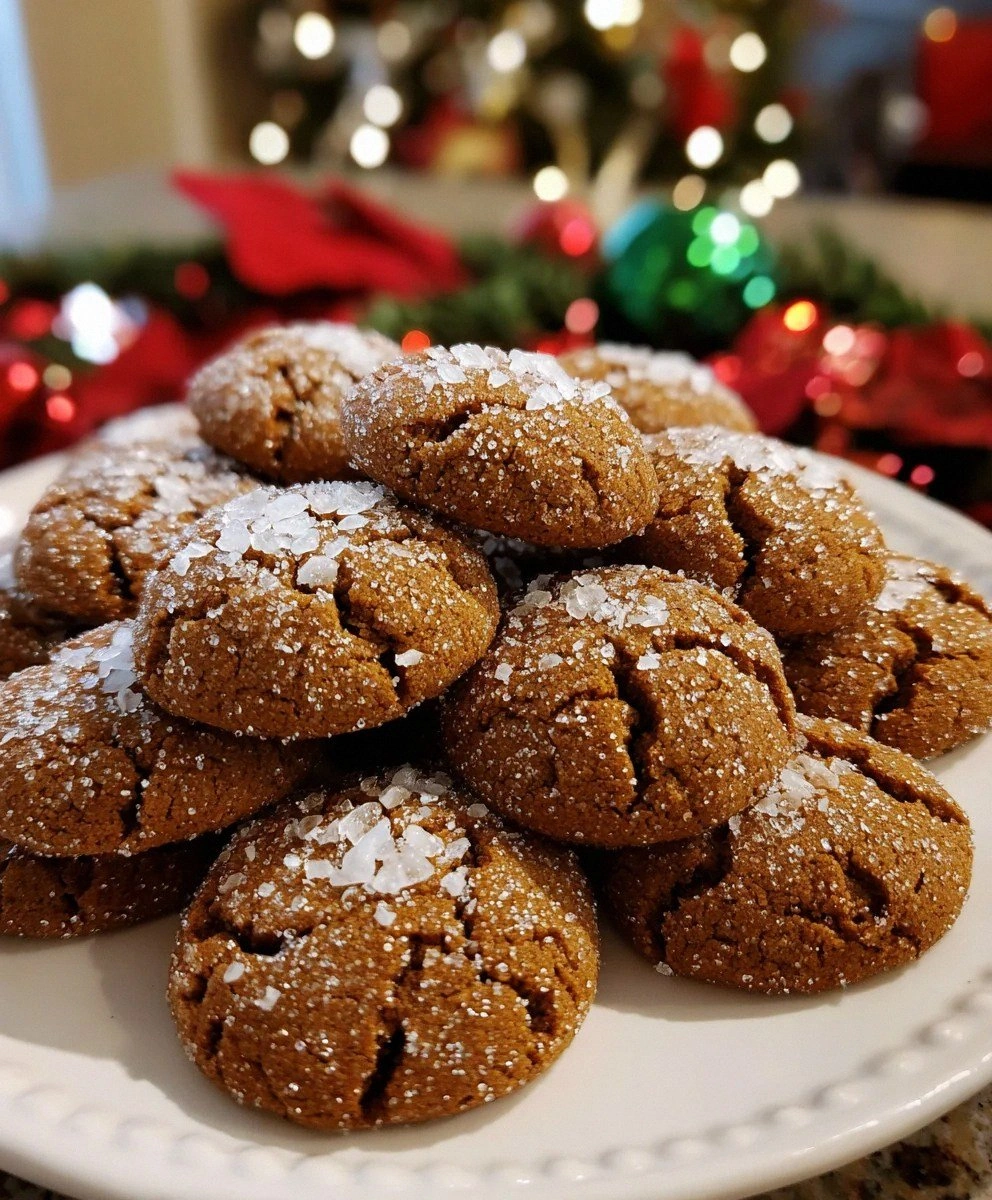
Picture this: It's December 23rd, your kitchen windows are fogged up from the warm oven, and your entire house smells like you've bottled the essence of Christmas itself. You're pulling out a tray of these beauties — soft, pillowy cookies with crackly tops, rolled in sparkly sanding sugar that catches the light like tiny diamonds. Then comes the moment of truth: pressing those Hershey's Hugs into the centers, watching them melt just enough to create this perfect chocolate-gingerbread marriage. The cookies are still warm, and you break one open (purely for quality control, obviously), and the chocolate creates these gorgeous ribbons against the dark, spicy cookie. That first bite? It's like someone took all your favorite holiday memories and compressed them into one perfect mouthful.
Here's what nobody tells you about gingerbread cookies: most recipes get the spice balance completely wrong. They're either so timid you can barely taste them, or they're like getting punched in the face by a Christmas candle. And don't even get me started on the texture issues — why do so many gingerbread cookies have the texture of sweetened cardboard? These cookies are different. They're soft and chewy, with edges that give just the slightest resistance before yielding to that tender center. The molasses doesn't just add flavor; it creates this incredible depth that makes people close their eyes when they taste them. Trust me, watch your guests' faces when they try these — that involuntary smile and eye-closing thing? That's when you know you've nailed it.
But here's the real kicker — and I say this with complete confidence — once you make these, you'll never need another gingerbread cookie recipe again. They're that perfect balance of approachable enough for beginners but impressive enough for your most critical foodie friends. The dough comes together in one bowl, there's no chilling required (though you can if you want), and the whole process from mixing to eating takes under an hour. Let me walk you through every single step — by the end, you'll wonder how you ever made it any other way.
What Makes This Version Stand Out
Perfect Spice Balance: Most recipes either overwhelm you with ginger or barely let it whisper. This version uses a precise ratio of ginger, cinnamon, nutmeg, and allspice that creates a warm, complex flavor profile where no single spice dominates. It's like a well-orchestrated symphony where every instrument plays its part perfectly.
Stay-Soft Texture: The combination of brown sugar and molasses doesn't just add flavor — it creates this incredible moisture retention that keeps these cookies soft for days. Even if you accidentally overbake them slightly, they'll still have that tender, chewy texture that makes people reach for seconds.
No-Fail Technique: Unlike fussy cut-out gingerbread cookies, these are drop cookies that couldn't be simpler. No rolling pins, no cookie cutters, no transferring delicate shapes. Just scoop, roll in sugar, bake, and press in the chocolate kiss. It's foolproof baking at its finest.
Chocolate Integration: Here's where most recipes miss the mark — they add chocolate that doesn't complement the spices. Hershey's Hugs are the perfect choice because the white and milk chocolate swirl mirrors the warm spices while adding just enough sweetness to balance the molasses.
Crowd-Pleasing Factor: I've never seen a plate of these last more than ten minutes at any gathering. Kids love them because they're not too spicy, adults love them because they're sophisticated enough for grown-up palates. They're the great equalizer of holiday cookies.
Make-Ahead Magic: The dough keeps beautifully in the fridge for up to five days, and the baked cookies freeze like a dream. Make a double batch in November, freeze half, and you'll have fresh gingerbread cookies ready to bake whenever the craving strikes.
Visual Impact: Let's be honest — these cookies are gorgeous. The contrast between the dark cookie, white sanding sugar, and striped chocolate kiss creates a cookie that looks as good as it tastes. They're practically begging to be Instagrammed.
Alright, let's break down exactly what goes into this masterpiece...
Inside the Ingredient List
The Flavor Base
All-purpose flour isn't just the structural foundation — it's the canvas that lets all those beautiful spices shine. I use a high-quality unbleached flour because it has a slightly nuttier flavor that complements the molasses perfectly. Too much flour and your cookies will be dense and cakey; too little and they'll spread into sad, greasy puddles. The magic happens when you measure it correctly: spoon it into your cup and level it off, never scoop directly from the bag unless you want hockey pucks.
Ground ginger is obviously the star here, but not all ginger is created equal. Freshly opened spice jars will give you that bright, almost citrusy heat that defines great gingerbread. If your ginger has been sitting in the pantry since last Christmas, do yourself a favor and buy a new jar. The difference between fresh and stale ginger is like the difference between a live concert and a scratchy recording — technically the same song, but one makes your soul sing.
The Texture Crew
Salted sweet cream butter is non-negotiable here. The salt enhances all the warm spices while the high fat content creates those tender, melt-in-your-mouth edges. Make sure it's properly softened — you should be able to press your finger into it easily, but it shouldn't be greasy or melted. This isn't the place for bargain butter either; spring for the good stuff because the butter flavor really shines through in the final cookie.
Light brown sugar does double duty, adding both sweetness and that subtle caramel note that makes people ask "what's in these?" The molasses in the brown sugar works with the added molasses to create layers of flavor that unfold as you eat. Dark brown sugar works too, but it can make the cookies a bit too robust — save that for gingerbread cake, not these delicate cookies.
The Unexpected Star
Molasses is where most recipes go wrong. They either use too much, creating bitter, overwhelming cookies, or too little, giving you bland, pale imposters. The key is using just the right amount — enough to give that gorgeous deep flavor and dark color, but not so much that it overpowers everything else. I use regular unsulphured molasses, not blackstrap, which can be bitter and metallic tasting.
The Final Flourish
Hershey's Hugs aren't just cute — they're the perfect chocolate choice because the white chocolate stripes add creaminess that tames the molasses, while the milk chocolate adds depth. Regular kisses work too, but Hugs create this beautiful marbled effect as they melt slightly into the cookie. Press them in immediately after baking when the cookies are still soft and warm — timing is everything here.
Everything's prepped? Good. Let's get into the real action...
The Method — Step by Step
- Start by whisking together your flour, ginger, cinnamon, baking soda, nutmeg, allspice, and salt in a medium bowl. This isn't just mixing — it's ensuring every bite has that perfect balance of flavors. Whisk for a full thirty seconds; you're not just combining, you're aerating the flour which helps create lighter cookies. The aroma that wafts up when these spices hit each other? That's Christmas in powdered form. Set this aside and let those flavors get acquainted while you move to the wet ingredients.
- In a large bowl, beat the softened butter and brown sugar together until light and fluffy — about 3-4 minutes on medium speed. Don't rush this step; proper creaming incorporates air that helps the cookies rise properly. You're looking for a pale, cloud-like mixture that practically doubles in volume. Scrape down the bowl halfway through to ensure everything gets evenly incorporated. This is where most people mess up — they beat until just combined and end up with dense, sad cookies.
- Add the molasses and beat until fully incorporated. The mixture will look like it's separating at first — that's totally normal and exactly what you want to see. Keep beating and watch as it transforms into this gorgeous, silky caramel-colored mixture that smells like liquid gingerbread. Add the egg and vanilla, beating just until combined. Overmixing here can make your cookies tough, so once you don't see any streaks of egg, stop the mixer.
- Gradually add the flour mixture to the wet ingredients, mixing on low speed just until combined. This is where restraint pays off — mix until you still see a few streaks of flour, then finish by hand with a spatula. Overmixing develops the gluten and gives you tough, bread-like cookies. The dough should be soft and slightly sticky, like thick peanut butter. If it's too dry, add a teaspoon of milk; if it's too wet, dust with a tablespoon of flour.
- Preheat your oven to 350°F and line two baking sheets with parchment paper. Scoop the dough into 1-inch balls — I use a small cookie scoop for uniformity, but two spoons work fine. Roll each ball in sanding sugar until completely coated; this creates that beautiful sparkly exterior and adds a delightful crunch. Place them 2 inches apart on your prepared sheets — they spread less than you'd expect, but give them room to breathe.
- Bake for 8-10 minutes, rotating the pans halfway through. They're done when the edges are set and the tops are just starting to crack — they should still look slightly underbaked in the center. This is crucial for that soft, chewy texture. Remove from the oven and immediately press a Hershey's Hug into the center of each cookie. The chocolate will melt slightly and adhere perfectly to the cookie. Let them cool on the pan for 5 minutes before transferring to a wire rack.
- Cool completely before storing, though I dare you to wait that long. The chocolate needs time to set back up, and the cookies need to firm slightly. But honestly? Eating one warm with the chocolate still gooey is one of life's great simple pleasures. Just have a napkin handy because things might get a little messy in the best possible way.
- Store in an airtight container at room temperature for up to 5 days, though they'll never last that long. The flavors actually improve after the first day as the spices meld together. If you somehow end up with leftovers, they freeze beautifully for up to 3 months. Just let them come to room temperature before serving — or pop them in the microwave for 10 seconds for that fresh-from-the-oven experience.
That's it — you did it. But hold on, I've got a few more tricks that'll take this to another level...
Insider Tricks for Flawless Results
The Temperature Rule Nobody Follows
Room temperature ingredients aren't just a suggestion — they're the difference between cookies that spread properly and ones that stay in sad little mounds. But here's what most recipes don't tell you: different brands of butter have different water contents, which affects how your cookies bake. European-style butters with higher fat content will give you richer, more tender cookies, while standard American butter creates slightly crispier edges. Both work beautifully, but knowing this helps you adjust expectations. If you're using European butter, you might need to add an extra tablespoon of flour to account for the lower water content.
Why Your Nose Knows Best
That moment when you're creaming butter and sugar? Don't just watch — smell. When the mixture goes from smelling like sweet butter to having this light, almost marshmallow-y aroma, you've nailed the texture. Same goes for baking: when your kitchen suddenly fills with that warm, spicy gingerbread smell, start checking for doneness. Your nose is actually more reliable than a timer because ovens vary so much. I've baked these in everything from a tiny apartment oven to a professional convection unit, and the smell test never fails.
The 5-Minute Rest That Changes Everything
After you press in the chocolate kisses, let the cookies sit on the hot pan for exactly 5 minutes before moving them. This isn't just about preventing breakage — it's allowing the residual heat to set the chocolate without melting it completely. Too short and the chocolate falls out when you pick them up. Too long and the bottoms get over-browned from the hot pan. Set a timer for this one; it's that important. Those 5 minutes are also when the cookies finish baking from residual heat, giving you that perfect chewy center.
The Sanding Sugar Secret
Regular granulated sugar works, but sanding sugar creates this incredible crunch that contrasts beautifully with the soft cookie. Plus, it doesn't melt during baking, so you get these gorgeous sparkly cookies that look like they're wearing tiny diamonds. If you can't find sanding sugar, pulse regular sugar in a food processor for 30 seconds — it makes the crystals slightly smaller and more adherent. But honestly? Sanding sugar is worth seeking out, especially if you're making these for gifts or parties. They make the cookies look professionally made.
Creative Twists and Variations
This recipe is a playground. Here are some of my favorite ways to switch things up:
Orange Zest Gingerbread
Add the zest of one large orange to the butter when you're creaming it with the sugar. The citrus oils infuse the entire cookie with this bright note that makes the spices pop even more. It's like adding a spotlight to all those warm flavors. Top with dark chocolate kisses instead of Hugs for a more sophisticated flavor profile that adults absolutely devour.
Salted Caramel Version
Replace half the brown sugar with dark brown sugar and add a teaspoon of flaky sea salt to the dough. The deeper molasses flavor combined with the salt creates this incredible salted caramel effect. Press in caramel-filled kisses (yes, they make them!) and sprinkle with a tiny bit more salt right after baking. The sweet-salty combination is absolutely addictive.
Gluten-Free Gingerbread That Doesn't Suck
Substitute the all-purpose flour with a 1:1 gluten-free baking blend, but add an extra egg yolk for richness. The molasses and brown sugar help mask any weird aftertaste from the flour substitute. I've served these to gluten-eaters who had no idea they were gluten-free. That's how good they are.
Spiced White Chocolate
Add 1/4 teaspoon of cardamom to the dry ingredients and use white chocolate kisses instead of Hugs. The cardamom adds this exotic floral note that pairs beautifully with white chocolate. It's gingerbread's sophisticated cousin who studied abroad and came back with interesting stories.
Mini Cookie Sandwiches
Make the cookies half-size (use a teaspoon instead of a tablespoon of dough) and don't add kisses. Once cooled, sandwich two cookies together with cream cheese frosting spiked with a touch of maple syrup. These are dangerous — you can pop them whole, which means you lose track of how many you've eaten until the plate is mysteriously empty.
Breakfast Gingerbread
Add 1/2 cup of finely chopped crystallized ginger to the dough and serve these warm for breakfast. The extra ginger kick is perfect with coffee, and you can convince yourself they're basically breakfast food because ginger is good for digestion, right? That's what I tell myself anyway.
Storing and Bringing It Back to Life
Fridge Storage
These cookies actually improve after a day or two as the flavors meld together. Store them in an airtight container with a small piece of bread — the bread prevents them from drying out by providing moisture. Replace the bread every other day. They'll stay fresh for up to a week, though I've never seen them last that long. Don't refrigerate them unless your kitchen is extremely hot; the cold makes the chocolate sweat and the cookies go stale faster.
Freezer Friendly
Both the dough and baked cookies freeze beautifully. For dough, scoop into balls, roll in sugar, and freeze on a tray. Once solid, transfer to a freezer bag — they'll keep for 3 months. Bake from frozen, just add 2-3 minutes to the baking time. For baked cookies, freeze in a single layer, then transfer to containers with parchment between layers. They'll keep for 2 months and thaw in about 30 minutes at room temperature.
Best Reheating Method
If your cookies have gone a bit stale (though they rarely last long enough), revive them by wrapping in a damp paper towel and microwaving for 10-15 seconds. The steam brings back that fresh-baked texture. For cookies straight from the freezer, 15-20 seconds does the trick. Don't overdo it or you'll have chocolate soup. For a crowd, warm them in a 300°F oven for 5 minutes — just enough to make the chocolate slightly melty again.