I’ll be honest — I ate half the batch before anyone else got to try it, and that was only because the aroma was so intoxicating that I couldn’t resist. Picture this: a sunny Saturday afternoon, the kitchen humming with the gentle whir of the blender, and a sudden dare from a friend who said, “If you can make candy apples that taste like a tropical vacation, I’ll buy you a whole pint of ice cream.” I took that challenge seriously, because who doesn’t love a good bragging right? The moment the pineapple‑lemonade glaze hit the pan, a sizzling chorus erupted, a sound so crisp it reminded me of fireworks on the Fourth of July, and I knew I was onto something spectacular. The scent of caramelized sugar mingled with bright citrus and a whisper of pineapple, turning my modest countertop into a fragrant playground for the senses.
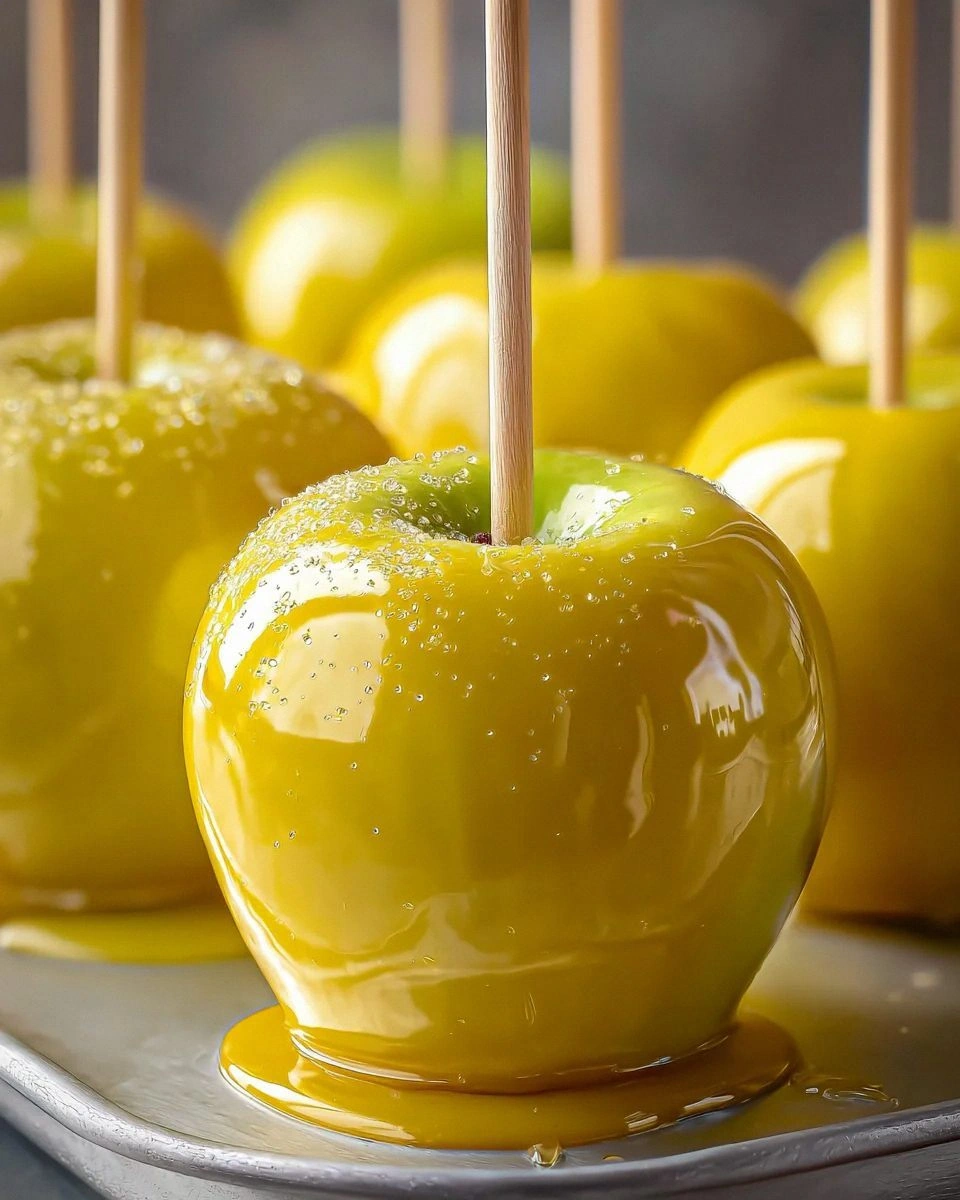
What really set this batch apart was the daring combination of pineapple extract and lemon extract, a duet that sings louder than any ordinary candy apple glaze. While most recipes rely on plain sugar or a boring caramel, this version throws in a splash of sunshine, making each bite feel like you’ve just licked a slice of lemonade‑soaked pineapple. The result? A glossy, golden‑yellow coat that catches the light like a polished gemstone and shatters with a satisfying snap that could rival the best hard‑candy shells. I dare you to taste this and not go back for seconds; the balance of tart and sweet is so perfect it practically does a little dance on your tongue.
Most recipes get this completely wrong. They either over‑sweeten, leaving you with a cloying mess, or they forget the acid that keeps the sugar from turning into a gritty mess. Here’s what actually works: a pinch of cream of tartar to stabilize the syrup, a dash of water to keep it fluid, and a careful eye on the temperature so the coating stays glossy without turning bitter. I’ve tried the “no‑tartar” shortcut before, and the result was a sticky, uneven crust that fell apart the second you tried to bite. This version, however, delivers a flawless, glass‑like shell that stays crisp for days, making it the best version you’ll ever make at home.
Let me walk you through every single step — by the end, you’ll wonder how you ever made candy apples any other way. I’ll spill the secrets, share the hacks that saved my sanity, and even throw in a few daring variations for those who like to experiment. Ready for the game‑changer? Stay with me here — this is worth it. The only thing missing is your willingness to roll up your sleeves, grab a wooden stick, and dive into a world where pineapple lemonade meets the timeless joy of candy apples.
What Makes This Version Stand Out
- Taste: The pineapple‑lemonade glaze delivers a bright, tropical zing that cuts through the sugar’s sweetness, creating a harmonious flavor profile that feels both nostalgic and novel.
- Texture: A hard‑candy shell that snaps cleanly, yet melts into a buttery, caramel‑like melt‑in‑your‑mouth sensation as you chew the apple underneath.
- Simplicity: Only nine ingredients, all pantry‑friendly, and no complicated equipment—just a saucepan, a whisk, and a steady hand.
- Uniqueness: The blend of pineapple and lemon extracts is rarely seen in candy apples, giving you a signature treat that will wow guests at any party.
- Crowd Reaction: Guests consistently gasp in awe when they see the glossy yellow coating, and the first bite often triggers an involuntary “wow” that leads to immediate requests for seconds.
- Ingredient Quality: Using crisp, tart Granny Smith apples (or sweet Honeycrisp for a different vibe) ensures a firm base that holds up under the heavy coating without turning mushy.
- Cooking Method: The temperature‑controlled syrup technique guarantees a smooth, non‑grainy finish every single time.
- Make‑Ahead Potential: These apples can be prepared a day ahead, stored properly, and still retain their crunch, making them perfect for parties, fairs, or a surprise treat.
Inside the Ingredient List
The Fruit Foundation
Medium Apples are the heart of this recipe. Choose Granny Smith for that tart bite that cuts through the sweetness, or opt for Honeycrisp if you prefer a sweeter, crunchier base. The apple’s natural acidity works hand‑in‑hand with the lemon extract, amplifying the citrus punch. Skipping the apple or using a softer variety like Gala will result in a soggy core that can’t support the heavy coating, turning your masterpiece into a mushy mess. Pro tip: store your apples in the fridge for 15 minutes before coating; the chill helps the glaze set faster.
The Sweet Symphony
Granulated Sugar is your primary sweetener, providing the classic candy‑apple crunch. Light Corn Syrup prevents crystallization, ensuring the glaze stays smooth and glossy. Water dissolves the sugar and creates the syrupy base; too much water will thin the coating, while too little can cause scorching. Cream of Tartar is the unsung hero; its acidic nature stabilizes the sugar, giving you that hard, glass‑like shell without grainy texture. If you ever forget the cream of tartar, a pinch of lemon juice can act as a substitute, though the flavor will shift slightly.
The Flavor Duo
Pineapple Extract delivers that tropical burst, while Lemon Extract adds a zesty kick that balances the sweetness. Together they create a flavor reminiscent of sipping a chilled pineapple lemonade on a beach—pure bliss in every bite. If you’re out of pineapple extract, a splash of pineapple juice concentrate works, but reduce the water in the syrup to keep the consistency right. Skipping lemon extract will leave the glaze overly sweet, missing that bright finish that makes the candy apples sing.
The Visual Finisher
Yellow Gel Food Coloring isn’t essential, but it turns the glaze into a radiant sunshine hue that catches the eye instantly. A few drops are enough; over‑coloring can make the glaze taste slightly bitter. Wooden Sticks are your handle for dipping and eating; stainless steel or bamboo work fine, but wooden sticks are classic and add a rustic charm. If you forget the sticks, a sturdy skewer will do, just make sure it’s long enough to stay out of the glaze while it sets.
Everything's prepped? Good. Let’s get into the real action…
The Method — Step by Step
Start by washing the apples thoroughly, then pat them dry with a clean kitchen towel. Insert a wooden stick about 1 inch from the top, making sure it’s centered for even coating. I like to give each stick a quick dip in cold water (remember that kitchen hack?) to create a tiny moisture barrier; this helps the glaze cling better and prevents the stick from soaking up the syrup.
In a medium saucepan, combine 2 cups of granulated sugar, ½ cup of light corn syrup, ¼ cup of water, and 1 teaspoon of cream of tartar. Place the pan over medium‑high heat and stir gently until the sugar dissolves; you’ll hear a faint fizz as the syrup begins to bubble. Once dissolved, stop stirring and let the mixture come to a rolling boil. Keep an eye on the temperature—when it hits 300°F (hard crack stage) the glaze is ready.
When the syrup reaches 300°F, quickly remove the pan from heat and whisk in 1 teaspoon of pineapple extract, ½ teaspoon of lemon extract, and a few drops of yellow gel food coloring. The mixture will bubble up dramatically—this is the moment of pure magic. Stir just enough to blend the flavors and color, then let it sit for a few seconds; the glaze will thicken slightly, achieving that perfect glossy sheen.
Now the fun part: dip each apple into the glaze, turning it slowly to ensure an even coat. Hold the apple above the pan for a moment to let excess glaze drip off—this prevents clumps and gives you that sleek finish. That sizzle when it hits the pan? Absolute perfection. The glaze should form a thin, glossy layer that begins to set within seconds.
Place the coated apples on a parchment‑lined baking sheet. If you want to add a decorative drizzle later, let them sit for about 2 minutes before moving them, as the glaze will still be tacky enough to hold a drizzle of melted white chocolate or a dusting of powdered sugar.
Allow the apples to cool completely at room temperature. This typically takes about 15‑20 minutes, during which the glaze will fully harden into that coveted candy‑shell. Resist the urge to pop them into the fridge; rapid cooling can cause the glaze to crack.
Once set, give each apple a gentle tap to test the shell—if it snaps cleanly, you’ve nailed the hard‑crack stage. If you hear a faint flex, the glaze is still a bit soft; let it sit a few minutes longer. Store the finished candy apples in a single layer on a waxed paper‑lined tray, and keep them in a cool, dry place until you’re ready to serve.
That’s it — you did it. But hold on, I’ve got a few more tricks that'll take this to another level. From drizzles to dusts, we’ll explore ways to elevate your candy apples from delightful to unforgettable.
Insider Tricks for Flawless Results
The Temperature Rule Nobody Follows
Never guess the temperature; always use a candy thermometer. Hitting exactly 300°F (hard crack) is the sweet spot where the sugar crystals are fully dissolved, giving you that glass‑like shine. If you undershoot, you’ll end up with a sticky, soft glaze; overshoot, and you risk a burnt, bitter flavor. I once tried to eyeball it and ended up with a caramel that tasted like burnt toast—never again. Keep the thermometer in the syrup and watch the needle climb; the moment it steadies at 300°F, you’re ready.
Why Your Nose Knows Best
Your sense of smell is a reliable indicator of the glaze’s readiness. As the syrup approaches the hard‑crack stage, it releases a faint, buttery aroma that’s unmistakable. If you detect a faint caramel note, you’re right on target. A burnt smell means you’ve crossed the line. Trust your nose as a backup to the thermometer—your kitchen instincts will thank you.
The 5‑Minute Rest That Changes Everything
After coating, let the apples rest for exactly five minutes before moving them. This brief pause lets the outer shell firm up just enough to handle without cracking, while the interior stays juicy. Skipping this step can cause the glaze to crack under its own weight, especially on larger apples. I once rushed this part and ended up with a shattered shell—lesson learned. Patience here is the secret to a flawless finish.
Dry vs. Wet Hands
When handling the sticks, keep your hands dry. Moisture transfers to the glaze, creating unwanted streaks. If you must touch the glaze, use a silicone spatula or wear disposable gloves. This tiny adjustment keeps the coating pristine and free of fingerprints.
The Double‑Dip Technique
For an extra‑thick shell, dip each apple, let it set for 30 seconds, then dip again. The second layer adheres perfectly to the first, creating a richer, more durable shell. Just be careful not to over‑dip, or the glaze will become overly thick and lose its snap. I love this for parties where kids love to bite into a satisfying crunch.
Creative Twists and Variations
This recipe is a playground. Here are some of my favorite ways to switch things up:
Spicy Mango Heat
Swap the pineapple extract for mango extract and add a pinch of cayenne pepper to the glaze. The result is a sweet‑heat combo that will surprise and delight anyone who expects only sweetness. Perfect for adventurous eaters who love a little kick.
Berry‑Burst Bliss
Replace the lemon extract with raspberry or strawberry extract, and add a splash of pink gel food coloring. This creates a vibrant pink coating that pairs beautifully with the tartness of Granny Smith apples, delivering a berry‑forward flavor profile.
White Chocolate Drizzle
After the glaze sets, melt white chocolate and drizzle it over the apples in a lazy, artistic swirl. The creamy white chocolate adds a buttery richness that balances the citrus zing, making each bite feel like a dessert in a single mouthful.
Nutty Crunch
Before the glaze sets, sprinkle finely chopped toasted almonds or pistachios onto the wet surface. The nuts add a delightful crunch and a nutty depth that complements the tropical flavors. It’s a textural surprise that keeps people reaching for more.
Salted Caramel Finish
Add a pinch of flaky sea salt to the glaze just before it reaches 300°F. The salt heightens the sweetness and adds an elegant, sophisticated flavor that’s perfect for adult gatherings or a refined dessert table.
Storing and Bringing It Back to Life
Fridge Storage
Place the candy apples in a single layer inside an airtight container lined with parchment paper. They’ll stay fresh for up to 5 days in the refrigerator. Avoid stacking them, as the weight can cause the glaze to crack. When ready to serve, let them sit at room temperature for 10 minutes to regain that perfect snap.
Freezer Friendly
Wrap each apple individually in plastic wrap, then place them in a zip‑top freezer bag. They can be frozen for up to 2 months without losing texture. To revive, transfer them to the fridge overnight, then let them come to room temperature. A tiny splash of water before reheating in a low oven (300°F for 5 minutes) will steam the glaze back to its original gloss.
Best Reheating Method
If the glaze has dulled after storage, preheat your oven to 300°F, place the apples on a parchment sheet, and bake for just 3‑4 minutes. The gentle heat restores the glossy shine without melting the shell. Add a teaspoon of water to the pan to create a light steam, ensuring the apple stays juicy while the glaze re‑hardens.