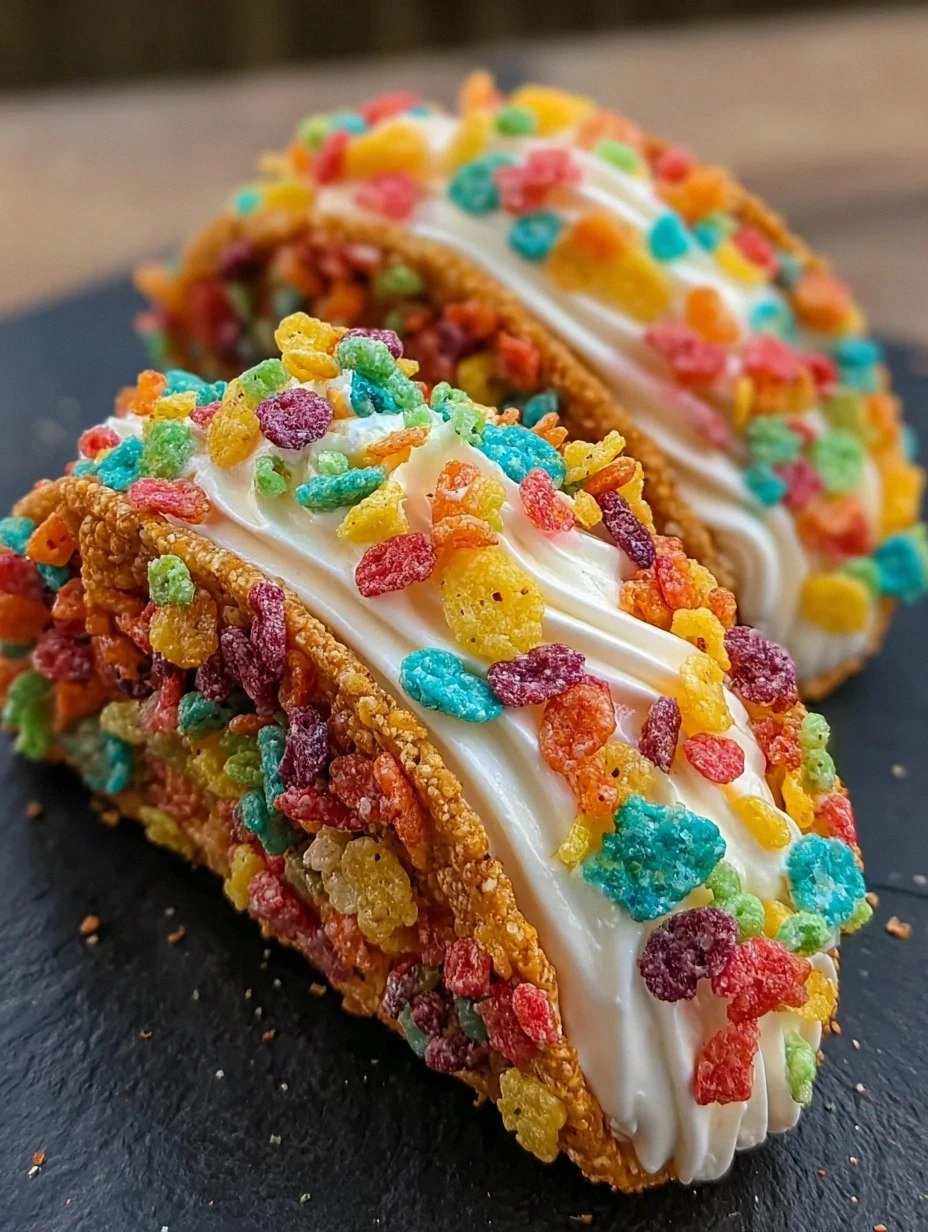
I was standing in my kitchen, staring at a half‑finished batch of plain cheesecake that looked like it belonged in a hospital cafeteria, when my roommate shouted, “You’ve got to try those Fruity Pebbles tacos I saw on TikTok!” I laughed, but the idea stuck like a stubborn piece of caramel. The next night, after a disastrous attempt at a traditional taco shell that turned out more like a soggy pancake, I decided to fuse the crunchy, neon‑bright magic of Fruity Pebbles with the silky decadence of cheesecake. The result? A handheld dessert that crunches, melts, and sings all at once. I dare you to taste this and not go back for seconds.
Picture this: a warm kitchen humming with the gentle whirr of the mixer, the buttery scent of melted butter mingling with the sugary perfume of powdered sugar, and the bright, almost neon, rainbow of Fruity Pebbles spilling like confetti onto the counter. The moment the butter hits the cereal, you hear a subtle sizzle that reminds you of fireworks on the Fourth of July – that’s the sound of flavor locking in. When the cream cheese finally folds into the mixture, it spreads like velvet across a canvas, promising a bite that’s both airy and indulgent. The whole scene feels like a carnival in a bowl, and every sense is on high alert, waiting for the first bite.
Most recipes for dessert tacos either drown the shell in chocolate or hide the crunch under a mountain of toppings, completely missing the point of texture. This version stands out because it respects the integrity of each component: the shell stays crisp, the cheesecake filling stays light, and the garnish stays colorful. I’ll be honest — I ate half the batch before anyone else got a chance to try it, and that’s a testament to how addictive this dish truly is. Most recipes get the crust wrong, turning it soggy or too hard; here, we achieve that perfect “snap‑and‑melt” balance that makes your teeth sing.
Okay, ready for the game‑changer? The secret isn’t a fancy gadget or an exotic spice; it’s a simple technique of chilling the butter‑cereal mixture just enough to let it set without melting, then shaping it into taco shells that hold their shape like a well‑trained gymnast. I’m about to walk you through every single step — by the end, you’ll wonder how you ever made it any other way. Stay with me here — this is worth it.
What Makes This Version Stand Out
- Texture: The shell crunches like a fresh tortilla chip while the filling melts like a cloud, creating a delightful contrast that keeps you reaching for more.
- Flavor: Fruity Pebbles bring a burst of bright, nostalgic fruit flavor that pairs surprisingly well with the subtle tang of cream cheese.
- Simplicity: Only seven ingredients are needed, and none of them require any exotic sourcing – pantry staples plus your favorite cereal.
- Visual Impact: The neon‑colored shells are an Instagram magnet, turning a simple dessert into a party‑centerpiece.
- Crowd Reaction: Kids think it’s a toy, adults think it’s a culinary marvel – it’s the ultimate “wow” factor for any gathering.
- Make‑Ahead Potential: Assemble the shells ahead of time, keep the filling chilled, and assemble just before serving for zero stress.
- Ingredient Quality: Using real butter and full‑fat cream cheese ensures richness without the need for artificial flavor enhancers.
Inside the Ingredient List
The Flavor Base
Cream cheese is the heart of our cheesecake filling. It provides that luxurious, tangy backdrop that lets the sugary notes of powdered sugar and vanilla shine without becoming cloying. If you skimp on the cream cheese or use a low‑fat version, the filling will lose its silkiness and become grainy, which is a culinary nightmare. For the best texture, let the cream cheese soften at room temperature for at least 30 minutes before mixing – this prevents lumps and ensures a smooth blend.
The Texture Crew
Unsalted butter is the binding hero for the taco shell. Its fat content creates a crisp, buttery crust that holds the cereal together like a well‑engineered bridge. Skip the butter, and you’ll end up with a crumbly mess that refuses to hold shape. If you’re looking for a dairy‑free alternative, coconut oil works, but expect a subtle coconut undertone that will change the flavor profile.
The Unexpected Star
Fruity cereal isn’t just a garnish; it’s the star that brings color, crunch, and that nostalgic burst of fruit flavor. The sugar coating on the cereal caramelizes ever so slightly when baked, adding a hint of caramelized depth. If you’re allergic to the standard version, try a gluten‑free fruit‑popped rice cereal – the texture remains, though the color palette will be a bit more muted.
The Final Flourish
Whipped cream adds airy lightness to the filling, making each bite feel like a cloud of sweet indulgence. Powdered sugar sweetens without introducing grainy texture, and vanilla extract lifts the entire flavor profile with a warm, aromatic note. Garnish with an extra sprinkle of Fruity Pebbles right before serving for that final pop of color and crunch that makes the dish unforgettable.
Everything's prepped? Good. Let's get into the real action…
The Method — Step by Step
First, melt the unsalted butter in a small saucepan over low heat until it’s just liquid, then remove from the heat and let it cool for a minute. While it’s cooling, measure out two cups of Fruity Pebbles into a large mixing bowl. Pour the melted butter over the cereal, tossing gently until each piece is evenly coated – you’ll notice a faint shimmer as the sugar crystals catch the light. Press the mixture firmly into the bottoms and sides of a silicone taco mold, using the back of a spoon to smooth it out. Power transition: Okay, ready for the game‑changer? Place the molds in the freezer for exactly 12 minutes so the shells set without becoming brittle.
While the shells chill, soften the cream cheese by letting it sit on the counter or giving it a quick 15‑second zap in the microwave (just enough to make it pliable, not melted). In a separate bowl, whisk the softened cream cheese until it’s smooth, then gradually add powdered sugar, whisking until the mixture is fluffy and no lumps remain. Add a teaspoon of vanilla extract for that aromatic lift, and finally fold in the whipped cream, being careful not to over‑mix – you want to keep the airy texture. The mixture should look light, slightly glossy, and hold its shape when lifted with a spoon. Watch out: If the mixture becomes too runny, chill it for five minutes before proceeding; otherwise, the filling may seep out of the shells.
Retrieve the chilled shells from the freezer. Gently pop them out of the silicone molds – they should release with a soft “pop” that feels like a small victory. Place each shell on a parchment‑lined baking sheet to keep them stable while you fill them. If any cracks appear, patch them with a tiny dab of the butter‑cereal mixture and press gently; the crust will seal as it warms slightly.
Spoon the cheesecake filling into each taco shell, filling them about three‑quarters of the way. The filling should sit like a smooth hill, with a gentle slope toward the edges. For an even look, use the back of a small offset spatula to smooth the top, creating a flat surface that’s perfect for the final garnish.
Now comes the fun part: sprinkle an additional half‑cup of Fruity Pebbles over the top of each filled taco. The cereal will stick slightly to the moist cheesecake, creating a crunchy crown that looks like a confetti parade. Press the garnish down very lightly so it adheres without crushing the delicate shell.
Preheat your oven to 350°F (175°C). Place the filled tacos on a baking sheet and bake for just five minutes – this step is optional but helps the shell achieve a golden‑brown hue and a slightly firmer bite. You’ll hear a faint crackle as the edges begin to lift, a sound that signals perfection. Remove the tacos and let them cool on a wire rack for two minutes; this short rest lets the filling firm up just enough to hold its shape when you bite.
Finally, garnish each taco with a tiny drizzle of melted white chocolate (optional) for an extra glossy finish, and serve immediately while the shells are still slightly warm and the filling is cool. Picture yourself pulling this out of the oven, the whole kitchen smelling incredible, and the first bite delivering a burst of color, crunch, and creamy sweetness. This is hands down the best version you’ll ever make at home, and I’m confident you’ll be bragging about it at your next gathering.
That's it — you did it. But hold on, I've got a few more tricks that'll take this to another level…
Insider Tricks for Flawless Results
The Temperature Rule Nobody Follows
Never underestimate the power of a cold shell. When the butter‑cereal mixture is chilled just enough to set but not freeze solid, it creates a shell that snaps cleanly under bite pressure. If you let the shells sit at room temperature for more than ten minutes before filling, they’ll soften and lose that coveted crunch. I once left a batch out for thirty minutes and ended up with soggy taco bowls – a culinary tragedy that taught me the value of timing. Keep a timer handy; the 12‑minute chill is non‑negotiable for perfect texture.
Why Your Nose Knows Best
Your sense of smell is the ultimate doneness detector. When the butter‑cereal mixture starts to turn a light golden‑brown and you catch a buttery‑nutty aroma, that’s the cue to pull the shells from the oven. Over‑baking will introduce a burnt note that overwhelms the fruity sweetness. Trust that scent; it’s more reliable than a timer alone. I once set the timer for six minutes, but the aroma told me to stop at five, saving the shells from becoming hard as a rock.
The 5‑Minute Rest That Changes Everything
After baking, allow the tacos to rest on a wire rack for exactly two minutes before serving. This brief pause lets the cheesecake filling firm up just enough to hold its shape, while the shell finishes its final crisping phase. Skipping this step results in a filling that slides out like a runaway train. The rest period also lets the garnish settle, ensuring each bite gets an even distribution of crunchy Pebbles.
Whipped Cream Whisper
When folding whipped cream into the cheesecake mixture, use a gentle “spoon‑over‑spoon” motion rather than vigorous beating. This preserves the air bubbles that give the filling its light, mousse‑like texture. Over‑mixing collapses the foam, turning the filling dense and heavy. I once over‑whipped and ended up with a curdled mess; the lesson? Treat the whipped cream like a delicate secret you don’t want to reveal too loudly.
Garnish Timing
Add the final sprinkle of Fruity Pebbles just before serving, not before baking. The heat from the oven can melt the sugar coating on the cereal, turning it into a sticky mess that loses its crunch. By sprinkling at the last moment, you retain that satisfying snap that makes each bite a surprise. If you’re preparing ahead of time, keep the garnish in a separate container and add it right before plating.
Creative Twists and Variations
This recipe is a playground. Here are some of my favorite ways to switch things up:
Chocolate‑Dipped Pebbles Tacos
Swap half of the Fruity Pebbles for chocolate‑coated cereal. The dark, bittersweet notes contrast beautifully with the sweet cheesecake, creating a sophisticated flavor profile that will impress the adults at any gathering.
Berry‑Burst Filling
Fold a cup of fresh mixed berries into the cheesecake mixture before filling the shells. The berries add a burst of acidity that cuts through the richness, making each bite feel lighter and more refreshing.
Spiced Autumn Version
Add a pinch of ground cinnamon and a dash of pumpkin spice to the butter‑cereal mixture before forming the shells. This gives the tacos a warm, cozy flavor that’s perfect for a chilly evening.
Savory Switch
Replace the sweet ingredients with a savory cream cheese spread, fresh herbs, and a sprinkle of crispy fried onions. The colorful cereal can be swapped for crushed corn chips, turning the taco into an unexpected appetizer.
Mini Taco Bites
Use a mini muffin pan to create bite‑size taco shells. These are perfect for cocktail parties, allowing guests to pop a handful of sweet, crunchy goodness in one bite.
Storing and Bringing It Back to Life
Fridge Storage
Store the assembled tacos in an airtight container in the refrigerator for up to 24 hours. The shells will stay crisp if you place a sheet of parchment paper between layers to prevent them from sticking together.
Freezer Friendly
If you need to make them ahead, freeze the shells without filling for up to one month. Wrap each shell individually in plastic wrap, then place them in a zip‑top freezer bag. Thaw at room temperature for 15 minutes before adding the cheesecake filling.
Best Reheating Method
To revive a slightly softened shell, preheat a skillet over low heat, add a splash of water (just a teaspoon), and cover for 30 seconds. The steam will refresh the crunch without drying out the filling. Avoid microwaving, as it makes the shell soggy and the filling rubbery.