Picture this: it's 11:30 a.m. on a lazy Saturday, your stomach is staging a full-scale rebellion, and the fridge looks like a crime scene from a cooking show—random leftovers, half-eaten waffles from yesterday, and that questionable slice of cheese that's been eyeing you all week. Most people would surrender to cereal or a sad desk-lunch sandwich. Not us. We're about to turn that chaos into the most outrageously delicious waffle sandwich you've ever sunk your teeth into, the kind that makes you wonder why you ever settled for plain toast and regret.
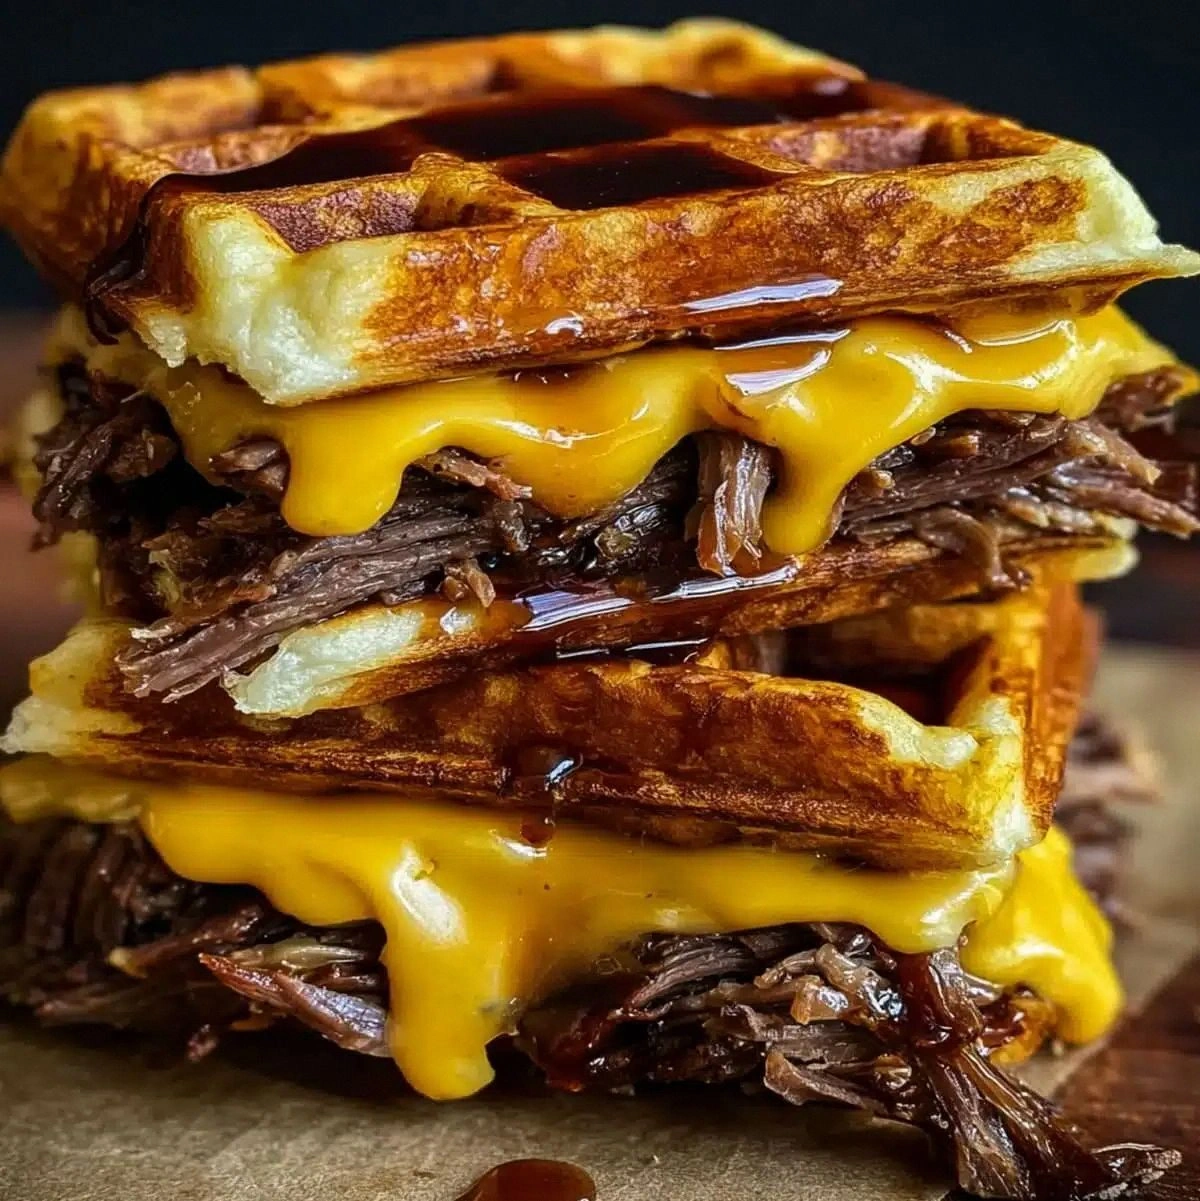
I'll be honest—this recipe was born out of pure desperation and a stubborn refusal to leave the house in pajama pants. I had cold waffles, some crispy bacon that refused to go soggy (bless its heart), and a craving that felt like a small earthquake in my soul. Ten minutes later, I was holding what I can only describe as a handheld brunch miracle: hot, syrupy waffles embracing melty cheese, runny egg yolk, and salty bacon in a hug so tight it could win a wrestling match. The first bite? A symphony of sweet, salty, creamy, and crunchy that had me pacing the kitchen like I'd just discovered fire.
Most recipes get this completely wrong. They treat waffles like bread, slapping fillings between limp, lifeless squares that collapse under pressure. Here's what actually works: you press, griddle, and layer until the waffle's craters become tiny pockets of flavor, the edges caramelize like the top of a crème brûlée, and the fillings fuse into one glorious, molten core. I dare you to taste this and not go back for seconds. I double-dog dare you.
Okay, ready for the game-changer? We're not just reheating waffles; we're transforming them into a vessel that can handle anything from smoky salmon to spicy kimchi without falling apart. Stay with me here—this is worth it. Let me walk you through every single step—by the end, you'll wonder how you ever made it any other way.
What Makes This Version Stand Out
This isn't your kindergarten peanut-butter-and-jelly-between-two-frozen-waffles situation. This is the varsity level, the kind of sandwich that shows up to brunch wearing sunglasses and a leather jacket. Here's why it crushes the competition:
- Crater Magic: Those waffle pockets aren't just cute—they're flavor bunkers. When you griddle the sandwich, cheese oozes into every square, creating a lacework of molten gold that keeps each bite exciting instead of a homogenous mush.
- Texture Contrast on Steroids: We're talking shatteringly crisp ridges against fluffy interiors, gooey cheese pulls against salty bacon snaps, and the gentle give of a perfectly runny yolk. It's like a rock band where every instrument solos at once—somehow it works.
- Speed Demon Status: From fridge raid to plate in under fifteen minutes, which is faster than delivery and infinitely more satisfying. Picture yourself pulling this out of the oven, the whole kitchen smelling like a diner that got a Michelin star.
- Make-Ahead Champion: Cook waffles on Sunday, stash them in the freezer, and you can assemble a hot, restaurant-quality sandwich on a Wednesday morning while your coffee brews. Future-you will send present-you a thank-you note.
- Infinitely Customizable: Sweet, savory, vegetarian, carnivore, gluten-free—this framework handles it all without crumbling. I've stuffed these with everything from Thanksgiving leftovers to last night's stir-fry, and not once have they complained.
- Crowd Hypnosis: Serve these at brunch and watch grown adults revert to childhood giddiness. If you've ever struggled with impressing in-laws or picky kids, you're not alone—and I've got the fix.
Alright, let's break down exactly what goes into this masterpiece...
Inside the Ingredient List
Great sandwiches start with great building blocks, but that doesn't mean you need to mortgage the house for truffle oil. Each component here earns its keep, and I'll show you how to spot the winners at any grocery store.
The Flavor Base
Let's talk waffles. If you're making them fresh, go all-in: a yeasted batter with a whisper of vanilla and a kiss of malt powder for that bakery aroma. If you're raiding the freezer like most mortals, pick waffles with a sturdy crumb—no flimsy diet waffles that surrender at the sight of bacon grease. Whole-grain waffles add nutty depth and hold up better under pressure, but buttermilk ones bring tangy nostalgia. Either way, toast them until the edges turn amber and your kitchen smells like Saturday morning cartoons.
Next up: cheese that melts like a dream but still has personality. I'm obsessed with sharp white cheddar for its boldness, but fontina is the stretchy superstar that gives you those Instagram-worthy cheese pulls. Skip pre-shredded bags—they're dusted with cellulose that prevents smooth melting. Buy a block and grate it yourself; your sandwich will reward you with velvet rivers instead of greasy clumps. And please, for the love of brunch, don't use fat-free cheese. I tried once—let's just say it tasted like plastic had a sad cousin.
The Texture Crew
Bacon is optional only if you're vegetarian; otherwise, it's mandatory. Thick-cut applewood-smoked bacon brings sweet-smoky notes that play beautifully with maple syrup. Cook it until the edges curl and turn mahogany, then drain on paper towels so it stays crisp instead of soggy. Turkey bacon works in a pinch, but you'll need a drizzle of smoked paprika oil to fake the depth. Vegetarians, swap in roasted mushrooms tossed with soy sauce and a whisper of liquid smoke—you'll get umami bombs that even carnivores steal off the plate.
Eggs are the lava flow that ties everything together. You want jammy yolks that burst like liquid sunshine, not rubber balls. The trick is medium-low heat and a lid on the pan for the last thirty seconds; the steam sets the whites while leaving the yolk trembling. If you're feeding a crowd, bake eggs in muffin tins at 325 °F for twelve minutes—easy, peelable, and perfectly portioned.
The Unexpected Star
Here's where we get weird in the best way: a whisper of Dijon mustard spread on the inner waffle faces. It cuts through richness like a squeeze of lemon on fried chicken, adding a sophisticated tang that makes people ask, "What's the secret?" Fruit preserves work too—fig jam with brie, raspberry with goat cheese—turning your sandwich into a mini Monte Cristo without the deep-fryer. And if you're feeling rebellious, a swipe of pesto brings herbaceous fireworks that make basil lovers weak in the knees.
The Final Flourish
Maple syrup isn't just for drizzling; brush a whisper on the outer waffle ridges before griddling and watch it caramelize into a shiny lacquer that shatters like thin ice. Use the real stuff—grade A amber, not the corn-syrup impersonator. A pinch of flaky salt on top wakes up every flavor like a splash of cold water on a sleepy face. Finish with a crack of black pepper; the heat blooms in the background, making sweet notes sing even louder.
Everything's prepped? Good. Let's get into the real action...
The Method — Step by Step
- Heat a non-stick skillet over medium heat and lay your bacon strips in a single, confident row. Listen for that first sizzle—it's the sound of weekend happiness. Resist the urge to poke or flip too early; let the fat render until the edges curl and turn the color of antique mahogany, about four minutes per side. Transfer to a paper-towel-lined plate and marvel at how you haven't eaten half of it already. If you do sneak a piece, I won't tell.
- While the bacon works its magic, crack your eggs into a small bowl so you can fish out any shell fragments without turning brunch into a scavenger hunt. Reduce the heat to medium-low, add a sliver of butter, and let it foam without browning—think gentle cloud, not angry volcano. Slide the eggs in, cover with a lid, and set a timer for three minutes. Peek only once; the whites should turn opaque like satin while the yolks jiggle like a proud food blogger on cheat day.
- Toast your waffles in a toaster until they're golden and feel light when lifted—this drives off moisture so they won't sog out later. If you're working with frozen waffles, give them an extra cycle; nobody wants an icy center to sabotage the grand finale. While they're still hot, spread a whisper-thin layer of Dijon on one inner face and a smear of fig jam on the other. The heat helps the spreads melt into every crater, creating a flavor glue that holds the sandwich together like edible Velcro.
- Sprinkle a generous handful of grated cheddar on the mustard face, then add your bacon shards, breaking them to fit like puzzle pieces. Nestle the egg on top, add a second layer of cheese (this is the molten mortar), and crown with the jam-slathered waffle, jam side down. Press gently so the cheese gets cozy with the bacon and egg, but don't squish so hard that the yolk explodes like a tiny brunch volcano.
- Return the skillet to medium-low heat and brush the top waffle with a whisper of maple syrup—just enough to make it sticky, not soggy. Carefully transfer the sandwich, syrup side down, and listen for a gentle sizzle, not an angry hiss. Brush the exposed waffle top with more syrup, then cover with a lid for two minutes. The steam helps the cheese melt evenly while the syrup caramelizes into a shiny, brittle lacquer that crackles under your fork like crème brûlée.
- Flip with confidence—slide a spatula under, place your hand on top, and rotate in one swift motion. If cheese escapes, tuck it back in like you're fixing a collar. Cook the second side uncovered for ninety seconds so the ridges crisp without burning. Peek underneath; they should be the color of a well-bronzed vacationer, not a lobster.
- Transfer to a cutting board and let it rest for one minute—this lets the cheese set slightly so it doesn't ooze out like a broken lava lamp. Use a sharp knife to cut on the diagonal; it's scientifically proven that triangles taste better. Sprinkle with flaky salt and a twist of black pepper, then serve on a warm plate so the bottom doesn't sweat and go soggy while you grab your camera for the money shot.
- Take your first bite while it's hot enough to make you dance from foot to foot but not so hot that you lose a layer of tongue. The crust should shatter, the cheese should stretch like taffy, and the yolk should burst in a golden flood that mingles with maple syrup and bacon fat. Close your eyes and savor the moment—this is what weekend dreams are made of. I confess: I ate half the batch before anyone else got to try it, and I'm not even sorry.
That's it—you did it. But hold on, I've got a few more tricks that'll take this to another level...
Insider Tricks for Flawless Results
The Temperature Rule Nobody Follows
Most people crank the heat to hurry things along, but that's how you get a scorched waffle and cold cheese. Keep your burner at medium-low—think of it as a gentle tanning bed, not a blast furnace. The sandwich should sigh when it hits the pan, not shriek. If you're unsure, hover your hand two inches above; you should feel warmth, not the need to yank away like you've touched a stove. Patience here is the difference between a molten core and a sad, solid lump.
Why Your Nose Knows Best
Trust the aroma. When the maple syrup caramelizes, it'll smell like a carnival midway—sweet, nutty, and just a hint of smoke. If you catch a whiff of burnt sugar, reduce the heat immediately and move the sandwich to a cooler part of the pan. A friend tried skipping this step once—let's just say it ended with a smoke alarm serenade and a back-patio brunch. Your nose is the built-in kitchen timer you forgot you had.
The 5-Minute Rest That Changes Everything
After cooking, park the sandwich on a wire rack set over a baking sheet for five minutes. The bottom stays crisp because air circulates underneath, and the cheese relaxes enough to stay put instead of escaping like a gooey prison break. Tent loosely with foil if you're worried about heat loss, but don't wrap tightly—steam is the enemy of crunch. This tiny pause turns a good sandwich into a legendary one that holds its shape all the way to the last bite.
Cheese Blend Alchemy
Use two cheeses: one for stretch (mozzarella, fontina) and one for punch (aged cheddar, Gruyère). The stretchy cheese creates the Instagram pull, while the flavorful one keeps your palate interested after the photo op. Aim for a 60/40 split in favor of the flavor cheese—too much mozzarella and the sandwich tastes like pizza, too much sharp cheddar and it oils off like a teenager's forehead. Balance is everything, and your taste buds will thank you with a standing ovation.
Creative Twists and Variations
This recipe is a playground. Here are some of my favorite ways to switch things up:
The Thanksgiving Leftover Edition
Swap bacon for shards of roast turkey, add a spoonful of cranberry sauce for tang, and use stuffing crumbs instead of cheese for the middle layer. The result tastes like November hugged your mouth. Drizzle with warm gravy for dipping and watch your relatives fight over who gets the last one. It's so good you'll wish Thanksgiving happened monthly.
The Caprese Morning
Layer fresh mozzarella, tomato slices, and a basil leaf or two inside the waffles. After griddling, top with a balsamic reduction that seeps into the squares like sweet-tart ink. Vegetarians rejoice, and meat lovers won't even notice the bacon is missing. Add a crack of pink peppercorn for floral heat that makes tomatoes taste like they were kissed by summer itself.
The Sweet-tooth Breakfast
Skip the cheese and bacon; instead, smear the waffles with Nutella, add sliced strawberries, and tuck in a marshmallow fluff layer. Grill until the fluff melts into sticky clouds and the chocolate turns fudgy. Dust with powdered sugar and serve with a tiny pitcher of warm maple syrup for dunking. It's basically lawful s'mores for breakfast, and nobody's complaining.
The Spicy Seoul Sister
Stir a teaspoon of gochujang into your egg before frying for a gentle, building heat. Add kimchi for crunch and funk, then use pepper jack cheese for extra kick. Finish with a drizzle of sesame oil and a sprinkle of scallion. The sweet waffle tames the spice like a diplomatic friend at a family feud. If you like it hot, add a squirt of sriracha in the final seconds of griddling so it caramelizes instead of scorching.
The Mediterranean Escape
Use feta for tang, roasted red peppers for sweetness, and a swipe of pesto for herbaceous depth. Add a slice of prosciutto if you're feeling fancy, or keep it veggie with grilled zucchini ribbons. The salty feta against the sweet waffle creates a push-pull that keeps your palate guessing. A final dusting of lemon zest brightens everything like sunshine on the Aegean.
Storing and Bringing It Back to Life
Fridge Storage
Wrap leftover sandwiches (if such things exist) in parchment, then foil, and refrigerate for up to three days. The parchment prevents sogginess by absorbing excess moisture, while the foil keeps odors out. Reheat in a dry skillet over medium-low, covering with a lid to steam the inside without turning the exterior rubbery. Add a tiny splash of water before covering—this creates a micro-steam oven that brings back the molten magic.
Freezer Friendly
Assemble, cool completely, then freeze individually on a baking sheet. Once solid, vacuum-seal or slip into freezer bags with parchment between. They'll keep for two months without flavor loss. Reheat from frozen in a 375 °F oven for twelve minutes, flipping halfway. The waffle ridges re-crisp while the cheese melts like it was freshly made. No microwave—unless you enjoy chewing on waffle-flavored leather.
Best Reheating Method
Skip the microwave unless you enjoy sadness. Instead, use a toaster oven at 350 °F for eight minutes, or a skillet with a lid and a tablespoon of water added to create steam. The water revives the cheese without turning the waffle soggy, and the lid traps heat so the center warms before the exterior burns. Flip once, be patient, and you'll be rewarded with a sandwich that tastes almost as good as minute one.