Picture this: I’m standing in a cramped kitchen, the air thick with the scent of sizzling onions and garlic, when my roommate’s phone buzzes with a text that reads, “You have to try this taco shell thing, it’s insane!” I had never even heard of taco-stuffed shells before, but my curiosity turned into a full-blown culinary obsession. That night, I grabbed a bag of jumbo shells from the grocery store, a packet of taco seasoning, and an entire rack of cheese, and I promised myself I would create the most unforgettable Tex‑Mex pasta mash‑up ever.
The first bite was a revelation. The shells were al dente, their glossy surface gleaming like polished armor, while the filling exploded with a symphony of smoky beef, tangy salsa, and creamy cheese that coated the pasta like velvet. The crunch of fresh lettuce and the bright burst of cilantro added a refreshing contrast, turning each mouthful into a carnival of textures. I swear the kitchen filled with a savory aroma that made my neighbors’ windows open, and the sound of the oven door slamming shut echoed like applause in a small theater. I was so hooked that I couldn’t resist sharing the secret with anyone who would listen.
If you’ve ever tried a standard taco recipe and found it lacking depth, this version is a game‑changer. The key lies in the combination of jumbo shells and a robust, homemade taco filling that’s richer than the usual canned salsa and processed cheese. It’s not just about flavor; it’s about the way the sauce clings to every curve of the pasta, creating a silky, indulgent bite that feels both comforting and adventurous. The result is a dish that defies the typical boundaries between pasta and Mexican cuisine, offering a harmonious blend of spices, textures, and heartiness.
What sets this recipe apart is the unexpected twist of adding a splash of sour cream right before baking, which gives the filling a silky sheen and a subtle tang that lifts the entire dish. I dare you to taste this and not go back for seconds—once you bite, you’ll feel the heat of the spices, the melt of the cheese, and the gentle crunch of fresh vegetables all at once. Most recipes get this completely wrong, but here’s what actually works: a perfectly balanced blend of heat, creaminess, and crunch that satisfies every craving. If you’ve ever struggled with a taco filling that turns out dry, you’re not alone—this recipe has the fix.
Picture yourself pulling this out of the oven, the whole kitchen smelling incredible, and the plates gleaming with a glossy, cheesy sheen. The first bite is a burst of flavor that makes you wonder why you ever settled for bland pasta dishes. I’ll be honest— I ate half the batch before anyone else got to try it, and the second round was a glorious, greasy triumph. The anticipation of that first bite is pure magic, and the final result is a dish that feels like a celebration in every forkful.
I’m not just here to brag; I’m here to walk you through every single step—by the end, you’ll wonder how you ever made it any other way. This is hands down the best version you’ll ever make at home, and it’s going to become your new go‑to for weeknight dinners, parties, or a comforting weekend treat. The journey from raw ingredients to a bubbling, golden masterpiece is both simple and rewarding, and I promise you’ll love the process as much as the result. Stay with me here—this is worth it.
Before we dive into the nitty‑gritty, let’s talk about the mindset that turns an ordinary dish into a culinary triumph. Approach the kitchen with curiosity, a dash of daring, and an open mind, because the secret sauce—literally—is in the details. Every ingredient, every step, and every tweak matters, and the joy comes from the little moments of discovery. I’ve learned that the best recipes are the ones that invite experimentation, and that’s exactly what this dish offers.
So grab your apron, turn up the music, and let’s turn these humble ingredients into a fiesta on a plate. The adventure starts now, and trust me, it will be worth every minute you spend in the kitchen. I’m ready, are you? Let’s begin.
What Makes This Version Stand Out
- Flavor: The blend of smoky beef, zesty salsa, and creamy cheese creates a depth that surpasses standard taco fillings. The sauce coats each shell like velvet, delivering a burst of heat and richness in every bite.
- Texture: Jumbo shells provide a satisfying chew, while the filling’s creamy consistency offers a silky contrast. Fresh lettuce and cilantro add a crisp, bright finish that keeps the dish from feeling heavy.
- Ease: The recipe uses pantry staples and minimal prep, making it a quick win for busy weeknights. No advanced techniques—just simple sautéing and baking.
- Uniqueness: Combining pasta with classic taco flavors is a bold mash‑up that breaks culinary norms. It feels like a fusion festival in your mouth.
- Crowd‑pleaser: The dish is generous, hearty, and easy to share. It’s a guaranteed hit at dinner parties or family gatherings.
- Quality Ingredients: Fresh ground beef, real cheddar, and homemade salsa elevate the dish from ordinary to extraordinary. The difference is in the taste.
- Make‑ahead Friendly: You can assemble the shells and filling in advance, refrigerate, and bake right before serving. It’s perfect for meal‑prep enthusiasts.
- Visual Appeal: The golden cheese topping and colorful garnishes make the dish Instagram‑worthy. Presentation matters.
Alright, let’s break down exactly what goes into this masterpiece…
Inside the Ingredient List
The Flavor Base
The foundation of this dish is the taco seasoning, a fragrant blend of cumin, chili powder, paprika, garlic powder, and oregano. It’s the secret that turns plain beef into a smoky, savory centerpiece. Skipping it would leave the filling bland and unremarkable. If you’re on a low‑sodium diet, look for a reduced‑salt version or make your own blend with fresh spices.
The Texture Crew
Jumbo shells bring a generous bite that holds the filling without breaking apart. Cook them al dente—about 2–3 minutes shy of the package instructions—to maintain their structure during baking. The shredded cheddar and Monterey Jack add a gooey, melty texture that coats the shells like a silky blanket. A splash of sour cream right before baking keeps the cheese from separating.
The Unexpected Star
Black beans and corn are the unsung heroes that add fiber, color, and a subtle sweetness. They also provide a hearty texture that balances the richness of the cheese. If you’re vegan, substitute with chickpeas or a plant‑based protein. The beans also help keep the filling moist during baking.
The Final Flourish
Fresh cilantro, diced tomatoes, and shredded lettuce provide a bright, fresh counterpoint to the rich filling. They’re added at the very end to preserve their crunch and color. If you’re a fan of extra heat, a spoonful of hot sauce or a sprinkle of crushed red pepper can elevate the dish to new levels.
Everything’s prepped? Good. Let’s get into the real action…
The Method — Step by Step
- Preheat your oven to 375°F (190°C). Lightly grease a 9×13-inch baking dish to prevent sticking. This is the moment of truth—your oven’s heat will set the stage for a golden, bubbly finish.
- Bring a large pot of salted water to a boil. Add jumbo shells and cook for 2–3 minutes less than the package instructions. Drain and set aside. The shells should still have a slight bite; they’ll soften slightly in the oven.
- In a large skillet, heat 1 tablespoon of olive oil over medium‑high. Add 1 diced small onion and 2 minced garlic cloves, sautéing until fragrant and translucent. The aroma of sautéed aromatics is a prelude to the flavor symphony that follows.
- Add 1 pound of ground beef (or turkey) to the skillet. Break it apart with a wooden spoon, cooking until browned and no longer pink. Drain excess fat to keep the filling from becoming greasy.
- Stir in 1 packet of taco seasoning, 1 cup of black beans, 1 cup of corn, and 1 cup of salsa. Cook for 2 minutes, allowing the flavors to meld. The mixture should thicken slightly and emit a smoky, savory scent.
- Remove the skillet from heat. Fold in 1 cup shredded cheddar, 1 cup shredded Monterey Jack, 1 cup sour cream, 1/2 cup chopped cilantro, and 1/2 cup diced tomatoes. Mix until the cheeses melt into a creamy sauce. Watch Out: Be careful not to overcook the cheese; it can separate and become rubbery.
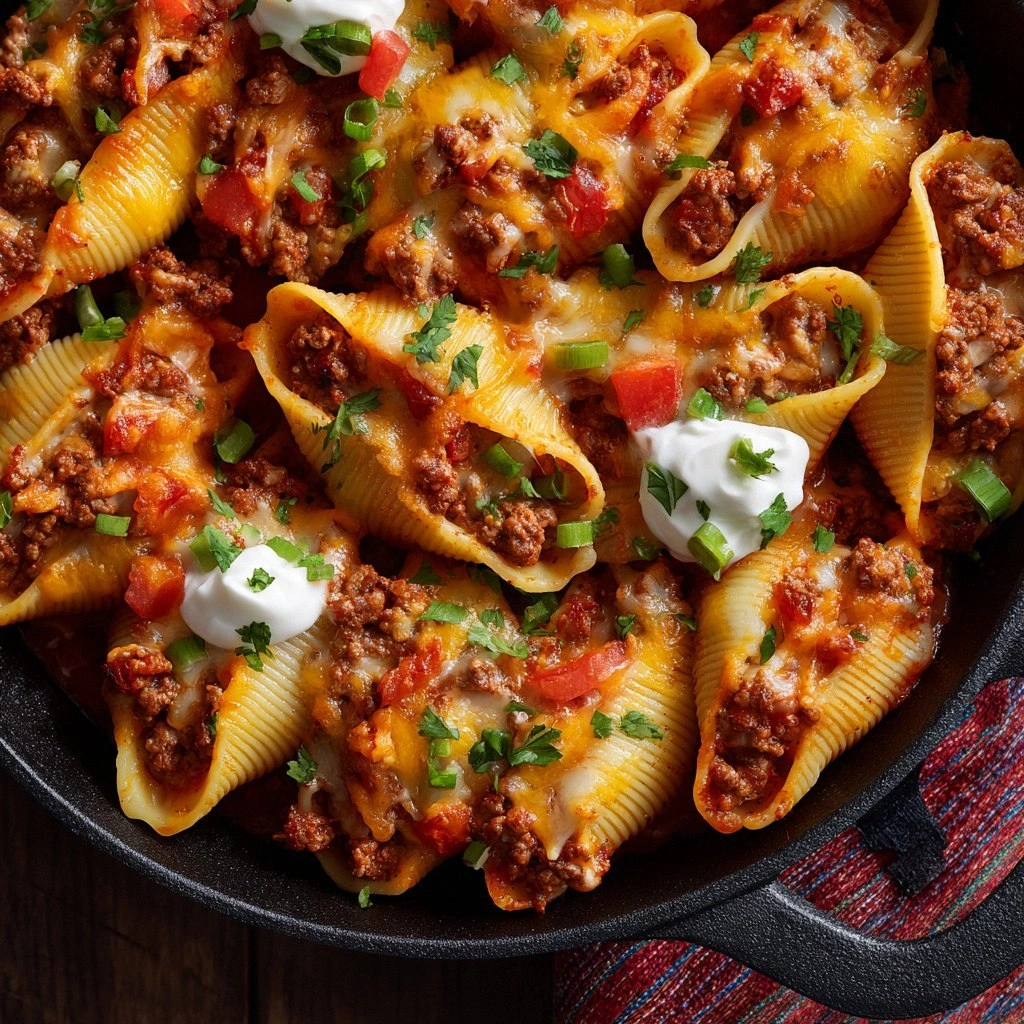
- Arrange the cooked shells in the prepared baking dish, filling each shell with the cheesy taco mixture. Sprinkle the top with an extra cup of shredded cheese for a golden crust.
- Cover the dish with foil and bake for 15 minutes. Then, remove the foil and bake for an additional 5 minutes until the cheese is bubbly and lightly browned. The foil keeps the shells from drying out, while the final 5 minutes create a crispy top.
- Let the dish rest for 5 minutes before serving. This short rest allows the flavors to settle and the cheese to set. Garnish with fresh lettuce and a sprinkle of cilantro. Serve hot with a side of guacamole or extra salsa.
- Enjoy the symphony of textures: the chewy shell, creamy filling, crunchy lettuce, and bright herbs. Each bite is a celebration of Tex‑Mex flavors wrapped in pasta bliss.
That’s it— you did it. But hold on, I’ve got a few more tricks that will take this dish to another level and make it even more unforgettable.
Insider Tricks for Flawless Results
The Temperature Rule Nobody Follows
Many cooks bake at 400°F, but 375°F is the sweet spot for this recipe. It ensures the cheese melts evenly without scorching, while the shells finish cooking just right. I’ve seen dishes that overcook at higher temperatures, resulting in a dry, rubbery texture. Keep the oven at 375°F for that perfect balance.
Why Your Nose Knows Best
As the dish bakes, the aroma of melted cheese and spices will fill the kitchen. Trust that scent—it’s a sign the filling is bubbling and the cheese is turning golden. If the aroma feels flat, the cheese may not be melting enough; give it a few more minutes. Your nose is the best judge of doneness.
The 5‑Minute Rest That Changes Everything
After removing from the oven, let the dish sit for 5 minutes. This short rest allows the filling to set, preventing a runny mess when you cut into the shells. It also lets the flavors meld, giving you a more cohesive taste profile. Skipping this step might leave you with a chaotic, uneven bite.
Use Fresh Ground Beef for Juiciness
Ground beef with a 80/20 lean-to-fat ratio gives the filling its juicy, savory depth. If you prefer a leaner option, add a splash of beef broth to compensate for the reduced fat. The extra moisture keeps the filling from drying out during baking.
Keep the Cheese Creamy
If the cheese separates, it’s likely due to over‑cooking. The trick is to bake just until it’s bubbly and golden. Adding a tablespoon of milk before baking can help maintain a smooth, creamy texture.
Use a Splatter Guard
When sautéing onions and garlic, a splatter guard keeps oil from flying onto your stove. It’s a simple tool that saves you from a greasy cleanup later. I’ve found it essential for keeping my kitchen tidy during fast‑paced cooking.
Creative Twists and Variations
This recipe is a playground. Here are some of my favorite ways to switch things up:
Mexican Street Taco Shells
Swap the jumbo shells for corn tortillas rolled into a shell shape. Add a layer of refried beans before the beef mixture for an extra protein boost. This version feels like a street taco, but with a pasta‑like bite.
Vegetarian Fiesta
Replace ground beef with crumbled tofu or tempeh, and use a vegetarian taco seasoning. Add sautéed bell peppers and zucchini for crunch. The result is a hearty, plant‑based dish that still satisfies the taco craving.
Cheesy Jalapeño Explosion
Dice 2–3 fresh jalapeños and fold them into the filling for a spicy kick. Top the finished dish with a drizzle of chipotle crema and a sprinkle of smoked paprika for an extra layer of flavor.
Breakfast Taco Shells
Use scrambled eggs instead of beef, and add diced ham or bacon. Sprinkle shredded cheddar on top and bake until the eggs are set. Serve with a side of salsa and avocado for a Tex‑Mex breakfast twist.
Gluten‑Free Option
Use gluten‑free jumbo shells or pasta shells made from corn or rice. The rest of the recipe remains unchanged, giving you a safe, delicious alternative for those with gluten sensitivities.
Low‑Carb Version
Replace jumbo shells with spiralized zucchini or cauliflower “pasta.” The filling stays the same, but the carb count drops significantly, making it a keto‑friendly option.
Storing and Bringing It Back to Life
Fridge Storage
Let the dish cool completely before covering it tightly with plastic wrap or a lid. Store in the refrigerator for up to 3 days. The flavors will deepen, and the cheese will remain creamy.
Freezer Friendly
Pack the baked dish in an airtight container or freezer bag and freeze for up to 2 months. Thaw overnight in the refrigerator before reheating. This is perfect for meal prep or a quick dinner on a busy night.
Best Reheating Method
Reheat in a 350°F oven for 10–12 minutes, or until heated through. Add a splash of water or milk before reheating to keep the cheese from drying out. The result is a warm, gooey, and flavorful dish that tastes almost as good as fresh.