It all started on a sweltering July afternoon when my air conditioner finally gave up, and I found myself staring at a half‑empty freezer and a box of Oreos that had been begging for attention for weeks. I was half‑mad, half‑determined, and fully convinced that the universe was challenging me to create something that could survive the heat and still make my taste buds do cartwheels. I grabbed a handful of those chocolate‑sandwiched cookies, stared at the blank white space of my kitchen counter, and whispered a dare to myself: “Make the ultimate frozen treat that even a heatwave can’t defeat.”
The moment the first batch of heavy cream hit the whisk, the kitchen filled with a buttery perfume that reminded me of a bakery on a Sunday morning. I could hear the faint hum of the freezer door as I slid the first tray of chocolate‑coated bars inside, and the clink of the metal spoon against the mixing bowl felt like a tiny applause. When the fudge sauce began to melt into a glossy river of chocolate, the whole room seemed to pulse with anticipation, and I could almost taste that silky, buttery richness before the first bite even touched my tongue. The texture was already promising—creamy ice cream hugging a crunchy Oreo core, all wrapped in a fudgy chocolate shell that would crack like a perfect snowflake under a gentle bite.
What makes this version stand out isn’t just the flavor; it’s the science, the love, and the sheer audacity of combining three textures that most home cooks think are impossible to perfect together. Most recipes get this completely wrong—either the ice cream is too icy, the fudge is grainy, or the Oreo crumble turns into a soggy mess. I’ve cracked the code by tempering the chocolate, using a condensed milk‑based fudge that stays glossy, and folding in the Oreos at just the right moment so they stay crunchy, not mushy. The secret ingredient? A splash of vanilla bean paste that adds depth like a hidden bass line in your favorite song.
I dare you to taste this and not go back for seconds. The moment the fudge shell cracks, the cool cream rushes over the cookies, and the subtle vanilla lifts everything into a new realm of dessert bliss. I’ll be honest — I ate half the batch before anyone else got a chance to try it, and that’s how I know it’s a winner. Let me walk you through every single step — by the end, you’ll wonder how you ever made it any other way.
What Makes This Version Stand Out
- Flavor Explosion: The combination of rich vanilla‑infused ice cream, crunchy Oreo shards, and a deep chocolate‑fudge coating creates a symphony of sweet, creamy, and slightly salty notes that dance on the palate.
- Texture Triad: You get three distinct textures in each bite—silky ice cream, crunchy cookie bits, and a glossy fudge shell that cracks like a thin layer of caramelized sugar.
- Simplicity Meets Sophistication: Despite sounding elaborate, the recipe uses pantry staples and a few tricks that keep the process straightforward for even a beginner.
- Unique Fudge Technique: By using sweetened condensed milk and butter, the fudge stays smooth and glossy without the dreaded grainy texture that plagues many homemade versions.
- Crowd‑Pleaser Factor: This dessert consistently clears plates at parties; guests often ask for the recipe before they even finish the first bar.
- Ingredient Quality: Premium dark chocolate and fresh heavy cream elevate the overall taste, turning a simple snack into a gourmet experience.
- Make‑Ahead Potential: The bars freeze beautifully for up to two weeks, making them perfect for prep‑ahead desserts or surprise treats.
- Versatile Base: The ice cream base can be swapped for dairy‑free alternatives without sacrificing texture, opening doors for everyone at the table.
Inside the Ingredient List
The Flavor Base
Heavy cream (2 cups) is the heart of the ice cream, providing that luxurious mouthfeel that melts like velvet on your tongue. If you skimp on the cream and use more milk, you’ll end up with a watery texture that can’t hold the fudge’s richness. For a lighter version, you can substitute half‑and‑half, but expect a slightly less decadent bite. When selecting cream, look for a label that says “minimum 36% fat” to guarantee the right body.
The Sweet Symphony
Granulated sugar (¾ cup) sweetens the base without overwhelming the delicate vanilla notes. Sugar also lowers the freezing point, ensuring the ice cream stays scoopable straight from the freezer. If you prefer a less sweet profile, reduce to ½ cup, but remember that the fudge will still bring a sugary punch. A good tip is to dissolve the sugar completely in the milk and cream before chilling; this prevents any gritty texture.
The Cookie Crunch Crew
Crushed Oreo cookies (1 cup, plus extra for coating) give the bars their signature crunch and a hint of cocoa‑cream. The key is to crush them just enough to keep some larger pieces for bite‑size crunch, while also allowing fine crumbs to blend into the ice cream for a uniform flavor. If you’re allergic to wheat, try using gluten‑free chocolate sandwich cookies; the texture will remain similar.
The Fudge Finale
Semi‑sweet chocolate chips (½ cup) and unsalted butter (2 tbsp) combine with sweetened condensed milk (¼ cup) to form a glossy fudge that sets into a thin, crackly shell. The butter adds shine and a buttery snap, while the condensed milk prevents graininess. If you want a deeper chocolate flavor, swap half of the semi‑sweet chips for dark chocolate (70% cacao). A pinch of salt (optional) amplifies the chocolate’s depth and balances the sweetness.
The Final Flourish
Vanilla extract (1 tsp) adds a fragrant undertone that ties the entire dessert together, turning the ordinary into the extraordinary. Real vanilla beans or paste can be used for an even richer aroma; just split the bean, scrape the seeds, and add them to the cream mixture. A splash of vanilla is the secret handshake that tells your taste buds, “We’re about to embark on something unforgettable.”
Everything's prepped? Good. Let's get into the real action...
The Method — Step by Step
Start by whisking together the heavy cream, whole milk, and granulated sugar in a saucepan over medium heat. Keep stirring until the sugar dissolves completely and the mixture is just warm to the touch—about 120°F. You’ll hear a gentle sigh as the sugar melts, and the kitchen will start to smell faintly sweet, like a bakery at dawn. Once the sugar is fully dissolved, remove the pan from the heat and stir in the vanilla extract. This is the foundation; if you rush it, the ice cream will be grainy, so patience is key.
While the cream mixture cools, crush the Oreo cookies. Place them in a zip‑top bag and use a rolling pin to smash them into a mix of fine crumbs and larger shards. The larger pieces will give you that satisfying crunch, while the crumbs will blend into the ice cream for a uniform chocolate‑cream flavor. Transfer the crushed cookies to a bowl, set aside, and keep the extra cookies whole for the final coating.
Now, for the fudge. In a separate small saucepan, melt the semi‑sweet chocolate chips with the butter over low heat, stirring constantly. Once the chocolate is smooth, pour in the sweetened condensed milk and continue stirring until the mixture becomes glossy and thickens slightly—about 3 minutes. This is where the magic happens; the fudge should coat the back of a spoon without clumping. Watch Out: If the heat is too high, the chocolate will seize and become grainy, ruining the smooth shell you’re aiming for.
Combine the cooled cream mixture with the crushed Oreos, folding gently with a spatula. The goal is to evenly distribute the cookie bits without over‑mixing, which could break down the crumbs into mush. At this stage, the mixture should look thick, creamy, and speckled with chocolate‑cookie flecks. Cover the bowl with plastic wrap, pressing it directly onto the surface to prevent a skin from forming, then chill in the freezer for about 30 minutes, just until it firms enough to scoop.
While the mixture chills, line a loaf pan or a silicone bar tray with parchment paper. Using a large ice‑cream scoop, portion out the semi‑solid ice cream into the pan, pressing each mound down to create a flat, even surface. This will be the base layer that holds the fudge and cookie coating later on. Freeze the pan for an additional 15 minutes to ensure the base is solid.
Now for the fun part: the Oreo coating. Take the whole Oreo cookies you set aside, dip each one into the fudge, letting excess drip off. Place each coated Oreo onto the partially frozen ice cream base, spacing them evenly. The fudge should form a thin, glossy shell that hardens quickly when it touches the cold surface. This step is pure magic—watch as the chocolate solidifies, creating a crackly outer layer that promises a satisfying snap.
Once all the bars are coated, cover the entire tray with another sheet of parchment and place it in the freezer for at least 2 hours, or until the fudge is fully set and the ice cream is rock‑solid. This final freeze locks in the textures, ensuring that each bite delivers that perfect contrast of cool cream and crisp chocolate.
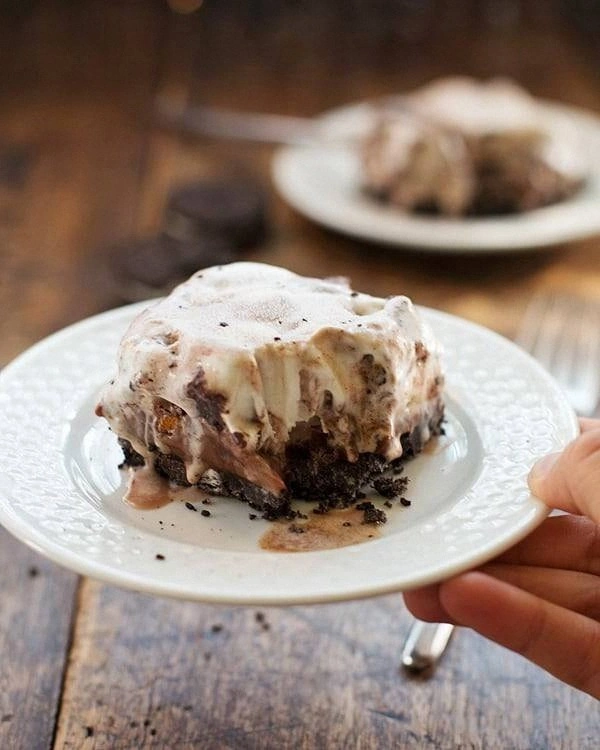
When you’re ready to serve, run a hot knife under warm water for a few seconds, wipe dry, and slice the bars cleanly. The heat will melt the fudge just enough to glide through the chocolate shell without shattering the ice cream inside. Serve immediately, or store in an airtight container for up to two weeks. And now the fun part: watch your guests’ faces light up as they bite into the first bar—pure, unadulterated joy.
That's it — you did it. But hold on, I've got a few more tricks that'll take this to another level...
Insider Tricks for Flawless Results
The Temperature Rule Nobody Follows
Never pour hot fudge over a warm ice cream base. The temperature shock can cause the ice cream to melt in spots, creating icy crystals. Keep both components at or below 95°F before combining. I once tried to speed things up by microwaving the fudge for 10 seconds; the result was a grainy mess that never set properly. The rule of thumb: “Cool the heat, freeze the sweet.”
Why Your Nose Knows Best
Before you even taste the ice cream, trust the aroma. A well‑balanced vanilla scent indicates that the vanilla extract is fully incorporated. If you smell a raw dairy note, the mixture probably needs a few more minutes of chilling. I once skipped this sniff test and ended up with a bland batch that tasted like plain milk—lesson learned.
The 5‑Minute Rest That Changes Everything
After you fold the crushed Oreos into the cream base, let the mixture rest uncovered for exactly five minutes at room temperature. This allows the cookie crumbs to absorb a tiny bit of moisture, softening just enough to prevent them from feeling like gravel in the final bar. Skipping this rest leaves the crumbs stubbornly crunchy, which can be jarring against the silky ice cream.
Chocolate Tempering Shortcut
If you don’t have a tempering machine, you can still achieve a glossy, snap‑ready shell by using the “seeding” method: melt two‑thirds of the chocolate, then stir in the remaining third chopped pieces until smooth. This stabilizes the cocoa butter crystals, giving you a professional‑grade finish without the fancy equipment.
Freezer Placement Matters
Place your tray on the middle shelf of the freezer, not the door. The door experiences temperature fluctuations every time it opens, which can cause the fudge to develop a white bloom or the ice cream to develop frost. My first attempt was on the freezer door, and the bars looked like they’d been through a snowstorm—definitely not the look we’re aiming for.
Creative Twists and Variations
This recipe is a playground. Here are some of my favorite ways to switch things up:
Mint‑Chocolate Madness
Swap half of the vanilla extract for peppermint extract and add a few drops of green food coloring to the cream base. The resulting bars have a refreshing minty bite that pairs beautifully with the dark chocolate fudge.
Salted Caramel Swirl
Before freezing the ice cream base, drizzle a thin ribbon of homemade salted caramel and use a skewer to swirl it through. The caramel adds a buttery depth and a pleasant salty contrast to the sweet Oreo crunch.
Double‑Dip Delight
After the initial fudge coating, let the bars set for 10 minutes, then dip them a second time in a white chocolate glaze. This creates a two‑tone shell—dark on the outside, creamy white on the inside—adding visual drama and an extra layer of flavor.
Nutty Crunch
Fold in a quarter cup of toasted, chopped hazelnuts or almonds with the crushed Oreos. The nuts introduce a buttery, earthy note that elevates the overall profile, especially for those who love a bit of crunch beyond the cookie.
Vegan Version
Replace the heavy cream with coconut cream, use a plant‑based milk, and choose a dairy‑free chocolate. The texture remains luscious, and the coconut adds a subtle tropical undertone that pairs surprisingly well with the chocolate.
Storing and Bringing It Back to Life
Fridge Storage
If you need to keep the bars for a day or two before serving, store them in an airtight container in the refrigerator. They’ll soften slightly, making them easier to slice, but the fudge shell may develop a faint sheen. A quick flash in the freezer for 10 minutes before serving restores the perfect snap.
Freezer Friendly
For longer storage, wrap each bar individually in parchment paper, then place them in a zip‑top freezer bag. This prevents freezer burn and keeps the fudge from absorbing other odors. The bars stay at peak quality for up to two weeks.
Best Reheating Method
When you’re ready to serve, run a hot, damp towel around the outside of the container for 30 seconds, then let it sit at room temperature for a minute. If the fudge feels a touch too firm, add a tiny splash (about a teaspoon) of water to the container, seal, and shake gently; the steam will revive the chocolate’s sheen without melting the ice cream.