Picture this: it’s a sweltering July afternoon, the kind where the air feels like a warm blanket and every bite you take should feel like a splash of cool water. I was stuck in my kitchen, battling a batch of soggy store‑bought lemon pies that tasted like regret and cardboard. My friend dared me to create something that could actually make the sun jealous, and I thought, “Why not a no‑bake cream cheese lemonade pie that’s so refreshing it could double as a poolside drink?” The result? A dessert that sings with citrus, hugs you with velvety cheese, and never asks you to turn on an oven.
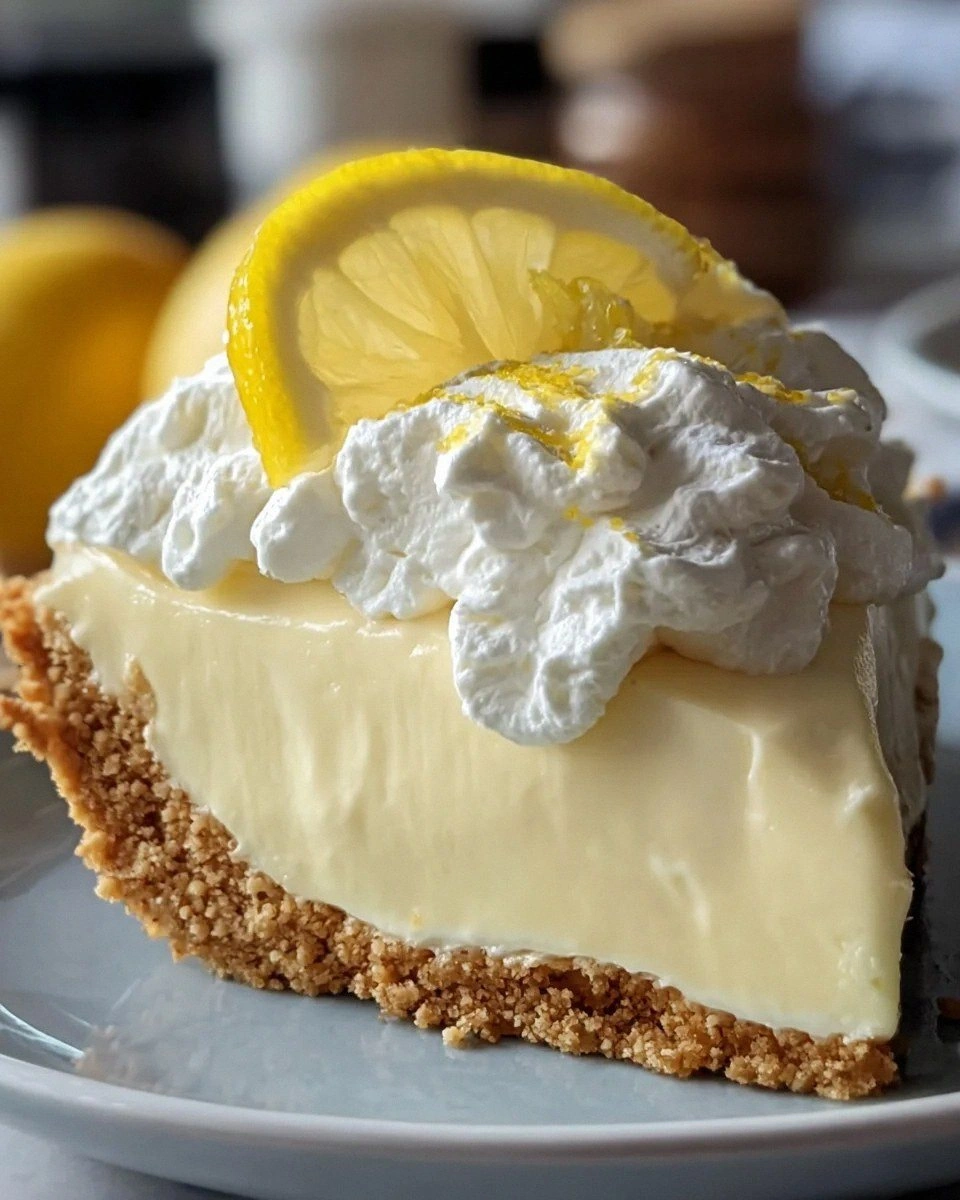
The moment I lifted the chilled pie from the fridge, a fragrant perfume of lemon zest and vanilla wafted up, mingling with the buttery crunch of a graham cracker crust that crumbled like fresh snow under a spoon. The filling was smooth, glossy, and as light as a cloud, yet it held enough body to stay put when you slice through it. The first forkful hit my tongue with a bright, tangy zing that was instantly balanced by the sweet, creamy undertone—think sunshine wrapped in a silky blanket. I dare you to taste this and not go back for seconds; the combination is practically addictive.
What makes this version stand out from every other “no‑bake lemon pie” you’ve seen on the internet is a secret weapon: frozen lemonade concentrate. Most recipes rely on fresh lemon juice, which can be tart to the point of harshness, but the concentrate brings a perfectly calibrated sweet‑sour balance that’s impossible to replicate with fresh fruit alone. Add in a generous dollop of whipped topping, and you get a texture that’s airy yet dense enough to satisfy any sweet tooth. Most recipes get this completely wrong—either they over‑sweeten, under‑fluff, or end up with a soggy crust. Not this one.
And here’s the kicker: the entire pie comes together in under thirty minutes, then chills for a quick hour, meaning you can have a show‑stopping dessert ready before the next episode of your favorite series rolls. No ovens, no burners, just a few simple steps and a little patience. I’ll be honest — I ate half the batch before anyone else got to try it, and that’s a testament to how irresistibly good it is. Let me walk you through every single step — by the end, you’ll wonder how you ever made it any other way.
What Makes This Version Stand Out
- Flavor Explosion: The frozen lemonade concentrate delivers a bright, balanced citrus punch that beats plain lemon juice any day.
- Velvet Texture: Cream cheese and whipped topping create a silky, melt‑in‑your‑mouth filling that feels like a dessert dream.
- Simplicity: No oven, no stovetop—just mix, pour, chill, and serve. Perfect for hot days or lazy weekends.
- Unique Twist: Using a graham cracker crust adds a buttery crunch that contrasts beautifully with the smooth filling.
- Crowd‑Pleaser: This pie consistently earns rave reviews, with guests asking for the recipe within minutes of the first bite.
- Ingredient Quality: Each component, from premium cream cheese to real vanilla extract, is chosen for maximum flavor impact.
- Make‑Ahead Magic: The pie can sit in the fridge for up to two days without losing its texture, making it ideal for potlucks.
- Seasonal Flexibility: While perfect for summer, the bright citrus works year‑round, giving you a refreshing treat any time.
Inside the Ingredient List
The Flavor Base
Frozen lemonade concentrate: Thawed and blended into the filling, this is the heart‑beat of the pie. It provides a concentrated lemon flavor that’s sweet, tart, and perfectly balanced. If you skip it, you’ll end up with a bland, watery filling that lacks that signature zing. For a less intense citrus note, try swapping half the concentrate with fresh lemon juice, but remember to add a bit more sugar.
Lemon zest: A teaspoon of freshly grated zest adds aromatic oils that lift the lemon flavor from flat to fragrant. The zest also introduces tiny specks of color that make each slice visually appealing. Missing the zest? The pie will still taste good, but it won’t have that bright, perfume‑like finish. Look for bright yellow zest, not the pale, dry kind that indicates an older lemon.
The Texture Crew
Cream cheese: Softened cream cheese gives the filling its luxurious, velvety body. It’s the structural backbone that holds the whipped topping and condensed milk together without curdling. Using low‑fat cream cheese can make the texture grainy; stick with full‑fat for that smooth mouthfeel. If you’re out of cream cheese, a blend of mascarpone and a touch of Greek yogurt can mimic the richness.
Whipped topping: Folded in at the end, this airy component lightens the dense cream cheese mixture, creating a cloud‑like consistency. Over‑whipping will cause it to separate, so stop as soon as soft peaks form. You can substitute a homemade whipped cream for a richer flavor, just be sure to sweeten it lightly.
The Unexpected Star
Sweetened condensed milk: This liquid gold adds sweetness, body, and a silky sheen to the filling. It also stabilizes the mixture, preventing it from weeping after chilling. If you’re watching sugar, you can halve the amount and add a splash of honey, but the texture will be slightly less glossy.
The Final Flourish
Graham cracker pie crust: The crust is the crunchy foundation that contrasts the smooth filling. Made from crushed graham crackers, butter, and a pinch of sugar, it sets firmly when pressed into the pan. Skipping the butter will result in a crumbly, unstable base that falls apart when sliced. For a gluten‑free version, use gluten‑free graham crackers or a blend of almond meal and coconut flour.
Vanilla extract: Just a teaspoon rounds out the flavor profile, adding depth that prevents the lemon from being too sharp. Real vanilla beans would be even more luxurious, but pure extract works perfectly. Omit it, and you’ll notice a faint flatness in the aftertaste.
Garnish options: A swirl of extra whipped topping or fresh lemon slices adds visual flair and an extra burst of flavor. These are optional but highly recommended for that Instagram‑ready finish.
Everything's prepped? Good. Let's get into the real action...
The Method — Step by Step
-
First, preheat no oven—just your mind—by gathering all your ingredients. Open the graham cracker box, measure out 1½ cups of crumbs, and melt ¼ cup of unsalted butter in a microwave‑safe bowl for about 30 seconds. The butter should be a golden pool, not bubbling. As soon as it’s melted, stir in 2 tablespoons of sugar until the mixture looks like wet sand.
Kitchen Hack: Press the crust mixture into a 9‑inch springform pan using the back of a measuring cup. This ensures an even, compact base without a fancy press.Set the pan on a cooling rack and pop the crust into the fridge while you move on to the filling.
-
While the crust chills, soften 8 ounces of cream cheese. Cut it into cubes and let it sit at room temperature for about 10 minutes; this prevents lumps later. In a large mixing bowl, beat the cream cheese with an electric mixer on low speed until it’s smooth, then increase to medium for another minute.
The mixture should be creamy and free of any visible lumps—think of a flawless marble statue.
-
Now, add the sweetened condensed milk (14‑ounce can) to the softened cream cheese. The liquid should flow like honey, turning the mixture a pale ivory color. Beat on low until fully incorporated, then add the thawed lemonade concentrate—about ½ cup. The moment the concentrate hits the bowl, you’ll hear a faint fizz, a sign that the citrus is awakening.
Watch Out: Do not over‑mix once the lemonade is added, or the mixture may become too thin and lose its ability to set.Stir gently until the color turns a sunny yellow, then fold in 1 teaspoon of lemon zest and 1 teaspoon of vanilla extract.
-
In a separate chilled bowl, whip 1 cup of cold whipped topping until soft peaks form. The peaks should hold their shape but still be supple enough to fold. This is the moment of pure magic—air meets cream, creating a lightness that will keep your pie from feeling heavy.
Using a rubber spatula, gently fold the whipped topping into the lemon‑cream cheese mixture. The motion should be slow and deliberate; think of coaxing two shy friends together.
-
Once the filling is airy and uniform, pour it over the chilled crust, spreading it with a spatula until the edges are smooth. The filling should settle like a sunrise over the horizon—bright, even, and inviting.
Tap the pan lightly on the counter three times; this releases any trapped air bubbles and ensures a flawless surface.
-
Cover the pie with plastic wrap, making sure the wrap touches the surface of the filling to prevent a skin from forming. Place the pie in the refrigerator for at least 1 hour, though 2 hours yields a firmer slice.
While it chills, you can prep your garnish: whip a little extra topping and slice a few thin lemon wheels.
-
After the chill, run a thin knife around the edge of the pan to release the crust. This step is crucial; a stuck crust will crumble and ruin the presentation.
Remove the springform ring gently, letting the pie sit on a serving platter.
-
Finish with a generous dollop of the extra whipped topping and arrange lemon slices or a sprinkle of zest on top. The garnish adds a pop of color and a final aromatic burst.
Now, step back and admire your creation. Picture yourself pulling this out of the fridge, the whole kitchen smelling incredible, and the first bite delivering that perfect balance of sweet, tart, and creamy. That’s the payoff.
Insider Tricks for Flawless Results
The Temperature Rule Nobody Follows
Never pour a warm filling onto a cold crust. The temperature shock can cause the crust to soften and lose its crunch. Keep both components at room temperature for a few minutes before assembling, then chill the whole pie immediately after. I once tried to speed things up by using a warm kitchen, and the crust turned into a soggy mess—lesson learned.
Why Your Nose Knows Best
When the lemon concentrate mixes with the cream cheese, you’ll smell a bright citrus aroma that signals the flavors are fully integrated. If you don’t catch that scent, give the mixture a few more gentle folds. Your nose is a better indicator than a timer for this step.
The 5‑Minute Rest That Changes Everything
After folding in the whipped topping, let the bowl sit uncovered for five minutes. This brief rest allows any tiny air bubbles to rise to the surface, resulting in a smoother final texture. Skipping this rest can lead to occasional pockets of air that feel like chewing on a bubble.
Crust Crunch Preservation
When you store leftovers, place a sheet of parchment paper directly on the surface of the filling before covering. This barrier prevents moisture from the whipped topping from soaking into the crust, keeping that satisfying crunch for days.
Garnish Timing
Add fresh lemon zest right before serving, not during the chill. The zest’s essential oils evaporate quickly, and waiting preserves that fresh burst of aroma that makes the pie unforgettable.
Creative Twists and Variations
This recipe is a playground. Here are some of my favorite ways to switch things up:
Berry Burst
Swap half of the lemonade concentrate for a mixed‑berry puree (strawberries, raspberries, blueberries). The result is a pink‑hued pie with a sweet‑tart berry backdrop that pairs beautifully with the creamy base.
Minty Fresh
Stir in a tablespoon of finely chopped fresh mint leaves into the filling before chilling. The mint adds a garden‑fresh note that elevates the lemon flavor to a sophisticated summer cocktail vibe.
Chocolate Swirl
Gently fold in ¼ cup of melted dark chocolate after the whipped topping is incorporated. The chocolate ribbons create a marbled effect and a subtle bitterness that balances the sweetness.
Spiced Citrus
Add a pinch of ground cardamom and a dash of ginger powder to the filling for a warm, exotic twist that’s perfect for early fall gatherings.
Gluten‑Free Delight
Replace the graham cracker crust with a blend of almond meal, coconut flour, and melted coconut oil. The crust becomes nutty, and the pie stays completely gluten‑free without sacrificing texture.
Storing and Bringing It Back to Life
Fridge Storage
Cover the pie tightly with plastic wrap, ensuring the wrap contacts the surface to prevent a skin from forming. It will stay fresh for up to three days, maintaining its creamy texture and crisp crust.
Freezer Friendly
Wrap the entire pie (still in its springform pan) in a double layer of foil, then place it in a freezer‑safe bag. It freezes well for up to two months. When ready to serve, thaw in the refrigerator overnight.
Best Reheating Method
Although this is a no‑bake dessert, if you prefer a slightly softer filling after freezing, place the slice on a microwave‑safe plate, add a tiny splash (about 1 tsp) of water, and microwave for 10‑15 seconds. The steam revives the creaminess without melting the crust.