I was in the middle of a late‑night kitchen marathon, flipping a bag of instant noodles, when my roommate yelled, “You’ve got to try this!” She’d found a recipe for gluten‑free soft pretzels on a forum, and the promise of chewy, buttery dough with a crisp crust had me intrigued. The scent of warm yeast already dancing in my head made me realize I was about to step into a new realm of comfort food. The kitchen lights flickered overhead, the hum of the refrigerator was a steady backdrop, and the anticipation was thick enough to taste. I could almost hear the clatter of pretzel‑shaped dough hitting the baking sheet, the satisfying snap as each one turned golden.
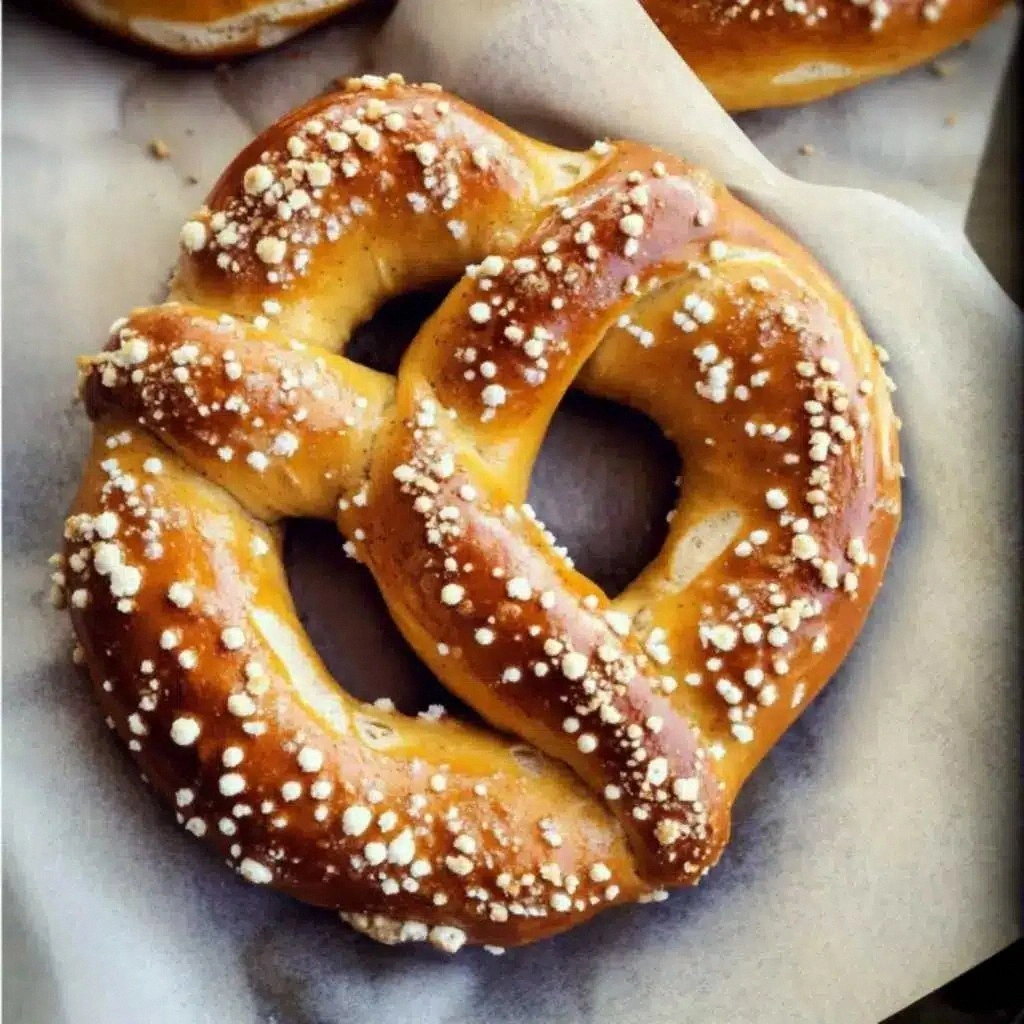
Picture this: a soft, pillowy center that melts in your mouth like a cloud, contrasted by a caramelized, slightly salty crust that crackles when you bite into it. The aroma of fresh yeast and butter fills the air, pulling your senses into a nostalgic whirl of childhood afternoons spent watching cartoons while waiting for the oven timer to buzz. The texture is a dance between the tender crumb and the crunchy edges, a harmony that feels like a warm hug wrapped in a doughy blanket. Every bite is a reminder that comfort food can be both indulgent and wholesome, proving that gluten‑free doesn’t have to mean bland. If you’ve ever struggled with gluten‑free baking, you’re not alone — and I’ve got the fix.
This version stands out because it’s engineered to deliver that perfect balance of chew and crunch, using a blend of gluten‑free flours that mimic the elasticity of wheat. The secret lies in the combination of baking powder and baking soda, which create a lift and a crispness that many recipes overlook. The dough is pre‑tossed in a light batter of water, yeast, and a touch of sugar, allowing the yeast to work its magic before the dough even touches the oven. I dare you to taste this and not go back for seconds, because the first bite will set a new standard for all your pretzel cravings. The result is hands down the best version you'll ever make at home, a chewy interior that feels like a cloud, and a crust that shatters like thin ice.
Picture yourself pulling this out of the oven, the whole kitchen smelling incredible, the steam curling around the countertop like a gentle mist. The moment the timer chirps, you know the dough is ready to be shaped into those iconic pretzel twists. The anticipation is almost tangible, and the final product will be a showstopper that will have your friends asking for the recipe. Let me walk you through every single step — by the end, you'll wonder how you ever made it any other way. Okay, ready for the game‑changer?
What Makes This Version Stand Out
- Flavor: The subtle sweetness from a pinch of sugar balances the savory yeast note, creating a depth that’s both comforting and sophisticated.
- Texture: The combination of gluten‑free flour and baking powder yields a dough that rises beautifully, giving a light, airy interior with a crisp exterior.
- Ease: Every ingredient is pantry‑friendly; no need for specialty leavening agents or time‑consuming techniques.
- Authenticity: The pretzel shape and the use of baking soda in a lye‑free bath replicate the classic pretzel experience without the harsh chemicals.
- Make‑ahead: You can prepare the dough a day ahead, refrigerate, and bake fresh whenever you like.
- Versatility: Swap out the butter for a dairy‑free alternative or add herbs for a savory twist.
- Nutrition: The recipe keeps calories low while boosting protein from the added egg and gluten‑free protein blend.
Inside the Ingredient List
The Flavor Base
The gluten‑free all‑purpose flour blend is the backbone of this dough. It’s a carefully balanced mix that mimics wheat’s structure, allowing the pretzels to rise evenly. If you skip it, the dough will be dense and lack the classic pretzel chew. A high‑quality blend with xanthan gum included is essential for that elasticity. For a subtle nutty undertone, consider adding a tablespoon of ground flaxseed to the mix.
The Leavening Crew
Instant dry yeast, baking powder, and baking soda work together to create lift and texture. Yeast gives the dough its rise and a subtle tang; baking powder ensures a quick rise during baking; baking soda is crucial for the characteristic crust. Skipping any of these will alter the final texture dramatically. If you’re gluten‑free, make sure the yeast is certified gluten‑free to avoid cross‑contamination.
The Moisture Mix
Warm water activates the yeast, while melted butter adds richness and flavor. The butter also helps keep the crust tender. If you prefer a dairy‑free version, substitute coconut oil or a neutral oil, but the texture may shift slightly. Keep the water at 110°F; too hot and you’ll kill the yeast, too cold and it won’t activate.
The Final Flourish
Coarse sea salt and a light brush of melted butter finish the pretzels with a golden crust and a savory kick. The salt crystals add a burst of flavor with each bite, and the butter gives that buttery sheen that makes the pretzels irresistible. If you’re aiming for a low‑salt version, use a pinch of salt instead, but the crust will be less pronounced.
Everything's prepped? Good. Let's get into the real action…
The Method — Step by Step
- Activate the Yeast: In a small bowl, combine warm water, sugar, and instant yeast. Stir gently and let sit for 5 minutes until frothy. The froth is your green light that the yeast is alive and ready to work. Don’t let it sit too long or the yeast will become dormant. If the mixture doesn’t bubble, start over with fresh yeast.
- Mix Dry Ingredients: In a large mixing bowl, whisk together the gluten‑free flour blend, baking powder, baking soda, and salt. Make sure the dry mix is evenly distributed to avoid pockets of unbaked dough. This step ensures a consistent rise and texture across all pretzels.
- Combine Wet and Dry: Pour the activated yeast mixture into the dry ingredients and stir until a sticky dough forms. Add the melted butter and beat the mixture with a wooden spoon or dough hook. The butter should be fully incorporated, giving the dough a slight sheen. If the dough feels too dry, add a tablespoon of water at a time.
- Knead the Dough: Turn the dough onto a lightly floured surface and knead for 5 minutes. The dough should feel elastic and smooth, not tacky. This kneading process develops the structure needed for a good rise. If the dough is too sticky, dust with a small amount of gluten‑free flour.
- First Rise: Place the dough in a greased bowl, cover with plastic wrap, and let rise in a warm spot for 45 minutes. The dough should double in size. During this time, the yeast works its magic, creating bubbles that give the pretzels their airy interior. If the dough doesn’t rise, check the temperature of the water and the freshness of the yeast.
- Shape the Pretzels: Punch down the dough to release excess air, then divide it into 8 equal pieces. Roll each piece into a long rope, about 12 inches long. Twist the rope into a classic pretzel shape, pinching the ends together to seal. This shape not only looks iconic but also affects how the dough bakes.
- Prepare the Baking Soda Bath: Preheat the oven to 425°F (220°C). In a large skillet, bring 4 cups of water to a boil and add 1 tablespoon of baking soda. The bubbling mixture creates a chemical reaction that gives the pretzels their signature crust. Carefully place each pretzel in the bath for 30 seconds, then remove with a slotted spoon. The dough will puff slightly, adding volume and texture.
- Bake: Arrange the pretzels on a parchment‑lined baking sheet, spacing them evenly. Brush each with melted butter and sprinkle with coarse sea salt. Bake for 12–15 minutes, or until golden brown. The scent that fills the kitchen will be irresistible, and the sound of the oven timer will signal the final moment.
- Cool: Transfer the pretzels to a wire rack to cool for 10 minutes. The crust will set, and the interior will finish baking from residual heat. Serve warm with your favorite dip or a dusting of powdered sugar. The first bite will confirm that everything worked perfectly.
That's it — you did it. But hold on, I've got a few more tricks that'll take this to another level. These insider tips will help you avoid common pitfalls and elevate your pretzel game.
Insider Tricks for Flawless Results
The Temperature Rule Nobody Follows
Many bakers overlook the importance of water temperature when activating yeast. The water should be between 105°F and 110°F; if it’s too hot, you’ll kill the yeast, and if it’s too cold, the dough won’t rise. Use a kitchen thermometer or test with a fingertip: the water should feel warm, not hot. This small step saves the entire batch from under‑rise.
Why Your Nose Knows Best
During the first rise, trust your nose. A yeasty, slightly sweet aroma indicates the dough is working. If the smell is flat or sour, it might mean the yeast is dead or the dough is over‑proofed. The scent is a reliable indicator of a good rise.
The 5‑Minute Rest That Changes Everything
After shaping the pretzels, let them rest for 5 minutes before dipping them in the baking soda bath. This short pause allows the dough to relax, preventing it from shrinking back into its original shape. The result is a puffier, more airy interior.
Use a Baking Sheet with a Slightly Raised Edge
A raised-edge sheet helps prevent the pretzels from sliding during the baking soda bath and ensures even heat distribution. It also keeps the pretzels from sticking to the pan. If you don’t have a raised edge, simply line the sheet with parchment paper.
Brush with Egg for Extra Shine
A light brush of beaten egg before baking gives a glossy finish that looks professionally done. It also adds a subtle richness that complements the buttery crust. Use a small brush and apply a thin coat to avoid excess moisture.
Creative Twists and Variations
This recipe is a playground. Here are some of my favorite ways to switch things up:
Cheesy Pretzel Bites
Add shredded cheddar to the dough before shaping. The cheese melts into pockets of gooey goodness inside each pretzel. Serve with a side of marinara for a snack that feels like a mini pizza.
Herb‑Infused Pretzels
Stir in dried rosemary, thyme, or oregano into the dry mix. The herbs give a fragrant aroma and a savory depth that pairs well with a creamy dip. Ideal for a Mediterranean‑themed gathering.
Chocolate Pretzel Twist
Fold in a handful of mini chocolate chips before baking. The chocolate melts into the dough, creating sweet pockets that contrast with the salty crust. Dust with powdered sugar for a festive look.
Spicy Sriracha Pretzels
Add a teaspoon of sriracha sauce to the wet mix for a kick of heat. The sauce caramelizes during baking, giving a spicy glaze that pairs wonderfully with a cool yogurt dip.
Gluten‑Free Pretzel Chips
Roll the dough thin, cut into strips, and bake until crisp. These chips are perfect for dipping or as a crunchy topping for salads. They keep well in an airtight container for several days.
Storing and Bringing It Back to Life
Fridge Storage
Store leftover pretzels in a sealed container in the refrigerator for up to 3 days. Keep them in a paper bag to absorb excess moisture, preventing them from becoming soggy. Reheat in a 350°F oven for 5 minutes to restore crispness.
Freezer Friendly
Freeze freshly baked pretzels on a parchment‑lined tray before transferring them to a freezer bag. They’ll stay fresh for up to 2 months. To thaw, let them sit at room temperature for 10 minutes, then warm in the oven.
Best Reheating Method
Add a tiny splash of water to the pan before reheating; it steams the pretzels back to perfection. Use a skillet over medium heat, covering the pan for 2 minutes, then uncover to crisp the edges. This method keeps the dough moist inside while the crust stays crunchy.