Picture this: you’re halfway through a busy Thursday, the fridge is a mess of leftovers, and the only thing you can think about is a late‑night craving for something savory, crunchy, and utterly satisfying. I had just finished a long day of meetings, and the thought of a plate of nachos—those golden, cheesy, chip‑laden delights—was the only thing that seemed to make sense. I pulled out the pantry, grabbed a handful of tortilla chips, a pound of ground beef, and a packet of taco seasoning, and I was ready to turn a kitchen disaster into a culinary triumph.
The first thing that caught my eye was the sizzling sound of the pan as the beef hit the heat. That sharp sizzle is the prelude to a flavor orchestra: a savory base of browned meat, the subtle sweetness of diced onion, the punch of garlic, and the boldness of taco seasoning. As the aroma rose, it mingled with the earthy scent of fresh cilantro and the sharp tang of sour cream, creating an intoxicating perfume that made the entire kitchen feel like a taco truck on a summer street. I could almost taste the first bite—a bite where the chips are crisp, the cheese melts into gooey ribbons, and the jalapeños give a gentle kick that lingers on the palate.
What makes this version stand out from the countless nacho recipes you’ll find online is the balance of textures and the strategic layering of flavors. I didn’t just dump everything onto a plate; I built it like a miniature culinary skyscraper. Each layer has a purpose: the base of seasoned beef anchors the dish, the beans add depth, the tomatoes bring acidity, the jalapeños provide heat, and the cheese crowns the whole thing like a golden halo. The result is a dish that satisfies both the craving for comfort food and the desire for something that feels a bit more sophisticated.
And there’s a twist you won’t expect—an extra splash of water during the seasoning stage that keeps the beef moist and the spices from burning, giving you a richer, more cohesive flavor. I dare you to taste this and not go back for seconds. The moment you bite into those perfectly crisp edges that shatter like thin ice, you’ll know you’ve reached a new level of nacho bliss. Let me walk you through every single step—by the end, you’ll wonder how you ever made it any other way.
What Makes This Version Stand Out
- Taste: The combination of seasoned beef, black beans, and fresh tomatoes creates a flavor profile that is both hearty and vibrant. The subtle sweetness of the onions balances the heat from the jalapeños, while the sour cream adds a creamy finish that rounds everything out.
- Texture: The chips stay crunchy thanks to a strategic layering of cheese and beans, preventing sogginess. The cheese melts into silky ribbons that cling to every chip, and the beans provide a pleasant bite that contrasts with the softness of the tomatoes.
- Simplicity: With only a handful of ingredients, this recipe is a breeze to whip up. You don’t need exotic spices or hard‑to‑find items; everything is pantry‑friendly.
- Uniqueness: The splash of water during seasoning is a secret trick that keeps the meat moist and the spices evenly distributed, a step often omitted in other recipes.
- Crowd Reaction: Friends who’ve tried this version say it’s “hands down the best version you’ll ever make at home.” The dish is perfect for parties, game nights, or a quick weeknight snack.
- Ingredient Quality: Using fresh ground beef and a high‑quality taco seasoning elevates the dish, while the fresh cilantro adds a bright finish.
- Cooking Method: The method balances stovetop searing with oven baking, ensuring that the cheese melts evenly and the chips stay crisp.
- Make‑ahead Potential: The assembled nachos can be stored in the fridge for up to 24 hours and reheated in the oven, making it ideal for meal prep.
Inside the Ingredient List
The Flavor Base
Ground beef is the heart of this nacho masterpiece. It provides a robust, meaty foundation that pairs beautifully with the spice blend. Choosing a lean-to-fat ratio of 80/20 ensures the meat stays juicy while still delivering that classic beefy flavor. If you skip the beef, the dish loses its depth, and the remaining components feel flat. For a healthier twist, you could use ground turkey, but the beef’s umami richness is irreplaceable in this version.
The Texture Crew
Tortilla chips bring the essential crunch. They must be sturdy enough to hold the toppings without breaking apart. A good rule of thumb is to use 8 ounces of chips per four servings; this gives you a generous, satisfying base. If you don’t have the exact weight, aim for a handful that feels substantial. The cheese is the crowning glory—shredded cheddar melts into silky ribbons that cling to every chip, creating a mouth‑watering coating. Skipping the cheese turns the dish into a plain chip‑and‑beef combo, which is fine, but you’ll miss that gooey, melty texture.
The Unexpected Star
Black beans add a subtle earthiness and a protein boost that elevates the dish into a more balanced meal. They also act as a moisture barrier, preventing the chips from becoming soggy. If you’re a fan of beans, you can double the amount, but be careful not to drown the chips. The diced tomatoes bring a fresh burst of acidity that cuts through the richness of the beef and cheese. Their juicy burst is a delightful contrast to the dense layers below.
The Final Flourish
Jalapeños and green onions provide that essential pop of heat and brightness. They’re not just decorative; they add layers of flavor that keep the dish exciting. A splash of sour cream and a handful of fresh cilantro finish the dish with a creamy, cool contrast that balances the spice. If you’re watching your sodium intake, you can reduce the taco seasoning or use a low‑sodium version, but the overall flavor profile remains intact.
Everything’s prepped? Good. Let’s get into the real action and start building that flavor tower.
The Method — Step by Step
- Preheat your oven to 375°F (190°C). This temperature is just hot enough to melt the cheese evenly without burning the chips. The oven also helps crisp the edges of the chips once the toppings are baked. The moment the oven door opens, you’ll notice the aroma of melted cheese and sizzling beef filling the kitchen.
- Heat a large skillet over medium‑high heat and add the tablespoon of olive oil. Once the oil shimmers, add the ground beef, breaking it up with a spoon. The beef should sizzle loudly, a signal that it’s getting a good sear. Cook until it’s no longer pink, about 5–7 minutes, stirring occasionally.
- Add the diced onion and minced garlic to the skillet. Cook until the onion turns translucent and the garlic releases its fragrance, about 3 minutes. The onion’s natural sweetness will balance the heat from the jalapeños later on. This step also builds a savory foundation for the taco seasoning.
- Sprinkle the packet of taco seasoning over the meat mixture. Pour in half a cup of water to keep the seasoning from sticking to the pan and to create a slight sauce that coats the beef. Stir until the mixture thickens and the beef is evenly coated. The water helps the spices distribute evenly, preventing burnt pockets.
- Drain the black beans and add them to the skillet. Stir until they’re warmed through, about 2 minutes. The beans absorb some of the flavorful sauce, adding a creamy texture that contrasts with the crisp chips. If you prefer a thicker consistency, mash the beans slightly with the back of a spoon.
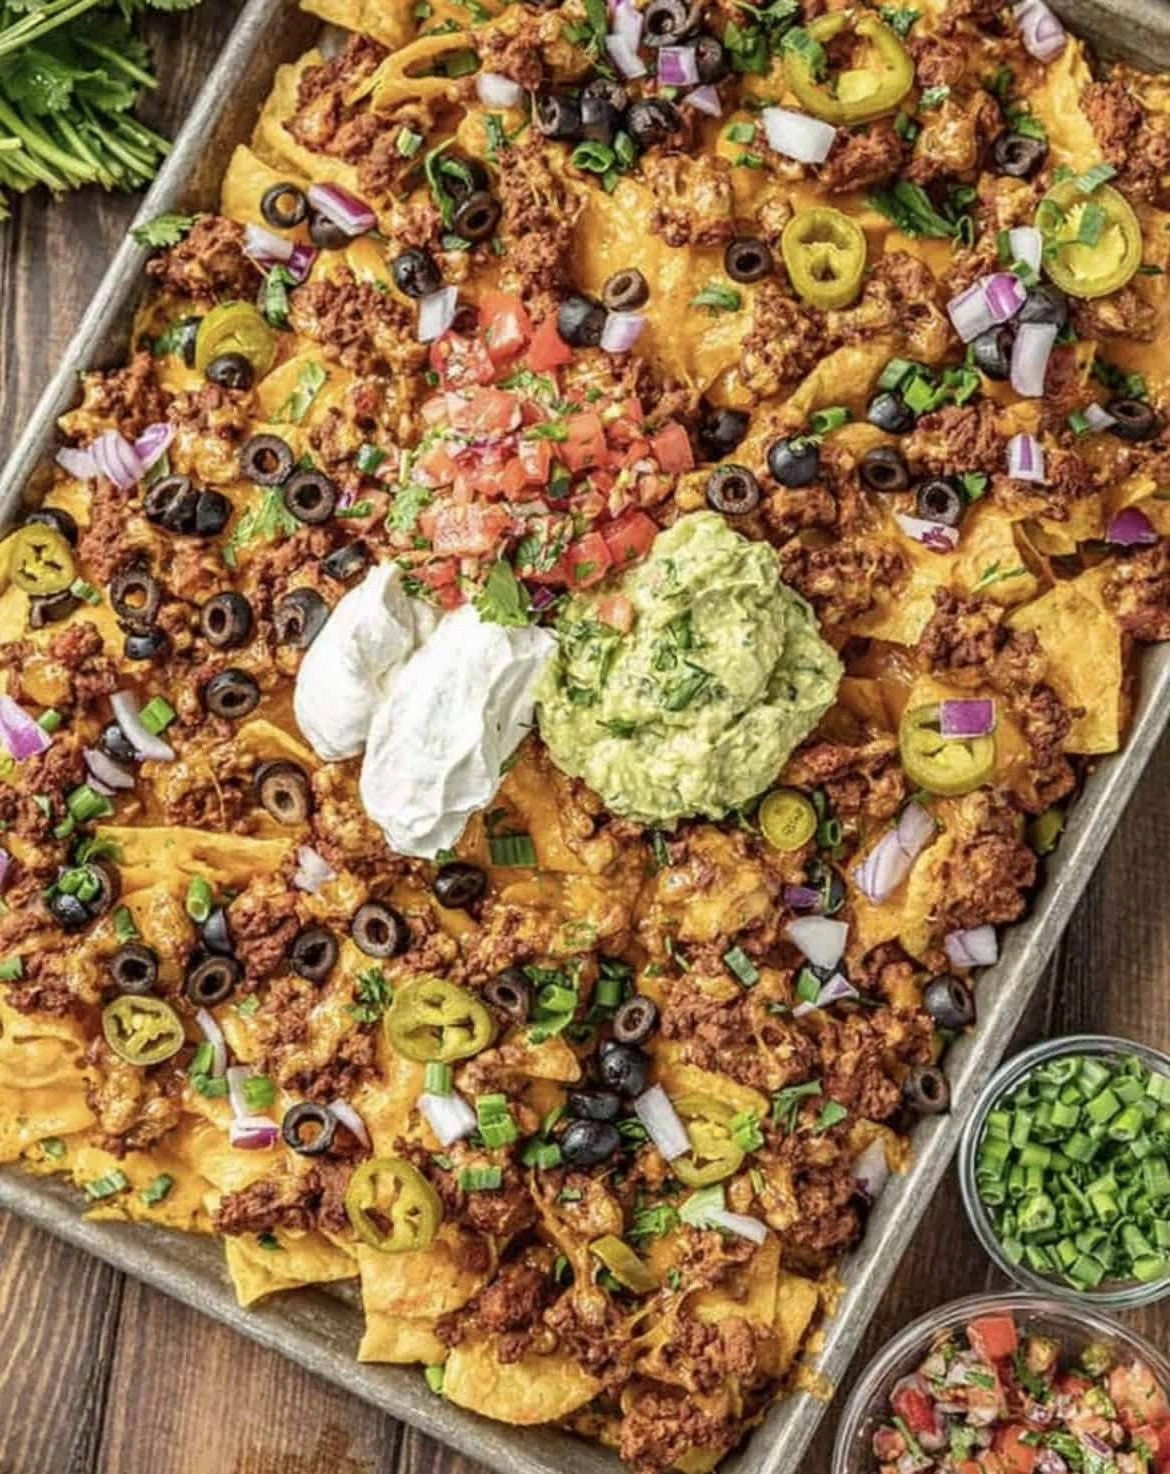
- Spread a single layer of tortilla chips on a large baking sheet. Use a generous amount of the beef‑bean mixture, spreading it evenly across the chips. The goal is to cover each chip without piling it too high, which could cause sogginess.
- Sprinkle shredded cheddar cheese over the top of the chips. The cheese should be the second layer, creating a bridge between the beef‑bean mixture and the jalapeños. The cheese melts into a golden, gooey coating that binds everything together.
- Add sliced jalapeños, diced tomatoes, and chopped green onions on top. These fresh ingredients add a bright, zesty contrast to the rich meat and cheese layers. They also introduce a bit of crunch and a burst of color that makes the dish visually appealing.
- Finish with a dollop of sour cream and a sprinkle of fresh cilantro. The sour cream adds a cool, creamy texture that balances the heat, while the cilantro brings a herbal brightness. This final touch is what elevates the nachos from a simple snack to a gourmet experience.
- Bake in the preheated oven for 12–15 minutes, or until the cheese is melted and bubbly and the edges of the chips are crisp. Keep an eye on the dish; you want the cheese to be golden brown, not burnt. Once baked, let the nachos rest for a minute or two before serving so the flavors settle.
That’s it—you did it. But hold on, I’ve got a few more tricks that will take this to another level. These insider tips will ensure every bite is a masterpiece.
Insider Tricks for Flawless Results
The Temperature Rule Nobody Follows
Many people bake nachos at a lower temperature, thinking it will keep the chips from burning. However, a higher oven temperature of 375°F ensures that the cheese melts quickly while the chips stay crisp. The heat also caramelizes the edges of the beef, adding a subtle nutty flavor. If you’re using a convection oven, lower the temperature by 25°F to avoid overcooking.
Why Your Nose Knows Best
When the nachos start to bake, the scent of melting cheese and sautéed beef will fill the kitchen. That aroma is a sign that the cheese is perfectly melted and the chips are crisp. Trust your nose; if it smells like a toasted marshmallow, you’re in the right zone. If it smells burnt, pull it out immediately to prevent a bitter aftertaste.
The 5-Minute Rest That Changes Everything
After baking, let the nachos rest for at least five minutes. This pause allows the cheese to set slightly, preventing it from sliding off the chips when you scoop them. It also gives the flavors a chance to meld, making each bite more harmonious. I’ve seen people eat nachos straight out of the oven, but the rest step makes the experience truly elevated.
The Secret of the Water Splash
Adding half a cup of water when you season the beef is a game‑changer. It prevents the spices from sticking to the pan and ensures the beef stays moist. Some cooks skip this step, resulting in a dry, unevenly seasoned meat. By keeping the water on hand, you guarantee a juicy, flavorful base every time.
The Cheese Ratio that Wins
Using 2 cups of shredded cheddar for four servings is the sweet spot. Too little cheese and the nachos will feel thin; too much and the chips will become soggy. If you’re a cheese lover, you can add an extra half cup, but be sure to spread it thinly to maintain crispness. This ratio keeps the nachos balanced and satisfying.
Creative Twists and Variations
This recipe is a playground. Here are some of my favorite ways to switch things up:
Spicy Chipotle Version
Swap the taco seasoning for a chipotle seasoning blend and add a tablespoon of chipotle in adobo sauce. The smoky heat will elevate the dish to a whole new level, making it perfect for chili‑lover evenings.
Mediterranean Mezze Twist
Replace the cheddar with crumbled feta and add chopped kalamata olives, diced cucumber, and a drizzle of tzatziki. This version brings a fresh, tangy flavor profile reminiscent of a Mediterranean mezze platter.
Vegan Delight
Use plant‑based ground meat, vegan cheddar, and a splash of plant‑based milk to create a creamy texture. Swap the sour cream for coconut yogurt and top with fresh cilantro. The result is a hearty, cruelty‑free nacho that still delivers on flavor.
Breakfast Nachos
Replace the tortilla chips with hash browns or breakfast tortillas and add scrambled eggs, bacon bits, and a sprinkle of cheddar. Finish with a drizzle of maple syrup for a sweet‑savory breakfast treat.
Mexican Street Taco Layer
Use small corn tortillas folded into triangles and layer them with carne asada, pico de gallo, and a squeeze of lime. This variation offers a street‑food vibe with a homemade twist.
Salsa Verde Surprise
Swap the diced tomatoes for a spoonful of salsa verde and add sliced avocado on top. The green, tangy salsa brings a fresh, bright flavor that balances the richness of the meat and cheese.
Storing and Bringing It Back to Life
Fridge Storage
Store leftover nachos in an airtight container for up to 24 hours. Keep the chips separate from the toppings if you want to maintain crispness. When you’re ready to reheat, spread the nachos on a baking sheet and bake at 350°F for 5–7 minutes, or until the cheese is melted.
Freezer Friendly
To freeze, assemble the nachos with the chips and toppings, then wrap tightly in plastic wrap and place in a freezer bag. They’ll keep for up to 2 weeks. Thaw overnight in the refrigerator before reheating in the oven as described above.
Best Reheating Method
The oven is the best method to preserve the crunch and melt the cheese evenly. If you’re in a hurry, use a microwave on medium power for 30–45 seconds, but the chips may lose crispness. For a quick fix, sprinkle a little water over the nachos before microwaving to create steam and rehydrate the chips.