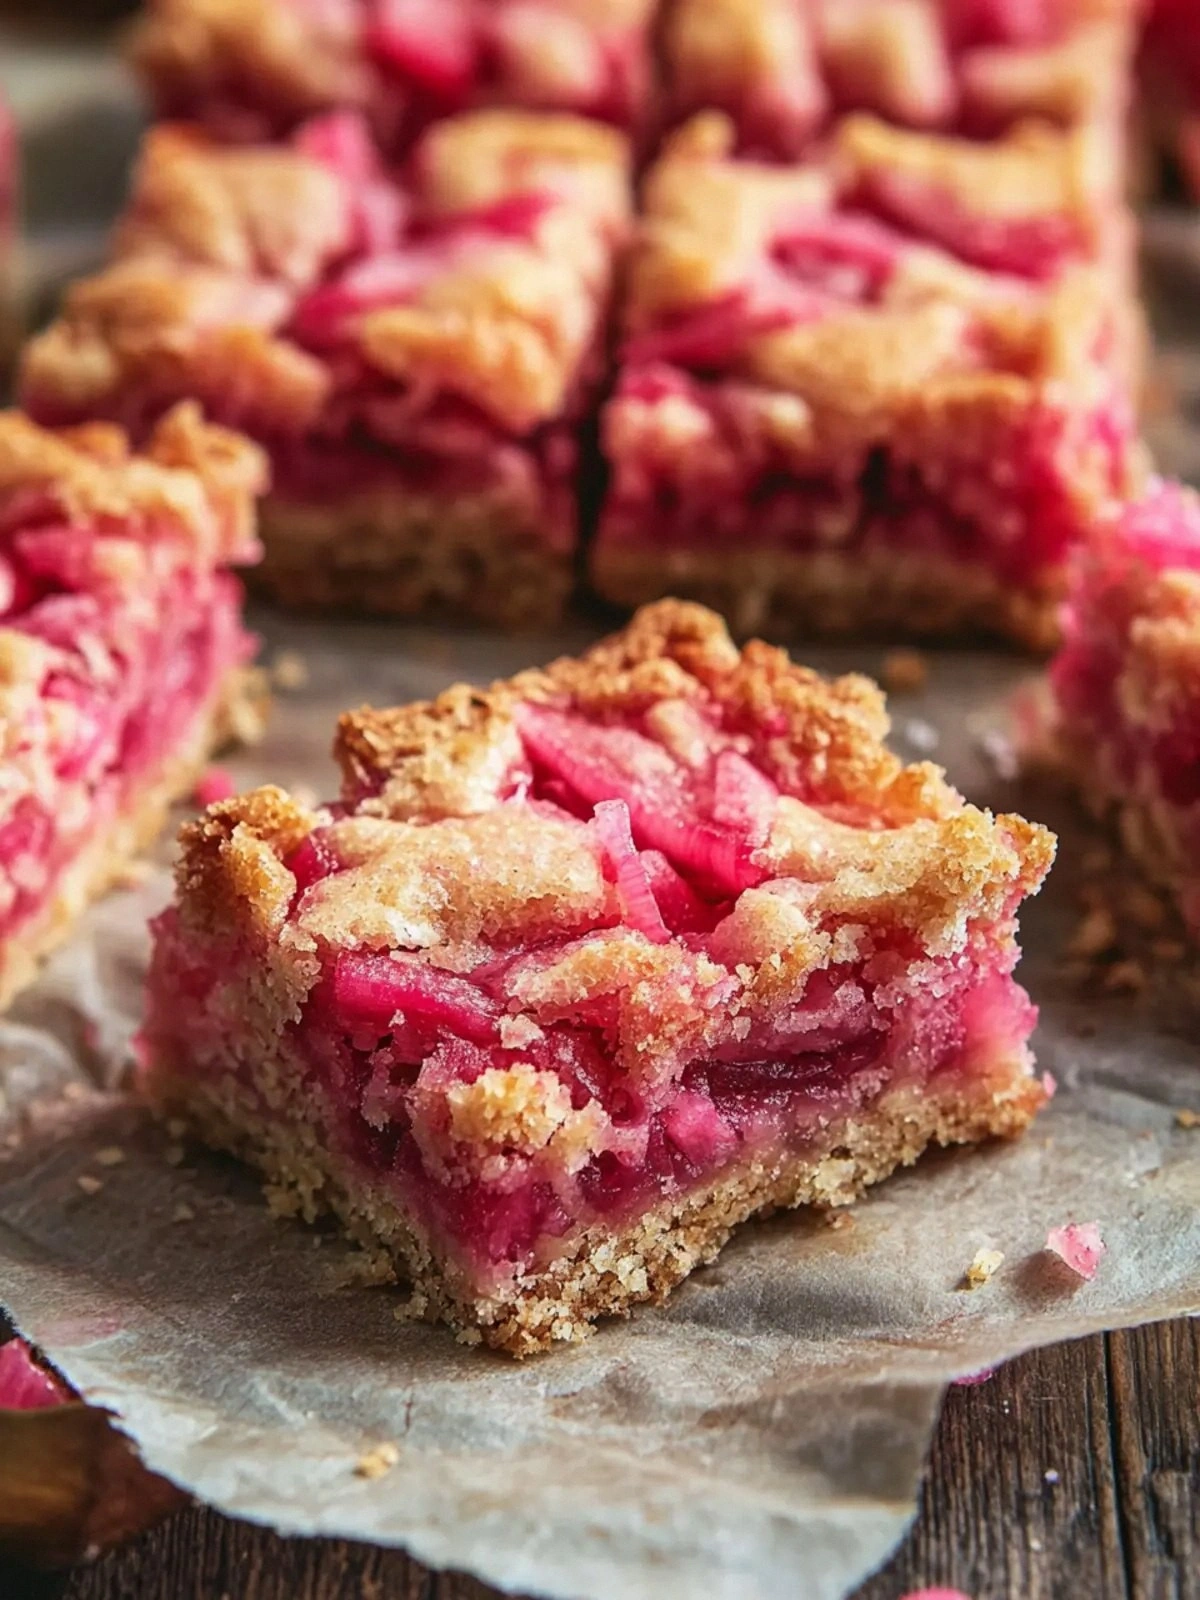
I was standing in my kitchen, staring at a half‑finished batch of what should have been a simple rhubarb crumble. The batter had been too thick, the rhubarb too tart, and the whole thing felt like a culinary misstep. I could almost hear the kitchen timer mocking me as it ticked toward a disappointing end. That night, after a few too many glasses of wine, I decided to flip the script. I pulled out my trusty skillet, grabbed a handful of fresh rhubarb, and set out to create something that would make even the most skeptical foodie swoon. The result? Rhubarb Dream Bars: Sweet Trea, a dessert that feels like a sweet, buttery hug with a tart twist that refuses to let you forget it.
Picture this: a golden, buttery crust that crackles as soon as it hits the oven, the scent of caramelized sugar mingling with the sharp, green tang of rhubarb. The first bite is a harmonious collision of sweet and sour, the rhubarb’s bite softened by the buttery crumb that melts in your mouth. The texture is a paradox—soft and crumbly on the inside, slightly crisp on the edges, and the subtle crunch of sugar crystals that give it an almost nostalgic feel. This isn’t just a dessert; it’s a sensory experience that will linger on your palate and in your memory. The secret? A surprisingly simple technique that turns ordinary rhubarb into a silky, sweet center that pairs perfectly with a buttery base.
I dare you to taste this and not go back for seconds. That’s the bold claim I make, and I’m not kidding. Most recipes get this completely wrong by either over‑cooking the rhubarb or under‑baking the crust. The result is either a soggy mess or a dry, crumbly disaster. My version solves both problems with a single, elegant trick: a quick sauté of the rhubarb with a splash of sugar and a pinch of salt before it’s folded into the batter. The sugar caramelizes the rhubarb, turning it into a silky, sweet center that stays moist and tender even after baking. And that’s just the tip of the iceberg.
If you’ve ever struggled with rhubarb desserts, you’re not alone—and I’ve got the fix. Picture yourself pulling this out of the oven, the whole kitchen smelling incredible, the bars still steaming, and the first bite delivering that perfect balance of sweet and tart. The aroma alone will have everyone in the house rushing to the kitchen. I’ll be honest — I ate half the batch before anyone else got to try it. But that’s the power of this recipe: it’s so good you can’t stop at just one. Stay with me here — this is worth it.
What Makes This Version Stand Out
- Texture: The crust is buttery, slightly crisp, and melts in your mouth, while the rhubarb center is silky, not mushy. This contrast creates a delightful bite that keeps you coming back for more.
- Flavor: The rhubarb is caramelized, giving it a subtle sweetness that balances its natural tartness. The butter adds a rich, savory note that elevates the entire dessert.
- Ease: With just eight simple ingredients, you can produce a show‑stopping dessert in under an hour. No complicated techniques or exotic ingredients required.
- Versatility: These bars can be served warm with vanilla ice cream, chilled as a refreshing snack, or even baked into a layered parfait.
- Crowd‑pleaser: Whether it’s a family gathering or a dinner party, the bars are guaranteed to be a hit. Their unique flavor profile stands out from the usual sweet treats.
- Ingredient Quality: Using fresh, high‑quality rhubarb is key. The bars taste better when the rhubarb is firm and slightly tart, not overly sweet.
- Make‑ahead: They store well in the fridge for up to five days and freeze for up to three months, making them a convenient option for busy weeks.
- Presentation: The bars look as good as they taste. Their golden crust and vibrant green rhubarb center create a striking visual that’s Instagram‑worthy.
Alright, let’s break down exactly what goes into this masterpiece. The recipe is a symphony of simple, well‑chosen ingredients, each playing a crucial role. The key to success lies in balancing the sweet, buttery crust with a tart, silky rhubarb center that doesn’t overwhelm but rather complements the base. And that’s exactly what makes these bars unforgettable.
Inside the Ingredient List
The Flavor Base
All-purpose flour is the backbone of the crust. It gives structure without overpowering the buttery flavor. Using a high‑protein flour would make the bars tough, while a low‑protein blend would result in a crumbly texture that’s hard to handle. If you’re in a pinch, whole‑wheat flour can be used, but the bars will have a nuttier taste and a denser crumb. For a gluten‑free version, a blend of rice flour, potato starch, and tapioca will work, though the texture will shift slightly.
The Sweet Layer
Sugar is used in two distinct stages: first, it’s combined with flour to create the crust, and second, it’s caramelized with the rhubarb to create a sweet, silky filling. The first sugar helps achieve a golden crust, while the second sugar caramelizes the rhubarb, reducing its tartness. If you’re watching calories, you can substitute part of the sugar with honey or maple syrup, but keep in mind that liquid sweeteners can alter the crust’s texture.
The Unexpected Star
Rhubarb, the star of this dessert, is often underrated. Fresh rhubarb is tart, but when sautéed with a touch of sugar and salt, it transforms into a silky, sweet center. The key is to avoid overcooking it; you want it just tender enough to break apart but still retain a slight bite. If you can’t find fresh rhubarb, frozen rhubarb works, but you’ll need to adjust the cooking time slightly to avoid sogginess.
The Final Flourish
Eggs act as a binder, helping the crust hold together and the rhubarb center set. They also add richness and a slight custard‑like texture to the filling. If you’re vegan, you can use flax eggs or a commercial egg replacer, but the texture will change slightly. Butter provides the buttery flavor and contributes to a flaky, tender crumb. Using salted butter adds a subtle depth of flavor that balances the sweetness.
Everything's prepped? Good. Let's get into the real action.
The Method — Step by Step
- Preheat and Prep: Set your oven to 350°F (175°C). Lightly grease a 9x13 inch baking pan or line it with parchment paper. The pan size matters because it determines the thickness of the bars; a deeper pan yields a denser crumb, while a shallow pan creates a lighter texture. As you grease, make sure to cover every corner so the bars release easily after baking. This step is crucial to avoid a sticky mess on the bottom of the pan.
- Combine Dry Ingredients: In a medium bowl, whisk together 1 cup all‑purpose flour, 1/4 cup sugar, 1/4 cup all‑purpose flour again (for a total of 1.25 cups), and 1/4 teaspoon salt. The extra flour might seem redundant, but it helps absorb the moisture from the rhubarb and ensures a consistent crumb. Mix until the dry ingredients are evenly distributed, then set aside. This step ensures that the sugar is evenly spread throughout the crust, preventing pockets of sweetness that could burn.
- Cut in Butter: Add 1/2 cup (1 stick) cold, cubed butter to the flour mixture. Using a pastry cutter or two forks, cut the butter into the flour until the mixture resembles coarse crumbs. The cold butter creates steam pockets during baking, giving the crust a flaky, tender texture. If you prefer, you can use a food processor for a quicker, more uniform result, but be careful not to overprocess.
- Whisk Eggs: In a separate bowl, beat 2 large eggs until fully blended. The eggs act as a binder, helping the crust hold together and the rhubarb center set. Once whisked, add the eggs to the dry mixture and stir until a rough dough forms. The dough should be soft enough to handle but not too sticky. If it feels too dry, add a teaspoon of water or milk; if it’s too wet, add a tablespoon of flour.
- Sauté the Rhubarb: Heat a skillet over medium heat and add a splash of oil or a small pat of butter. Add 2 cups diced rhubarb, 1 cup sugar (the second sugar), and a pinch of salt. Stir until the sugar dissolves and the rhubarb starts to soften, about 3-4 minutes. This quick sauté caramelizes the rhubarb, turning its tartness into a silky sweetness that pairs beautifully with the buttery crust. Watch for the rhubarb to release its juices but avoid overcooking; you want it just tender.
- Fold in Rhubarb: Gently fold the sautéed rhubarb into the dough, ensuring an even distribution. The goal is a uniform crumb with pockets of sweet, juicy rhubarb. Be careful not to overmix, as this can break down the crust’s structure. If the dough feels too wet after adding the rhubarb, add a tablespoon of flour to absorb the excess moisture. This step is the moment of truth; the quality of your rhubarb will directly affect the final flavor.
- Spread and Bake: Transfer the dough to the prepared pan and spread it evenly with a spatula or the back of a spoon. The dough should be about 1/2 inch thick. Bake for 30 minutes, or until the top is golden brown and the crust feels firm. The bars should release easily from the pan when you lift the parchment. The baking time is critical; underbaking results in a doughy center, while overbaking dries out the rhubarb filling.
- Cool and Serve: Remove the pan from the oven and let the bars cool on a wire rack for at least 20 minutes. This resting period allows the rhubarb filling to set, making the bars easier to cut. Once cooled, cut into bars or squares. Serve warm with a scoop of vanilla ice cream or chilled for a refreshing treat. The bars are best enjoyed the same day, but they keep well in the fridge for up to five days.
- Storage Tips: Wrap the bars tightly in plastic wrap and store them in an airtight container. They can be frozen for up to three months; thaw in the refrigerator overnight before reheating. To reheat, place the bars in a preheated oven at 350°F for 10 minutes, or microwave on low for 30 seconds. The bars will regain their buttery softness and rhubarb’s silky texture.
That's it — you did it. But hold on, I've got a few more tricks that'll take this to another level. The secret to a flawless crust and a perfectly set rhubarb filling lies in the details. Let’s dive into some insider knowledge that will help you master this recipe every time.
Insider Tricks for Flawless Results
The Temperature Rule Nobody Follows
Most bakers set their ovens to the lowest setting that achieves a golden top, but the real trick is to use a preheated oven at exactly 350°F. This temperature ensures the crust cooks evenly without burning the sugars on the top. If your oven runs hot, use a lower setting and extend the baking time slightly. A thermometer helps to confirm the internal temperature of the bars reaches 190°F, indicating the filling is set.
Why Your Nose Knows Best
As the bars bake, the aroma of caramelized sugar and butter will fill your kitchen. Trust that scent; it signals that the crust is golden and the rhubarb is tender. If the smell is faint, give them a few more minutes. The right aroma means the sugars are fully caramelized, giving the bars that signature sweet, buttery flavor.
The 5-Minute Rest That Changes Everything
Letting the bars rest for 5–10 minutes after baking is essential. During this time, the rhubarb filling continues to set, and the crust firms up, making the bars easier to cut. Cutting them too soon will cause them to crumble and spill the filling. A quick rest also allows the flavors to meld, creating a more cohesive taste experience.
Avoiding the Soggy Bottom
If you notice a soggy bottom, it’s likely because the dough was too wet. The rhubarb releases juices during baking, and if the dough can’t absorb them, moisture accumulates. To prevent this, add an extra tablespoon of flour to the dough or reduce the amount of rhubarb slightly. Another trick is to pre‑bake the crust for 5 minutes before adding the rhubarb mixture.
The Sweet‑Sour Balance
The key to a great rhubarb dessert is balancing the tartness with the right amount of sweetness. If the bars taste too tart, add an extra tablespoon of sugar to the rhubarb mixture. Conversely, if they’re overly sweet, reduce the sugar in the crust by half a tablespoon. Taste the rhubarb mixture before folding it into the dough to ensure the flavor profile is to your liking.
Creative Twists and Variations
This recipe is a playground. Here are some of my favorite ways to switch things up:
Berry Burst Bars
Swap the rhubarb for a mix of fresh blueberries and raspberries. The berries will add a juicy burst of flavor and a pop of color. Keep the rest of the recipe unchanged, but reduce the sugar slightly to account for the berries’ natural sweetness.
Chocolate‑Infused Dream
Add 1/4 cup of unsweetened cocoa powder to the flour mixture. The chocolate will deepen the flavor and give the bars a richer, indulgent twist. Pair them with a drizzle of dark chocolate ganache for an extra wow factor.
Citrus Zest Variation
Incorporate the zest of one orange or lemon into the dough. The citrus will brighten the buttery crust and add a subtle aroma. This variation is perfect for brunch or a light dessert.
Nutty Crunch Bars
Fold in 1/2 cup of toasted walnuts or pecans into the dough before baking. The nuts add a satisfying crunch and a nutty flavor that pairs wonderfully with the sweet rhubarb. Toast the nuts beforehand to bring out their natural oils.
Spiced Rhubarb
Add a pinch of ground cinnamon or allspice to the rhubarb mixture. The spices will give the bars a warm, comforting flavor that’s perfect for fall or winter gatherings.
Gluten‑Free Version
Use a gluten‑free flour blend (such as a rice‑based mix) in place of the all‑purpose flour. Keep the same ratios, but be prepared for a slightly denser crumb. Add a tablespoon of xanthan gum to help bind the dough if your blend doesn’t contain it.
Storing and Bringing It Back to Life
Fridge Storage
Store the bars in an airtight container at room temperature for up to 5 days. Wrap them tightly in plastic wrap to prevent them from drying out. If you’re in a humid environment, place a small paper towel in the container to absorb excess moisture.
Freezer Friendly
For longer storage, freeze the bars in a single layer on a parchment‑lined tray. Once frozen, transfer them to a freezer‑safe bag. They’ll stay fresh for up to 3 months. Thaw them at room temperature before reheating.
Best Reheating Method
Reheat the bars in a preheated oven at 350°F for 10 minutes, or microwave on low for 30 seconds. Add a tiny splash of water before reheating; this steams the bars back to perfection, preventing them from drying out. The result is a warm, buttery bar with a silky rhubarb center, just like the first time.