Ever had a night when your kitchen felt more like a science lab than a home? I was in that mood, juggling a blender, a saucepan, and a stubborn chocolate bar that refused to melt. The result was a disaster: a chocolate mess that looked more like a crime scene than dessert. But that very frustration sparked a mission—to turn that chaos into the ultimate frozen chocolate mudslide pie. Picture this: a silky, coffee‑kissed chocolate core, a buttery graham cracker crust, and a swirl of velvety cream that feels like a midnight hug. That’s the promise of this recipe, and it’s about to become your new obsession.
Imagine stepping into the kitchen on a chilly evening. The air is thick with the aroma of dark chocolate melting in a gentle heat, the faint scent of coffee liqueur dancing in the background. Your ears catch the subtle hiss of the blender as it whirls, and your eyes catch the glossy sheen of chocolate chips glistening like tiny stars. Your tongue tastes the first spoonful—a rich, bittersweet depth that lingers, followed by the creamy, buttery finish of the crust. Your hands feel the cool, smooth surface of the pie, the texture as smooth as silk. This isn’t just dessert; it’s an experience that awakens every sense.
What makes this version stand out? It’s not just the ingredients; it’s the way they work together. I dare you to taste this and not go back for seconds. The secret lies in the balance of sweetness and bitterness, the contrast between the crunchy crust and the silky filling, and the subtle kick of coffee liqueur that elevates the chocolate. Most recipes get this completely wrong by over‑sweetening or under‑cooking the chocolate. Here, the chocolate is cooked just enough to release its full flavor without turning into a hard candy. The result? A pie that is hands down the best version you'll ever make at home.
If you’ve ever struggled with frozen desserts that fall apart or taste flat, you’re not alone—and I’ve got the fix. Picture yourself pulling this out of the freezer, the whole kitchen smelling incredible, the crust crisp and the filling glistening like liquid midnight. You’ll feel the anticipation build as you cut through the top, revealing a glossy, chocolatey core that oozes with every bite. This is pure magic, and by the end of this post, you’ll wonder how you ever made it any other way.
What Makes This Version Stand Out
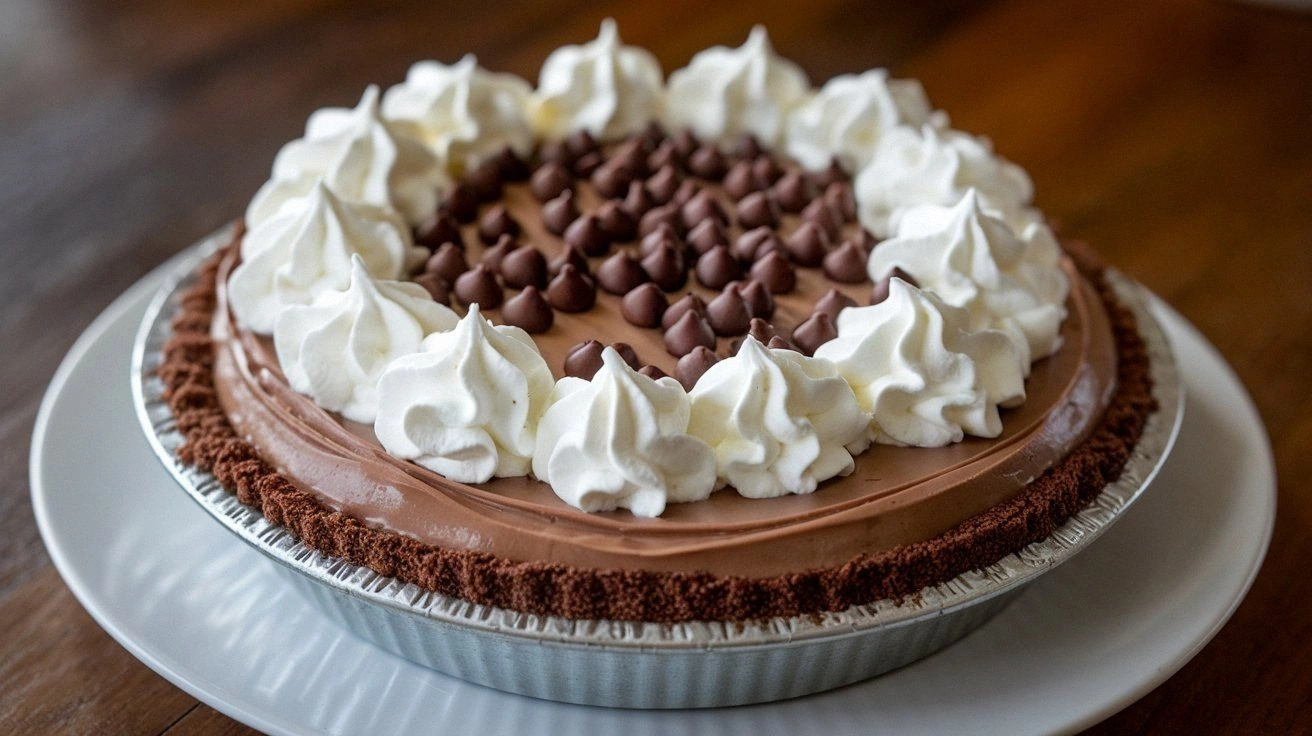
- Depth: The combination of dark chocolate, coffee liqueur, and a hint of vanilla creates layers of flavor that unfold with each bite.
- Texture: A buttery graham cracker crust provides a satisfying crunch that contrasts with the smooth, creamy filling.
- Simplicity: The recipe requires only a handful of ingredients and minimal prep time, making it approachable for beginners.
- Uniqueness: The subtle addition of coffee liqueur gives the pie a sophisticated twist that sets it apart from ordinary chocolate desserts.
- Crowd Reaction: This pie is guaranteed to become the highlight at gatherings, with guests begging for seconds.
- Ingredient Quality: Using high‑grade chocolate and fresh cream ensures a luxurious mouthfeel and rich flavor.
- Make‑ahead: The pie can be assembled a day ahead and frozen, making it perfect for busy schedules.
- Versatility: It pairs beautifully with whipped cream, chocolate shavings, or a drizzle of espresso sauce.
Alright, let’s break down exactly what goes into this masterpiece…
Inside the Ingredient List
The Flavor Base
The foundation of this pie starts with the graham cracker crumbs and melted butter. The crumbs provide a neutral backdrop that absorbs the chocolate’s richness, while the butter adds a buttery depth that keeps the crust from drying out. If you skip the butter, the crust becomes brittle and loses its melt‑in‑your‑mouth quality. For an extra touch, use dark chocolate graham crackers to reinforce the chocolate theme.
The Texture Crew
Heavy cream is the star that turns the chocolate into a silky, mousse‑like filling. Cream’s fat content creates a smooth mouthfeel that balances the chocolate’s intensity. A pinch of sea salt is essential; it cuts through the sweetness and amplifies the chocolate’s flavor. If you’re lactose intolerant, substitute the cream with coconut cream for a dairy‑free version that still delivers that creamy texture.
The Unexpected Star
Coffee liqueur is the secret ingredient that elevates this pie. It adds a subtle bitterness that pairs beautifully with chocolate, giving the dessert a sophisticated adult twist. Don’t be shy—use a high‑quality liqueur, or if you prefer a non‑alcoholic version, add a splash of espresso or strong brewed coffee. The liqueur also helps to set the filling, giving it a firmer structure that holds up during freezing.
The Final Flourish
Chocolate ice cream is folded into the filling just before freezing. It brings a creamy, cold element that contrasts with the warm chocolate base, creating a dynamic texture profile. The chocolate chips, melted into the cream, add bursts of chocolate flavor that melt into the filling. If you want a vegan version, replace the ice cream with a plant‑based alternative and use vegan chocolate chips.
Everything's prepped? Good. Let's get into the real action…
The Method — Step by Step
- First, combine the graham cracker crumbs, melted butter, and ¼ cup sugar in a bowl. Stir until the mixture resembles wet sand. Press the mixture into the bottom of a 9‑inch springform pan, creating an even crust. Chill the crust for 15 minutes to set.
- While the crust chills, melt 1 cup of semi‑sweet chocolate chips in a heat‑proof bowl over a pot of simmering water. Stir until smooth, then remove from heat and let cool slightly.
- In a separate bowl, whisk 2 cups of heavy cream, 1 cup of milk, ¼ cup of coffee liqueur, and 1 tsp vanilla extract until the mixture is frothy. Fold in the melted chocolate until fully incorporated.
- Pour the chocolate mixture over the chilled crust, smoothing the top with a spatula. Sprinkle the crushed chocolate cookies evenly across the surface for an added crunch.
- Fold 1 cup of chocolate ice cream into the mixture, ensuring it’s fully blended. This step is crucial for achieving that creamy, mousse‑like consistency.
- Cover the pan with plastic wrap and place it in the freezer for 6 hours, or until the pie is firm. The key is to let it freeze slowly to avoid ice crystals.
- When ready to serve, let the pie sit at room temperature for 10 minutes to make slicing easier. Use a warm knife dipped in hot water for clean cuts.
- Serve chilled with a drizzle of espresso sauce or a dollop of whipped cream. The contrast between the cold filling and the warm sauce creates a delightful sensory experience.
That’s it—you did it! But hold on, I've got a few more tricks that'll take this to another level. Let’s dive into insider tips that will make every bite flawless.
Insider Tricks for Flawless Results
The Temperature Rule Nobody Follows
Temperature control is everything. Keep the cream at room temperature before whipping; this ensures it folds smoothly into the chocolate. If you add the ice cream too early, it can melt the filling, causing a runny texture. I’ve learned that a 15‑minute chill of the cream before whipping is the sweet spot for a silky finish.
Why Your Nose Knows Best
Smell the chocolate as it melts. A deep, nutty aroma signals the right level of flavor. If it smells flat, give it a minute longer on low heat. The aroma will guide you to the perfect balance between chocolate and coffee.
The 5‑Minute Rest That Changes Everything
After folding the ice cream, let the mixture rest for five minutes before pouring it into the crust. This brief pause allows the ice cream to soften slightly, making it easier to blend without breaking the structure. It also gives the chocolate a chance to set, preventing a runny filling.
The Secret to a Crunchy Crust
If you like a crisp crust, bake the graham cracker base for 5 minutes at 350°F before chilling. This step caramelizes the sugars, giving the crust a golden crunch that contrasts beautifully with the creamy filling.
The Espresso Sauce Touch
A homemade espresso sauce adds a glossy finish and a punch of flavor. Simmer equal parts espresso and sugar until thickened, then drizzle over the pie just before serving. The sauce’s bitterness balances the sweetness, creating a harmonious finish.
Creative Twists and Variations
This recipe is a playground. Here are some of my favorite ways to switch things up:
Minty Madness
Add a tablespoon of fresh mint extract to the filling for a refreshing twist. Top with crushed peppermint candies for added crunch. This variation is perfect for spring celebrations.
Nutty Delight
Replace the graham cracker crust with a pecan crust: mix chopped pecans, butter, and a dash of cinnamon. The nutty flavor pairs wonderfully with the chocolate, creating a layered taste profile.
Caramel Swirl
Swirl caramel sauce into the chocolate mixture before freezing. The caramel adds a buttery sweetness that complements the coffee liqueur, giving the pie a decadent finish.
Vegan Version
Use coconut milk and coconut cream instead of dairy. Swap chocolate chips for dairy‑free dark chocolate. The result is a creamy, indulgent pie that’s completely plant‑based.
Holiday Twist
Add a sprinkle of crushed gingerbread cookies to the crust and a dash of pumpkin spice to the filling. This gives the pie a warm, holiday vibe that’s perfect for Christmas or Thanksgiving.
Alcohol‑Free Alternative
Replace coffee liqueur with a shot of cold brew coffee. The bitterness remains without the alcohol, making the pie suitable for all ages.
Storing and Bringing It Back to Life
Fridge Storage
Store the pie in the refrigerator for up to 3 days. Keep it covered with plastic wrap to prevent it from absorbing fridge odors. If you plan to serve it the next day, let it sit at room temperature for 10 minutes before slicing.
Freezer Friendly
The pie can stay frozen for up to 2 weeks. Wrap it tightly in plastic wrap and then in foil to protect it from freezer burn. When ready to eat, thaw in the refrigerator for 4 hours.
Best Reheating Method
To revive a frozen slice, place it on a microwave‑safe plate and heat on 30‑second intervals until warm. Add a splash of milk or cream before microwaving; this steams the filling back to a silky texture. Avoid over‑heating, or the chocolate may separate.