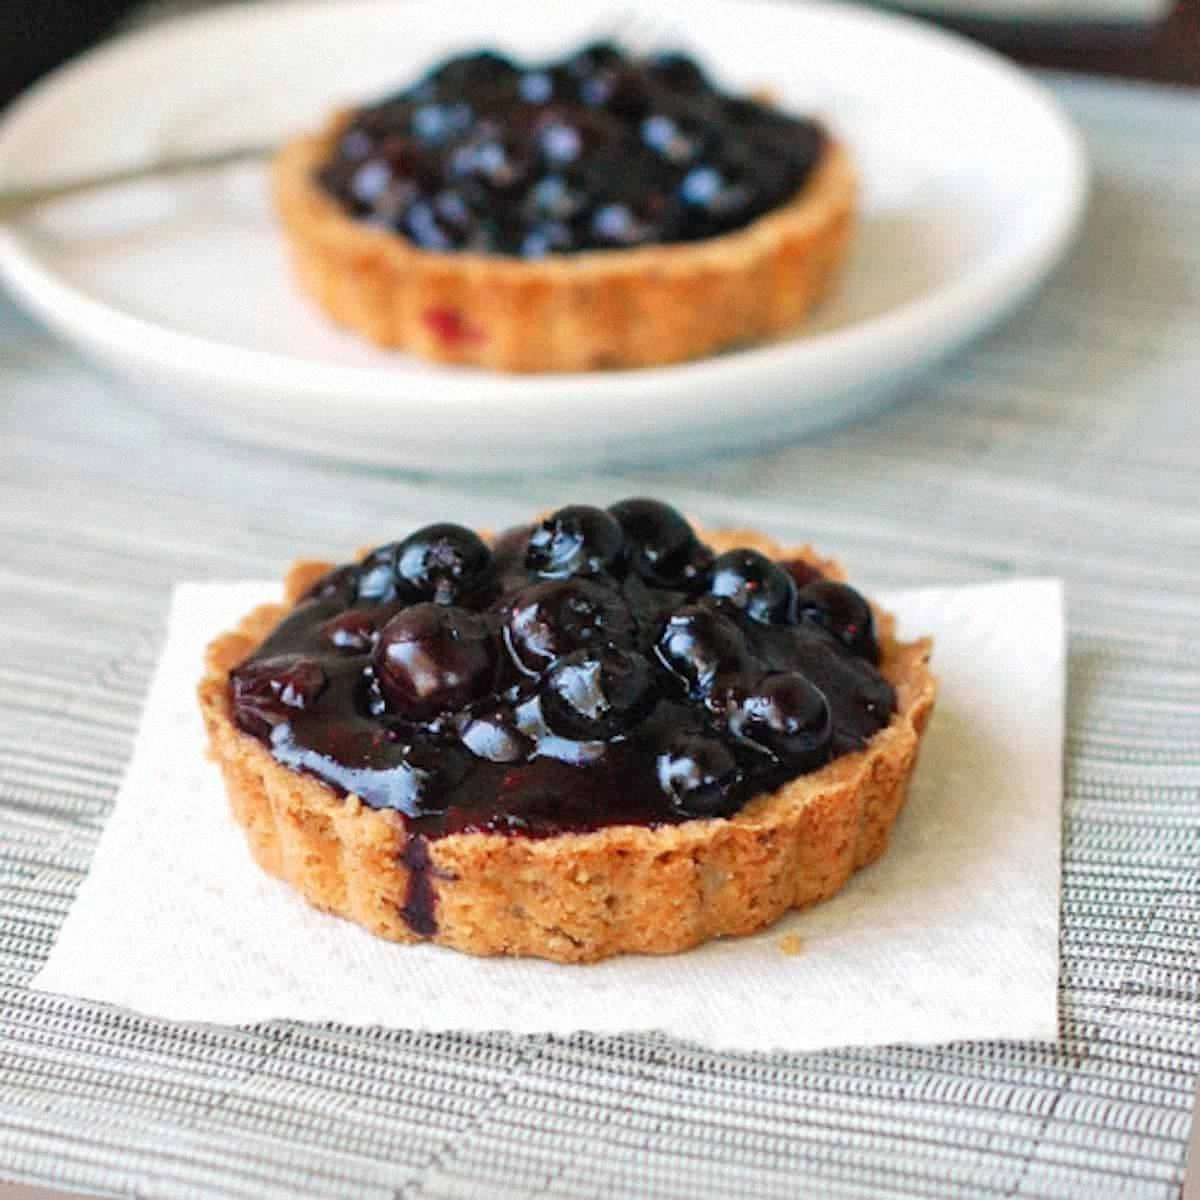
If you’ve ever found yourself standing in the pantry at midnight, staring at a bag of frozen blueberries and wondering why the universe hasn’t blessed you with a proper dessert, you’re not alone. I was in that exact spot last summer, after a marathon of backyard barbecues, when my friend dared me to “make something that looks like it belongs on a bakery window but tastes like summer in a bite.” The result? A batch of Fresh Blueberry Tarts that made the grill‑smoked ribs look like an afterthought. I’ll be honest — I ate half the batch before anyone else got a chance to try them, and I’m still not sorry.
Picture this: the kitchen filled with the sweet perfume of blueberries mingling with a whisper of lemon zest, the buttery crust turning a golden‑brown that glistens like sunrise on a lake, and the filling bubbling just enough to give you that “look, don’t touch” temptation. The first bite is a symphony—crisp, buttery edges that shatter like thin ice, a velvety interior that coats your tongue like a silk scarf, and bursts of blueberry that explode with the intensity of a fireworks finale. The sound of the crust cracking under your fork is the kind of auditory cue that tells you you’ve nailed it, and the lingering aftertaste is a gentle reminder that you’ve just created something unforgettable.
Most blueberry tart recipes get this completely wrong. They either drown the berries in a sugary swamp, or they bake the crust so long that it becomes a rock. This version flips the script by using a chilled dough that’s rolled out thin, a light cornstarch‑kissed filling that stays bright, and a quick‑bake method that locks in the fruit’s natural juices. The secret ingredient? A splash of high‑quality vanilla‑infused heavy cream that you brush on just before the final minutes, giving the tops a glossy finish that looks like they were painted by a pastry chef.
And now the fun part: I’m going to walk you through every single step—by the end, you’ll wonder how you ever made a tart any other way. I dare you to taste this and not go back for seconds. Ready? Let’s get started.
What Makes This Version Stand Out
- Flavor Explosion: The blueberries retain their natural tartness, balanced by a hint of lemon and a whisper of vanilla that makes each bite sing.
- Texture Contrast: A buttery, flaky crust meets a silky, slightly thickened fruit filling that doesn’t turn mushy.
- Simplicity: No fancy mixers or exotic ingredients—just pantry staples and fresh berries.
- Uniqueness: A quick glaze of heavy cream at the end creates a glossy finish that most recipes skip.
- Crowd Reaction: Even the most skeptical eaters admit these tarts are “the best thing they’ve ever had” on the spot.
- Ingredient Quality: Using unsalted, cold butter and plump, ripe blueberries makes a measurable difference.
- Cooking Method: The dough is chilled, rolled thin, and baked at a high temperature for a perfect rise.
- Make‑Ahead Potential: You can assemble the tarts a day ahead and bake them fresh when guests arrive.
Alright, let's break down exactly what goes into this masterpiece...
Inside the Ingredient List
The Flavor Base
Fresh blueberries are the heart of this tart. Choose berries that are deep blue, firm to the touch, and slightly sweet—these will hold their shape and give you that burst of flavor. If you’re forced to use frozen berries, make sure to thaw and pat them dry; excess water will turn the filling soggy. A splash of vanilla extract (about one teaspoon) adds a warm, aromatic undercurrent that elevates the fruit without overwhelming it.
The Texture Crew
All‑purpose flour provides the structure for the crust, while cold unsalted butter creates layers that puff up as steam escapes. The butter should be cut into small cubes and mixed until the mixture resembles coarse crumbs—think sand at the beach, not a paste. A light dusting of cornstarch (two tablespoons) in the filling prevents the juices from making the crust soggy, acting like a tiny barrier that still lets the flavor shine through.
The Unexpected Star
Heavy cream, brushed on just before the final minutes of baking, forms a glossy, buttery sheen that makes the tarts look restaurant‑ready. It also adds a subtle richness that balances the tartness of the berries. If you’re dairy‑free, a thin layer of almond milk mixed with a dash of maple syrup works surprisingly well, though you’ll lose a touch of that luxurious sheen.
The Final Flourish
Lemon zest is the secret weapon that cuts through the sweetness and adds a bright, citrusy pop. Just a tablespoon of zest—no more—will keep the flavor lively without turning the tart sour. Finally, a pinch of sea salt (about a quarter teaspoon) enhances every other flavor, making the berries taste sweeter and the crust richer.
Everything's prepped? Good. Let's get into the real action...
The Method — Step by Step
Start by whisking together 2 cups of all‑purpose flour, 1/4 teaspoon of salt, and 1/4 cup of granulated sugar in a large bowl. The sugar isn’t just for sweetness; it helps the butter caramelize slightly, giving the crust a subtle golden hue. I like to sift the dry ingredients to avoid any clumps that could lead to uneven texture later. This step sets the foundation for a crust that’s both tender and sturdy.
Cut 1/2 cup of cold unsalted butter into small cubes and add it to the flour mixture. Using a pastry cutter or two forks, work the butter into the dry ingredients until the mixture resembles coarse crumbs—think tiny pebbles, not a paste. This is where the magic of a flaky crust begins; the butter’s ice crystals will melt in the oven, creating steam that lifts the dough. Power transition: Okay, ready for the game‑changer?
Kitchen Hack: If the butter starts to soften, pop the bowl in the freezer for 5 minutes—this keeps the dough cold and ensures a flaky result.Make a well in the center of the mixture and pour in 1 egg, lightly beaten, along with 2 teaspoons of vanilla extract. Stir gently until the dough just comes together; you don’t want to overwork it. Over‑mixing develops gluten, which can make the crust tough instead of tender. The dough should feel slightly sticky but manageable—if it’s too dry, add a tablespoon of ice‑cold water, one at a time.
Gather the dough into a disc, wrap it in plastic wrap, and refrigerate for at least 30 minutes. This chilling period relaxes the gluten and firms up the butter, both essential for a crisp, layered crust. While the dough rests, you can prep the filling, which is where the flavor really shines.
In a separate bowl, combine 2 cups of fresh blueberries, 2 tablespoons of cornstarch, 2 tablespoons of lemon zest, and a pinch of salt. Toss gently until the berries are evenly coated. The cornstarch will thicken the juices as the tarts bake, preventing a soggy bottom, while the lemon zest adds that bright pop that cuts through the sweetness.
Preheat your oven to 425°F (220°C). While it heats, roll out the chilled dough on a lightly floured surface to about 1/8‑inch thickness. Using a 4‑inch tart pan (or a muffin tin for mini versions), gently press the dough into the wells, making sure there are no air pockets. Trim any excess dough with a sharp knife, then prick the base with a fork to stop it from puffing up excessively.
Place a sheet of parchment paper over each crust and fill with pie weights or dried beans. Bake the blind‑baked shells for 10‑12 minutes, until the edges start to turn a light golden brown. Remove the weights and parchment, then let the shells cool for a couple of minutes. Watch Out: If you skip the blind‑bake, the crust will become soggy once the blueberry filling is added.
Watch Out: Over‑baking the crust at this stage can lead to a burnt edge; keep a close eye on the color.Once the shells are lightly golden, spoon the blueberry mixture into each crust, filling them just below the rim. The berries will swell as they bake, so don’t over‑fill. For an extra touch of elegance, drizzle a thin line of heavy cream (about 1/2 cup) over the top of each tart; the cream will set into a glossy sheen.
Return the tarts to the oven and bake for an additional 12‑15 minutes, or until the filling is bubbling and the crust is a deep, buttery gold. The scent at this point is pure heaven—the sweet‑tart aroma mingling with buttery notes fills the kitchen and makes you want to dance. When you see the edges pulling away from the pan, you know they’re done.
Remove the tarts from the oven and let them rest on a wire rack for five minutes. This short rest lets the filling set, making it easier to slice without the berries spilling out. Serve warm, dusted with a light sprinkle of powdered sugar if you like, or keep them as‑is for a more natural look. That sizzle when it hits the pan? Absolute perfection.
That's it — you did it. But hold on, I've got a few more tricks that'll take this to another level...
Insider Tricks for Flawless Results
The Temperature Rule Nobody Follows
Most home bakers bake at a moderate 350°F, but cranking the oven up to 425°F for the initial bake creates steam that lifts the layers of butter, resulting in that coveted flaky texture. I once tried a lower temperature and ended up with a dense, biscuit‑like crust that was more “cookie” than “tart.” Trust the heat; it’s the secret behind pastry chef‑level crusts.
Why Your Nose Knows Best
Don’t rely solely on a timer. The moment the kitchen fills with that sweet‑tart aroma and you hear a faint bubbling, you know the filling is ready. If you’re unsure, lift a tart gently; the edges should be firm, and the center should jiggle just a touch. Your nose is the ultimate thermometer for baked goods.
The 5‑Minute Rest That Changes Everything
After the tarts come out of the oven, let them sit for exactly five minutes. This short pause allows the juices to redistribute, preventing a runny bottom. Skipping this step is a common mistake that leads to soggy crusts—trust me, I’ve learned that the hard way.
Butter Brush Brilliance
Brushing the crust with a little melted butter before the final bake adds a subtle sheen and deepens the flavor. It also helps the powdered sugar adhere later, if you choose to dust them. A thin coat is enough; too much will make the crust greasy.
Freeze for Later, Bake When Needed
If you want to prep ahead, assemble the tarts (crust + filling) and freeze them unbaked. When you’re ready to serve, add an extra 5‑7 minutes to the bake time. This trick saved me during a holiday gathering when I was short on time, and the results were just as fresh as if they’d been made that day.
Creative Twists and Variations
This recipe is a playground. Here are some of my favorite ways to switch things up:
Raspberry‑Lemon Fusion
Swap half of the blueberries for fresh raspberries and add a teaspoon of lemon juice to the filling. The raspberries bring a gentle tartness that pairs beautifully with the lemon zest, creating a bright, summery flavor profile.
Almond‑Infused Crust
Replace ¼ cup of the flour with finely ground almond flour. The almond adds a nutty depth that complements the berries, and the crust takes on a slightly darker hue—perfect for a more sophisticated look.
Chocolate Drizzle Delight
Once the tarts have cooled, drizzle melted dark chocolate over the tops. The bittersweet chocolate adds a luxurious contrast to the sweet berries, making each bite feel like a mini dessert indulgence.
Spiced Autumn Version
Add a pinch of ground cinnamon and a dash of nutmeg to the blueberry mixture. This warm spice blend transforms the tarts into a cozy autumn treat, especially when paired with a dollop of whipped cinnamon‑infused cream.
Mini Tart Pops
Use a mini muffin tin instead of a larger tart pan, and insert a wooden skewer into each before baking. These bite‑size pops are perfect for parties, and the skewer makes them easy to serve and eat while standing.
Storing and Bringing It Back to Life
Fridge Storage
Place the cooled tarts in an airtight container and store them in the refrigerator for up to three days. The crust will stay crisp for the first 24 hours, after which it may soften slightly—but a quick reheating will bring it back.
Freezer Friendly
Freeze unbaked tarts (crust + filling) on a parchment‑lined tray, then transfer to a zip‑top bag. They’ll keep for up to two months. When you’re ready, bake them straight from frozen, adding an extra 5‑7 minutes to the bake time.
Best Reheating Method
To revive a refrigerated tart, preheat the oven to 350°F, place the tart on a baking sheet, and add a tiny splash (about a tablespoon) of water to the edge of the pan. Cover loosely with foil and heat for 8‑10 minutes; the steam will restore the crust’s crispness while the filling stays juicy.