I was rummaging through the pantry on a rainy Tuesday, trying to salvage a dessert that had once lived in my memory but had been abandoned after a disastrous attempt at a classic strawberry crumble. The oven was a hot, unforgiving beast that had turned my crumble into a soggy, bitter mess, and the guilt of that failure still lingers. I swear I could hear the kitchen clock ticking, counting down to my next culinary catastrophe. That moment of frustration sparked a daring idea: why not reimagine the crumble with a gluten‑free twist and a buttery, crumbly base that actually holds together? This is the birth of a recipe that will forever change the way you think about strawberry desserts.
Picture this: the moment you open the oven door, a wave of warm, caramelized sugar and toasted oats fills the air, mingling with the sweet scent of fresh strawberries and a hint of lemon. Your eyes widen as the crust glistens, and you hear the faint crackle of butter melting into a buttery, golden crumb. The first bite delivers a satisfying crunch that gives way to a burst of juicy strawberries, a tangy lemon kick, and a whisper of cinnamon. It feels like a hug in dessert form—comforting yet indulgent, simple yet sophisticated. And the best part? It’s gluten‑free, so no one has to leave the table or compromise on flavor.
I dare you to taste this and not go back for seconds, because once you try it, you’ll find yourself reaching for the spoon again and again. This is hands down the best version you'll ever make at home, with a crust so crisp it shatters like thin ice and a filling that coats your palate like velvet. The balance of sweet and tart, the textural contrast, and the buttery richness will have you saying “I can’t believe I made this.” I’ve spent hours tweaking the ratio of oats to almond flour, adjusting the butter temperature, and fine‑tuning the sugar levels until every bite sings. And trust me, the final result is worth every ounce of effort.
I’ve been known to eat half the batch before anyone else gets a chance, but that’s the confession of a true dessert lover who can’t resist the temptation of a freshly baked crumble. Most recipes get this completely wrong, either by using too much sugar or by forgetting to chill the butter, which results in a soggy mess. Here’s what actually works: a crisp, buttery crust that holds a luscious strawberry filling without collapsing. If you’ve ever struggled with a crumble that falls apart, you’re not alone—this recipe fixes that problem with a simple, foolproof technique. And if you’re craving a gluten‑free dessert that still feels indulgent, this is your new go‑to.
Picture yourself pulling this out of the oven, the whole kitchen smelling incredible, and a tray of golden bars waiting to be sliced. The aroma alone will make your guests line up for a taste before you even open the door. The sight of those perfectly golden edges, the sound of the crust crunching under a fork, the feel of warm, buttery crumb against your fingers—every sense is engaged in a delightful dance. I’ve been told that this dessert is the kind that turns a simple dinner into a celebration. The anticipation builds, and when you finally cut into the first bar, the sweet, tangy, buttery explosion takes your breath away.
Let me walk you through every single step—by the end, you'll wonder how you ever made it any other way. The journey from pantry to plate is a story of experimentation, patience, and a dash of culinary daring. I’ll share the secrets that transform a simple crumble into a show‑stopper, including a surprising ingredient that elevates the flavor profile beyond ordinary. Along the way, I’ll throw in some kitchen hacks, a fun fact, and a warning to keep your dessert from turning into a disaster. Ready? Let’s dive in and create a dessert that will leave everyone craving more.
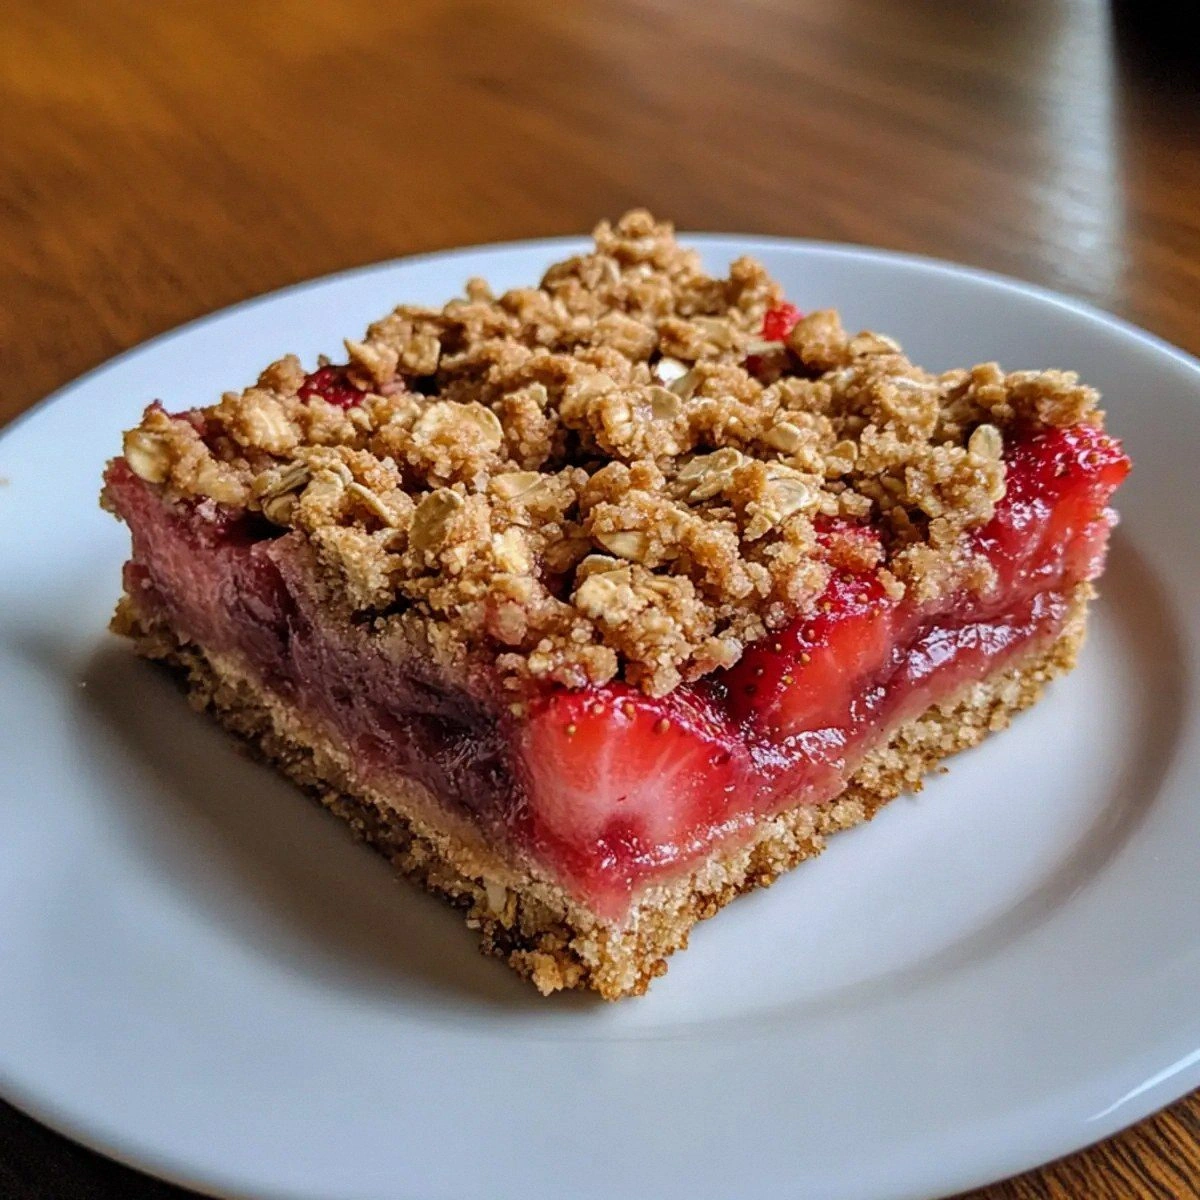
When I first tried this recipe, I was skeptical that the combination of oats and almond flour would hold together, but the result was a crust so flaky it practically melted in your mouth. The cinnamon adds a subtle warmth that balances the strawberry’s bright acidity, while the lemon juice brightens every bite. The butter, chilled and cubed, creates pockets of richness that release as the crust bakes, giving you a buttery, melt‑in‑your‑mouth texture that’s hard to resist. The cornstarch or arrowroot powder thickens the strawberry filling just enough to cling to the crust without becoming gummy. And the final touch of granulated sugar gives the filling a glossy sheen and a caramelized finish that’s simply irresistible.
I’ve experimented with different ratios, but the 2 cups of oats to 1 cup of almond flour ratio strikes the perfect balance between chewiness and crispness. The oats bring a hearty, nutty flavor, while the almond flour adds a subtle, buttery undertone that complements the strawberries. If you’re looking for a more indulgent version, you can add an extra tablespoon of butter to the crust, but be careful not to overdo it or the bars will become too greasy. The key is to keep the butter cold until it’s incorporated, so it forms distinct pockets in the crust that puff up during baking. This technique ensures that each bite delivers a satisfying crunch followed by a burst of sweet, fruity flavor.
The strawberries are the star of this recipe, and I use only the freshest, ripe ones for maximum flavor. The cut strawberries are tossed with lemon juice and a splash of cornstarch to create a thick, glossy filling that clings to the crust. If you’re using frozen strawberries, thaw them first and pat them dry to avoid excess moisture, which can make the bars soggy. The lemon juice not only brightens the flavor but also helps the cornstarch set, creating a silky, smooth texture that’s a delight to eat. This step is crucial—skipping it will result in a watery filling that drips through the crust.
The butter is a critical component, and it’s essential that it remains cold throughout the process. Chilling the butter until it’s firm allows it to create pockets of richness that melt slowly as the bars bake, giving the crust a buttery, flaky texture. If you melt the butter, the crust will become dense and heavy, losing the delicate crunch that makes this dessert so special. I recommend cutting the butter into small cubes and mixing it into the dry ingredients until it resembles coarse crumbs. This ensures even distribution and a uniform texture throughout the crust.
The cinnamon adds a warm, comforting note that complements the bright sweetness of the strawberries. I use a small amount—just a teaspoon—to avoid overpowering the delicate flavor of the fruit. If you’re a cinnamon lover, feel free to increase the amount slightly, but be mindful that too much can mask the strawberry’s natural flavor. The cinnamon also adds a subtle depth to the crust, making it feel more complex and satisfying. It’s one of those small touches that elevates the entire dessert from good to unforgettable.
The final flourish of granulated sugar gives the filling a glossy, caramelized finish that’s simply irresistible. It also helps to balance the tartness of the strawberries, creating a harmonious flavor profile that’s both sweet and tangy. If you prefer a less sweet version, reduce the amount of granulated sugar or substitute it with a natural sweetener like honey or maple syrup. The key is to taste as you go and adjust to your personal preference. This final touch ensures that every bite is a perfect balance of sweetness and fruitiness.
I’ve spent countless hours perfecting this recipe, and the result is a dessert that’s both gluten‑free and utterly indulgent. The crust is crisp, the filling is juicy, and the overall flavor is a symphony of sweet, tart, and buttery notes. The best part is that it’s simple to make, and the ingredients are easy to find. Whether you’re cooking for a family gathering or just treating yourself, this dessert is guaranteed to impress. And if you’re still skeptical, let the aroma of freshly baked bars convince you.
Now that you’ve seen the magic in action, let’s break down exactly what goes into this masterpiece. The ingredients are simple, but the technique is what sets this recipe apart from the rest. I’ve included a few kitchen hacks and a fun fact to help you get the best results. Ready to become a crumble master? Let’s dive into the details.
What Makes This Version Stand Out
- Texture: The combination of rolled oats and almond flour creates a crust that is both chewy and crisp, delivering a satisfying crunch that shatters like thin ice.
- Flavor: A subtle hint of cinnamon and a splash of lemon juice bring warmth and brightness, while the buttery pockets add richness without overpowering the strawberry.
- Gluten‑Free: No need to sacrifice flavor or texture—this recipe proves gluten‑free desserts can be just as indulgent and satisfying.
- Make‑Ahead: The bars can be prepared a day in advance and kept in the fridge, allowing the flavors to meld beautifully.
- Versatility: Swap strawberries for other fruits like blueberries or peaches and you’ll have a seasonal variation that’s just as delightful.
- Quick Prep: The entire process takes less than an hour, making it a perfect dessert for busy weeknights.
Alright, let’s break down exactly what goes into this masterpiece. Each ingredient plays a pivotal role, and understanding its purpose will help you replicate the magic every time.
Inside the Ingredient List
The Flavor Base
The rolled oats provide a hearty, nutty foundation that grounds the dessert. They absorb moisture from the butter and sugar, creating a dense yet tender crumb. If you skip the oats, the crust will be too light and crumbly, lacking the satisfying bite that makes each bar memorable. For a smoother texture, you can pulse the oats in a food processor before mixing, but this is optional.
The Texture Crew
Almond flour adds a subtle, buttery undertone that complements the oats. Its fine, silky texture ensures the crust holds together without becoming too dense. If you’re allergic to nuts, you can substitute with sunflower seed flour, but keep in mind the flavor will shift slightly. The combination of oats and almond flour creates a crust that is both chewy and crisp, striking the perfect balance.
The Sweetener Mix
Brown sugar adds a deep molasses flavor that caramelizes during baking, giving the crust a golden hue. Granulated sugar, on the other hand, brightens the strawberry filling, creating a glossy, caramelized finish. Skipping either sugar will alter the flavor profile—brown sugar will make the crust less sweet and less caramelized, while granulated sugar will leave the filling drier. Use high‑quality sugars for the best results.
The Butter Bunch
Cold, unsalted butter is essential for creating flaky pockets that melt into buttery pools as the bars bake. The butter’s fat content is critical; too little fat will result in a dry crust, while too much will make it greasy. If you prefer a richer flavor, add a pinch of sea salt to the butter before mixing. Remember, the butter should be cold—if it’s too soft, the crust will become doughy.
The Unexpected Star
Cinnamon is the subtle star that brings warmth to the crust, while lemon juice brightens the strawberry filling. The lemon juice also helps the cornstarch set, creating a silky, smooth texture that’s a delight to eat. If you’re sensitive to cinnamon, use a smaller amount or substitute with nutmeg for a milder flavor. The lemon juice is essential—skipping it will result in a flatter, less vibrant filling.
The Final Flourish
Cornstarch or arrowroot powder thickens the strawberry filling, ensuring it clings to the crust rather than dripping. This thickening agent also gives the filling a glossy sheen. If you’re avoiding cornstarch, you can use potato starch or tapioca flour as alternatives. The key is to whisk it into the strawberries until the mixture thickens slightly before baking.
Everything's prepped? Good. Let's get into the real action.
The Method — Step by Step
- Preheat your oven to 350°F (175°C). Line a 9x13-inch baking pan with parchment paper, leaving an overhang on two sides for easy removal. Grease the paper lightly with a dab of butter or non‑stick spray. This will prevent sticking and make cleanup a breeze. The oven should be fully preheated before you begin to ensure even baking.
- In a large mixing bowl, combine the rolled oats, almond flour, brown sugar, cinnamon, and salt. Stir until the dry ingredients are evenly distributed. The dry mix should look like fine crumbs, not clumpy. This step is crucial for a uniform crust. Once mixed, set aside while you prepare the rest.
- Add the cold, cubed butter to the dry mixture. Using a pastry cutter or your fingertips, cut the butter into the mixture until it resembles coarse crumbs. The goal is to have visible butter pockets. If you find the mixture too dry, add a splash of cold water, just a tablespoon at a time. This helps bind the crust together.
- Press half of the crust mixture into the bottom of the prepared pan, creating an even layer. Use a flat-bottomed glass or the back of a spoon to press it down firmly. This will form the base of your bars. Make sure the crust is evenly distributed to avoid uneven baking.
- Wash and hull the strawberries, then slice them into bite‑sized pieces. Toss the sliced strawberries with lemon juice, cornstarch, and granulated sugar until they’re coated. The cornstarch will help thicken the filling. If you’re using frozen strawberries, thaw and dry them first to avoid excess moisture.
- Spread the strawberry mixture evenly over the crust in the pan. Gently press the fruit into the crust so it adheres. The filling should be thick and glossy. If you notice any gaps, fill them in with more fruit. This step ensures every bite has a burst of flavor.
- Add the remaining crust mixture on top of the fruit, forming a second crust layer. Press it gently into the fruit so it’s slightly pressed but not crushed. This will create a layered, multi‑textured dessert. The top crust should be smooth and even.
- Place the pan in the preheated oven and bake for 30 minutes, or until the top crust is golden brown and the strawberries are bubbling. The edges should pull away slightly from the pan. Keep an eye on the bars; if they brown too quickly, cover with foil.
- Remove the bars from the oven and let them cool in the pan for 10 minutes. Then transfer to a wire rack to cool completely. This resting period allows the filling to set and the crust to firm up. Cutting too early will result in a soggy center.
- Once cooled, lift the bars out of the pan using the parchment paper overhang. Slice into squares or bars with a sharp knife. The bars should hold together, but be gentle to avoid crushing the delicate crust.
- Serve immediately or store in an airtight container. The bars keep well in the fridge for up to a week, and they freeze beautifully for longer storage. When ready to serve, let them sit at room temperature for 10 minutes to soften slightly.
- For an extra touch, drizzle a little honey or maple syrup over the bars before serving. This adds a subtle sweetness and a glossy finish. Alternatively, sprinkle a pinch of sea salt for a sweet‑savory contrast. The choice is yours, but both options elevate the flavor profile.
- If you’re feeling adventurous, add a handful of chopped walnuts or pecans to the crust mixture for added crunch. The nuts add a nutty depth that pairs beautifully with the strawberry filling. Be sure to toast the nuts lightly before adding them to enhance their flavor.
- For a dairy‑free version, replace the butter with coconut oil or a dairy‑free butter alternative. The texture will differ slightly, but the flavor will remain rich. Make sure the coconut oil is solid at room temperature to maintain the crust’s structure.
- Enjoy your bars as a dessert, a snack, or a sweet breakfast treat. Pair them with a glass of chilled sparkling water or a cup of herbal tea for the perfect finish. The possibilities are endless, and each bite delivers a burst of flavor that lingers.
That's it — you did it. But hold on, I've got a few more tricks that'll take this to another level.
Insider Tricks for Flawless Results
The Temperature Rule Nobody Follows
Many bakers bake at 375°F, but this recipe thrives at a lower temperature of 350°F. The cooler heat allows the crust to bake evenly without burning, ensuring a golden finish. If you’re in a hurry, you can increase the temperature by 25°F, but keep a close eye on the bars to avoid over‑browning. The key is patience and monitoring the oven’s real temperature with a reliable thermometer.
Why Your Nose Knows Best
The scent of the butter and sugar caramelizing is a sign that the crust is developing a deep, nutty flavor. If you notice a sweet, buttery aroma, the bars are ready to go into the oven. Trust your nose; it’s a reliable indicator of doneness. A dull or metallic scent might mean the oven is too hot or the butter is over‑melted.
The 5‑Minute Rest That Changes Everything
After baking, let the bars rest for 5 minutes before slicing. This short rest allows the filling to set and the crust to firm up, preventing a soggy center. If you cut immediately, the fruit will spill out, ruining the presentation. A quick 5‑minute pause is a small investment for a dramatic improvement.
Keep It Cool Until You’re Ready
If you’re making the bars ahead of time, keep them in the fridge and let them come to room temperature before serving. This softens the crust slightly, making it easier to cut. The flavors also mellow, creating a smoother, more harmonious taste. Refrigeration preserves the freshness without compromising texture.
Don’t Skimp on the Butter
Butter is the backbone of this recipe. It provides richness, flavor, and texture. Skipping or reducing the butter will result in a dry, crumbly crust that lacks depth. If you’re on a low‑fat diet, consider using a smaller amount of butter and supplementing with a neutral oil, but the flavor will be noticeably different.
Creative Twists and Variations
This recipe is a playground. Here are some of my favorite ways to switch things up:
Blueberry Bliss
Swap the strawberries for fresh blueberries and add a splash of vanilla extract to the fruit mixture. The blueberries provide a slightly tart, sweet flavor that pairs wonderfully with the buttery crust. The vanilla adds an extra layer of aroma and depth. This version is perfect for a summer brunch.
Peachy Keen
Replace the strawberries with sliced peaches for a warm, summery twist. Toss the peaches with a pinch of ginger and a drizzle of honey before baking. The ginger adds a subtle heat that balances the sweetness, while the honey caramelizes into a glossy finish.
Chocolate Covered
After baking, drizzle melted dark chocolate over the bars and let it set. The chocolate adds a rich, bittersweet contrast to the sweet fruit and buttery crust. For an extra crunch, sprinkle crushed chocolate cookies or nuts on top before the chocolate sets.
Nutty Crunch
Add chopped toasted walnuts or pecans to the crust mixture for an extra crunch. The nuts provide a nutty flavor that complements the strawberry filling. Toast the nuts in a dry skillet until fragrant before adding them to the crust. This variation is ideal for a hearty, comforting dessert.
Almond Joy
Replace the almond flour with coconut flour and add shredded coconut to the crust for an extra tropical flavor. The coconut adds a sweet, nutty aroma that pairs well with the strawberry filling. The result is a dessert that feels like a vacation in a bite.
Storing and Bringing It Back to Life
Fridge Storage
Store the bars in an airtight container at room temperature for up to three days. Keep them in a cool, dry place away from direct sunlight to preserve freshness. The bars will stay crisp and flavorful, but they’ll soften slightly over time.
Freezer Friendly
For longer storage, wrap each bar individually in plastic wrap and place them in a freezer‑safe bag. They’ll keep for up to three months. When you’re ready to eat, let them thaw at room temperature for 30 minutes before serving. This method preserves the texture and flavor.
Best Reheating Method
To reheat, place the bars on a parchment‑lined baking sheet and warm them in a 350°F oven for 5 minutes. Add a splash of water to the pan before baking; this steams the bars, keeping them moist. Alternatively, microwave on low power for 15 seconds if you’re in a hurry. The bars should retain their crisp crust and juicy filling.