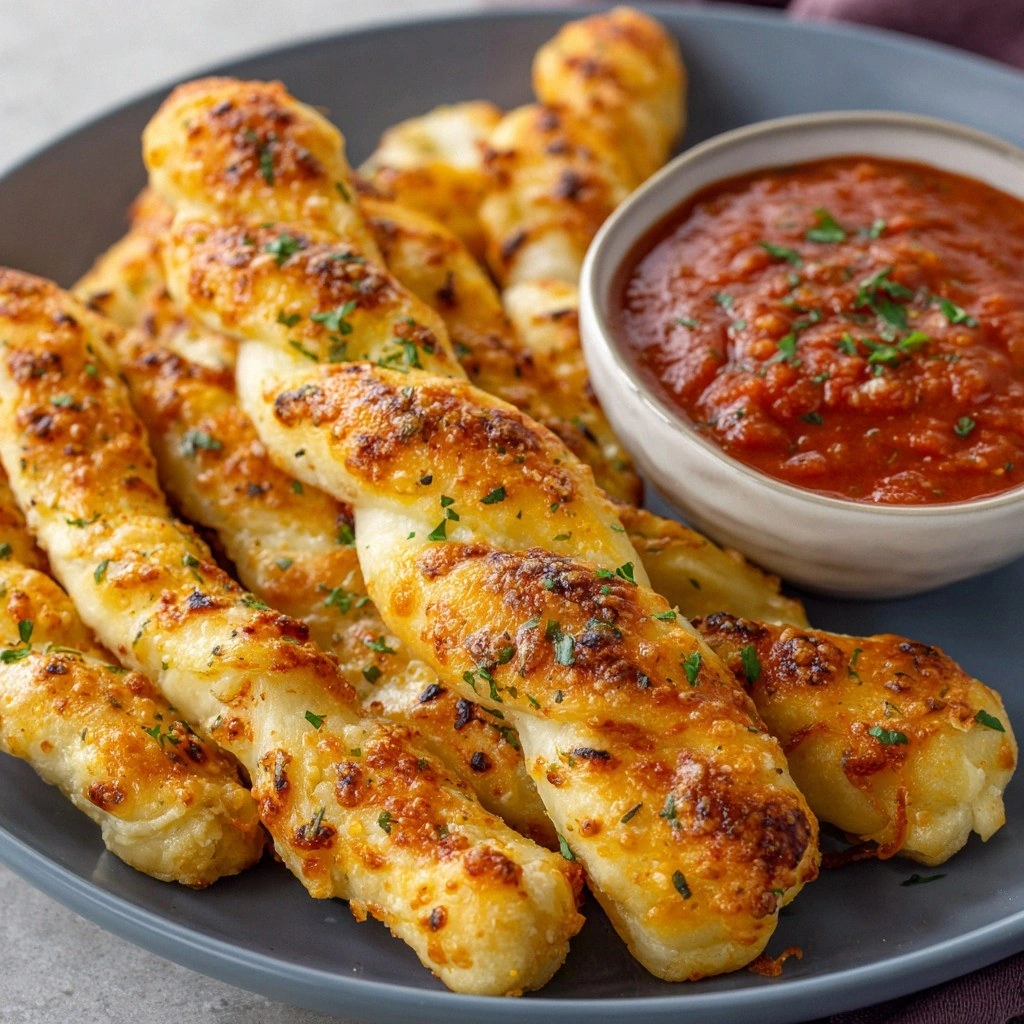
I was in the middle of a late‑night pizza binge when my phone buzzed with a friend’s dare: “Show me the best pizza dough dip you’ve ever made.” The kitchen was a chaotic mess—cheese drips, flour dust, and the sweet scent of tomato sauce still clinging to my hands. I stared at the empty countertop, feeling the familiar itch for something crispy, cheesy, and utterly irresistible. That moment sparked a culinary revelation: why not turn the classic pizza dough into bite‑size dippers that can be served on the fly? The result is a crunchy, melty, flavor‑packed snack that feels like a party in every bite.
Picture this: golden edges that crackle like thin ice under your knife, a molten mozzarella core that stretches like a silky ribbon, and a tangy tomato sauce that coats each piece like velvet. The aroma alone—warm dough, garlic, and oregano—has the power to draw a room together, while the first bite delivers a satisfying crunch followed by a savory explosion. I dare you to taste this and not go back for seconds. When you finish, you’ll wonder how you ever made pizza dough in any other shape.
What sets these dippers apart isn’t just the dough; it’s the meticulous layering of flavors and textures that elevate them from simple snack to culinary triumph. The dough is brushed with a hint of olive oil for a buttery sheen, then rolled thin and cut into perfect squares. Each piece is topped with a spoonful of sauce, a sprinkle of cheese, and a dash of fresh basil before a final bake that crisps the edges while keeping the center tender. The result? A bite‑size pizza that feels indulgent yet is surprisingly light.
I’ll be honest—after making the first batch, I ate half before anyone else even got a chance. Most recipes get this completely wrong, either by overbaking the dough or using too much sauce, leading to soggy, flavorless results. This version, however, balances moisture and crunch flawlessly. Picture yourself pulling the golden dippers out of the oven, the whole kitchen smelling incredible, and watching the crowd’s faces light up with delight. Let me walk you through every single step—by the end, you’ll wonder how you ever made it any other way.
What Makes This Version Stand Out
- Taste: The sauce is a symphony of tomatoes, garlic, and oregano that complements the dough’s subtle sweetness. The cheese blend melts into a creamy, savory coating that holds the pieces together.
- Texture: Crispy edges give way to a tender, airy center, creating a delightful contrast that keeps you coming back for more.
- Simplicity: All you need is pantry staples and a few minutes of prep, making it perfect for spontaneous gatherings.
- Uniqueness: The square shape and dip‑ready design set these apart from traditional pizza slices or calzones.
- Crowd Reaction: Friends rave about the bite‑size convenience and the way the cheese stretches when pulled apart.
- Ingredient Quality: Using high‑quality olive oil and fresh basil elevates the flavor profile beyond mass‑market pizza.
- Cooking Method: A quick bake at a high temperature locks in moisture while crisping the exterior.
- Make‑Ahead Potential: The dough can be prepared a day ahead and frozen, allowing you to assemble and bake on demand.
Inside the Ingredient List
The Flavor Base
All‑purpose flour: The backbone of the dough, providing structure and a neutral canvas for the other flavors. A lower protein flour keeps the dippers tender; using bread flour will make them chewier. If you skip it, the dough won’t hold together, and the final product will crumble. For best results, sift the flour to aerate it and reduce clumps.
The Texture Crew
Active dry yeast: The leavening agent that gives the dough its airy pockets. Yeast also contributes a subtle tang that balances the richness of the cheese. If you forget to proof it in warm water, the dough may not rise properly, leading to dense dippers. A quick test—place a small amount of dough in a bowl; if it expands noticeably, it’s ready.
The Unexpected Star
Fresh basil: Adds a burst of herbaceous freshness that cuts through the richness of the cheese. Basil’s aromatic oils coat the dough, creating a subtle perfume that lingers on the tongue. If you use dried basil, the flavor will be muted; consider adding it at the end of baking to preserve its potency.
The Final Flourish
Olive oil: Brushed on the dough before baking, it gives a glossy finish and helps the edges crisp. Olive oil also enhances the flavor of the tomato sauce, creating a cohesive taste profile. Skipping the oil will result in a drier product that doesn’t hold sauce as well.
Everything's prepped? Good. Let's get into the real action and watch the dough transform into a mouth‑watering snack.
The Method — Step by Step
- Combine 2 cups of all‑purpose flour, 1 tsp of salt, 1 tsp of sugar, and 1 tsp of active dry yeast in a large mixing bowl. Stir the dry ingredients together to ensure even distribution of the yeast. The yeast needs to be evenly dispersed; otherwise, some parts of the dough may not rise.
- In a separate cup, mix 3/4 cup of warm water (about 110°F) with 2 tbsp of olive oil. Pour the liquid mixture into the dry ingredients and stir until a shaggy dough forms. This step is crucial—too much water will make the dough sticky, too little will make it tough.
- Turn the dough onto a lightly floured surface and knead for about 8–10 minutes until it’s smooth and elastic. A well‑kneaded dough will have a slight sheen and will pass the window‑pane test, where you can stretch a small piece thin enough to see light through.
- Place the dough in a lightly oiled bowl, cover it with a damp towel, and let it rise in a warm spot for 1 hour or until it doubles in size. The rising time can vary depending on room temperature; if it’s cooler, give it a little extra time.
- While the dough is rising, prepare your toppings: mix 1 cup of pizza sauce with 1/2 tsp of garlic powder, 1 tsp of Italian seasoning, and a handful of chopped fresh basil. This sauce will be the heart of each dip, so make sure it’s well‑seasoned.
- After the dough has risen, punch it down to release the air. Divide it into 12 equal portions and roll each into a small ball. Then roll each ball into a 2‑inch square, keeping the thickness consistent for even baking.
- Preheat your oven to 425°F (220°C) and line a baking sheet with parchment paper. Place the dough squares onto the sheet, leaving a small space between each piece. This spacing ensures that the edges crisp up nicely.
- Brush each square lightly with olive oil, then spoon a tablespoon of the prepared sauce onto each piece. Sprinkle 1 cup of shredded mozzarella and 1/4 cup of grated Parmesan over the sauce. The combination of cheeses creates a gooey, golden top.
- Bake for 12–15 minutes, or until the edges are golden brown and the cheese is bubbly. Keep an eye on them—oven temperatures can vary, and you don’t want the tops to burn.
- Remove the dippers from the oven and let them cool for 2 minutes before serving. The cheese will be hot, so a brief rest prevents burns and allows the flavors to settle.
That's it—you did it! But hold on, I've got a few more tricks that'll take this to another level. These insider tips will help you master the dough, perfect the bake, and ensure every bite is a triumph.
Insider Tricks for Flawless Results
The Temperature Rule Nobody Follows
Many people bake at 400°F, but the secret is a hotter oven—425°F. The higher temperature creates a rapid rise that locks in moisture while crisping the crust. If your oven runs hot, lower the temperature by 25°F to avoid burning the tops.
Why Your Nose Knows Best
As the dippers bake, the aroma of baking cheese and tomato sauce will fill the kitchen. Trust your nose—when you smell the cheese bubbling and the dough turning golden, it’s the perfect moment to pull them out. A premature removal will leave the edges undercooked.
The 5‑Minute Rest That Changes Everything
Letting the dippers rest for 5 minutes after baking allows the cheese to set, preventing it from sliding off when you serve. It also lets the steam redistribute, giving each bite a tender interior. Skipping this step can result in a messy, cheese‑leakage disaster.
Use a Pizza Stone for Authentic Crunch
If you have a pizza stone, preheat it for at least 30 minutes before baking. The stone’s heat retention creates a crisp base that’s hard to replicate on a regular baking sheet. The result is a drier, more satisfying bite that mimics a pizzeria crust.
Don’t Skip the Olive Oil Brush
A thin coat of olive oil before baking gives the dough a shiny, golden finish and prevents the sauce from soaking into the base. It also adds a subtle nutty flavor that balances the sweetness of the tomatoes. If you’re watching calories, use a spray instead of brushing.
Creative Twists and Variations
This recipe is a playground. Here are some of my favorite ways to switch things up:
Mediterranean Medley
Swap the mozzarella for feta and add olives, sun‑dried tomatoes, and a drizzle of tzatziki after baking. This version offers a briny, tangy kick that pairs wonderfully with a glass of chilled white wine.
Buffalo Chicken Bites
Fill each square with shredded rotisserie chicken tossed in buffalo sauce, top with blue cheese, and finish with a drizzle of ranch dressing. The spicy, creamy combo turns the dippers into a crowd‑pleasing appetizer for game day.
Veggie Supreme
Add sautéed mushrooms, spinach, and roasted red peppers between the dough and sauce. The earthy vegetables bring depth and a pop of color, making these dippers a healthy yet indulgent choice.
Cheesy Jalapeño Burst
Incorporate diced jalapeños and a sprinkle of cheddar cheese into the sauce. The heat from the peppers balances the richness of the cheese, creating a zesty, mouth‑watering experience.
Sweet & Savory Pineapple
Top each dough square with pineapple chunks, ham, and a drizzle of honey before baking. The sweet‑savory combo delivers a tropical twist that’s surprisingly delightful.
Garlic Parmesan Crunch
Instead of mozzarella, use a blend of parmesan and garlic‑infused olive oil. The result is a crisp, savory bite that’s perfect for a quick snack or a sophisticated appetizer.
Storing and Bringing It Back to Life
Fridge Storage
Store leftover dippers in an airtight container in the refrigerator for up to 3 days. Wrap them in parchment paper to prevent sticking, and reheat in a 350°F oven for 5 minutes to restore crispness.
Freezer Friendly
Freeze individual dippers on a parchment‑lined tray until solid, then transfer to a freezer bag. They’ll keep for up to 2 months. When ready, bake directly from the freezer at 425°F for 12–15 minutes.
Best Reheating Method
Add a splash of water to a skillet and cover for 2 minutes; this steams the cheese and keeps the dough from drying out. Alternatively, use a microwave with a damp paper towel for a quick, though slightly less crisp, option.