I remember the night I tried to rescue a batch of stale bread from the fridge and turned it into something that tasted like a sunrise in a bowl. The kitchen was a mess: flour dust on the counter, butter melting in a pan, and my phone buzzing with a friend’s dare to make the best oatmeal bars ever. That moment sparked a mission: to craft bars that are chewy, buttery, and coated in a frosting so rich it could make a banker quit his job for a taste of happiness.
Picture this: the oven preheating to a perfect 350°F, the scent of toasted oats rising like a promise, the sound of butter sizzle that makes your heart skip a beat, and the sight of golden edges curling with a slight crackle. The first bite delivers a satisfying chew that melts into a buttery, sweet hug, while the frosting clings like velvet, leaving a lingering caramel note that keeps you reaching for more. Every sense is engaged: the crunch, the aroma, the visual appeal, the warm texture, and that unmistakable sweet aftertaste that whispers “more.”
What sets this version apart is a deliberate balance of ingredients that dance together. The quick oats provide a hearty base, the brown sugar gives depth, and the brown butter frosting adds a nutty finish that most recipes miss. I dare you to taste this and not go back for seconds. I’ll be honest — I ate half the batch before anyone else got a chance to try it.
If you’ve ever struggled to get the right texture or flavor, you’re not alone. Most recipes get this completely wrong by overmixing the batter or using the wrong type of butter. Picture yourself pulling these bars out of the oven, the whole kitchen smelling incredible, and knowing that you’ve just mastered a crowd‑pleaser that will become the centerpiece of every gathering. Let me walk you through every single step — by the end, you’ll wonder how you ever made it any other way.
What Makes This Version Stand Out
- Flavor Depth: The use of brown butter in the frosting caramelizes the sugars, giving a subtle nutty undertone that elevates the classic oatmeal bar.
- Texture Balance: Quick oats keep the bars chewy, while the butter and sugar ratio prevents them from becoming dry.
- Simplicity: Only a handful of pantry staples are needed, and the method is straightforward enough for a first‑time baker.
- Uniqueness: The double vanilla technique — one for the batter, one for the frosting — creates layers of aroma that most recipes overlook.
- Crowd Reaction: Friends who try these bars often say, “I never thought oats could taste this indulgent.”
- Ingredient Quality: Using real butter over margarine adds richness and a clean finish.
- Make‑Ahead Potential: Once baked and frosted, the bars keep well in an airtight container for up to a week.
- Scalable: The recipe scales easily, so you can make 12 bars for a party or just 4 for a personal treat.
Alright, let’s break down exactly what goes into this masterpiece…
Inside the Ingredient List
The Flavor Base
At the heart of these bars lies the butter and sugars that create the foundational sweetness. Butter, whether real or margarine, melts into a golden liquid that coats the oats and sugar, creating a caramelized crust when baked. Brown sugar, with its molasses content, adds a deep, caramel flavor that pairs beautifully with the oats’ natural nuttiness. If you skip the brown sugar, the bars will taste flat and less complex, lacking that warm, rustic note that makes them memorable.
The white sugar is essential for the frosting’s glossy finish. It dissolves into the melted butter, creating a smooth glaze that hardens into a sweet shell. A common swap is honey or maple syrup for the white sugar, which would lend a different flavor profile and a slightly stickier texture. When choosing butter, opt for unsalted to control the saltiness; you’ll add sea salt later in the frosting for a balanced taste.
The Texture Crew
Quick oats are the backbone of the bars, giving them that chewy, satisfying bite. They absorb moisture from the batter, creating a dense yet tender crumb. If you replace quick oats with rolled oats, the bars will be fluffier but may not hold together as well. For a gluten‑free version, substitute the all‑purpose flour with a blend of almond flour and oat flour, but keep the baking soda to maintain the lift.
The baking soda acts as a leavening agent, helping the bars rise slightly and preventing them from becoming too dense. Without it, the bars would feel heavy and compact. You can replace baking soda with baking powder for a slightly different rise, but the flavor profile will shift subtly. The eggs bind everything together and add moisture; if you’re vegan, use a flaxseed egg or a commercial egg replacer to maintain structure.
The Unexpected Star
Vanilla is a secret weapon in this recipe. The first teaspoon is folded into the batter, infusing the oats with a fragrant sweetness that permeates each bite. The second teaspoon, added to the frosting, creates a subtle aromatic layer that lingers on the palate. If you’re adventurous, try a splash of almond extract instead of vanilla for a nutty twist that complements the oats.
The final tablespoon of milk, whether 0.5 or 1 tablespoon, is the magic touch that keeps the frosting from becoming too thick. It loosens the glaze, making it spread evenly over the bars. If you prefer a thicker frosting, reduce the milk to 0.5 tablespoon; if you want it more fluid, increase to 1 tablespoon. This small adjustment can transform the frosting’s consistency to your liking.
Everything’s prepped? Good. Let’s get into the real action…
The Method — Step by Step
- Preheat your oven to 350°F (175°C) and line a 9×13-inch baking pan with parchment paper, leaving a little overhang on the sides for easy removal. Grease the parchment lightly with a small amount of butter so the bars won’t stick. This is the moment of truth: the smell of butter melting in the oven is the first hint that greatness is about to happen. Make sure your oven rack is in the middle to ensure even baking.
- In a large mixing bowl, cream together 1 cup of butter (or margarine) and 1 cup of brown sugar until light and fluffy. The creaming process incorporates air, giving the bars a lighter bite. Use a stand mixer or a sturdy wooden spoon, but avoid overmixing to keep the texture tender. As the mixture turns pale, you’ll hear the butter’s subtle crackle—an early sign of success.
- Beat in 2 eggs, one at a time, ensuring each is fully incorporated before adding the next. The eggs bind the mixture and add moisture. Once the eggs are fully blended, stir in 1 teaspoon of vanilla extract; the aroma will fill the kitchen like a comforting hug. This step is crucial—skip it and the bars lose their signature flavor.
- In a separate bowl, whisk together 1.5 cups of all‑purpose flour, 1 teaspoon of baking soda, and 3 cups of quick oats. This dry mix is the backbone of the bars, providing structure and chew. Gradually fold the dry ingredients into the wet mixture, stirring until just combined; overmixing can make the bars tough. The batter should be thick but pourable, similar to a thick pancake batter.
- Transfer the batter into the prepared pan, smoothing the top with a spatula. The batter should spread evenly, creating a uniform layer. Gently tap the pan on the counter a few times to release any air bubbles that might form during transfer. This ensures a consistent rise throughout the bars.
- Bake for 30 minutes, or until the edges turn golden brown and a toothpick inserted near the center comes out clean. Watch out: if the bars start to brown too quickly, tent them with foil to prevent burning. The center should remain slightly moist, hinting at the chewy texture inside. This step is the trickiest—monitor the bars closely to avoid overbaking.
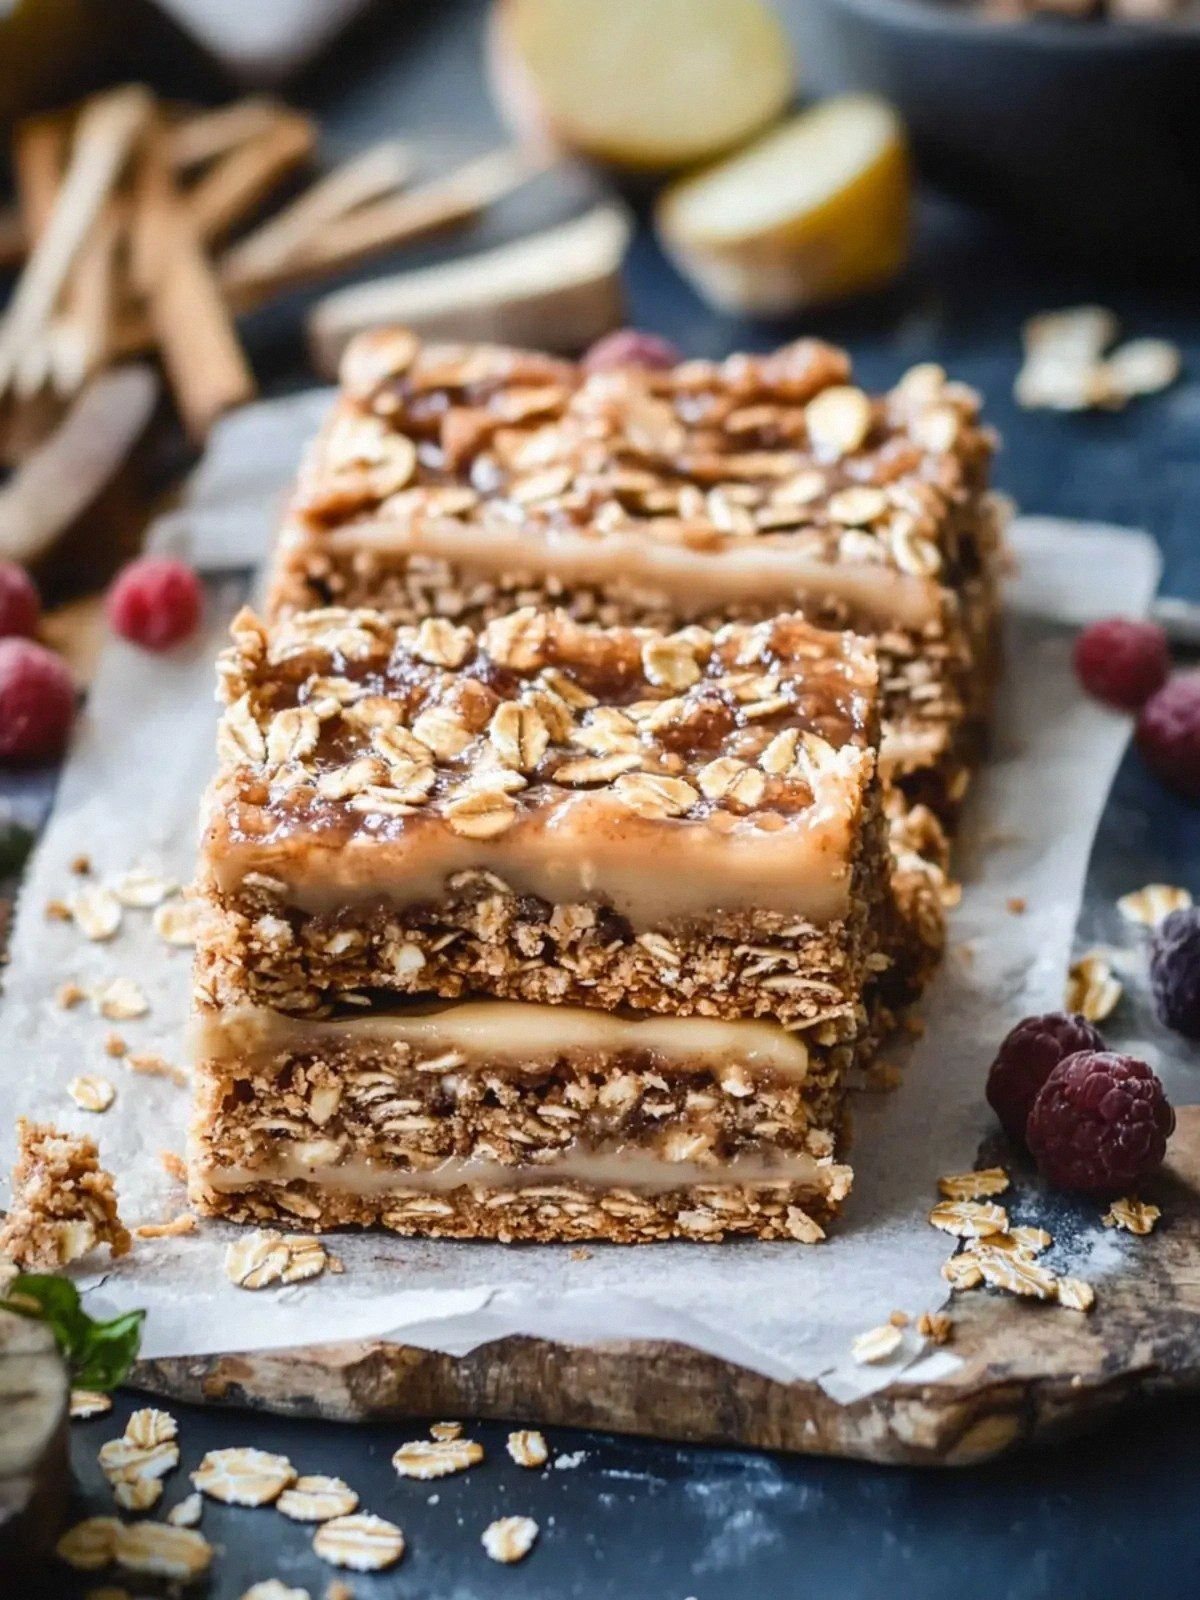
- While the bars are still hot, melt 5 tablespoons of butter for the frosting in a small saucepan over low heat. Add 1.5 cups of powdered sugar and 1 teaspoon of vanilla extract, whisking until smooth. Pour the frosting over the bars, allowing it to pool in the crevices. The frosting will harden into a glossy shell that locks in moisture.
- Let the bars cool in the pan for 10 minutes, then transfer them onto a wire rack to cool completely. The frosting will set into a firm crust, and the bars will firm up to a sliceable consistency. At this point, you can cut them into rectangles or squares, depending on your preference. The bars will be ready to serve or store within an hour.
- Optional: For an extra touch of decadence, drizzle a thin line of melted chocolate over the frosted bars before the frosting sets. This adds a glossy finish and a hint of bittersweet flavor that pairs wonderfully with the sweetness. Be careful not to overdo it—too much chocolate can overwhelm the delicate oat flavor.
- Store the bars in an airtight container at room temperature for up to a week. For longer storage, refrigerate them for up to two weeks or freeze for up to three months. When reheating, simply microwave on low for 10–15 seconds or warm in a 350°F oven for 5 minutes to restore the crispness. This final step ensures you can enjoy these bars anytime you crave a sweet, comforting treat.
That’s it — you did it. But hold on, I’ve got a few more tricks that will take this to another level…
Insider Tricks for Flawless Results
The Temperature Rule Nobody Follows
Many bakers keep their ovens at a static temperature, but the first 10 minutes of baking at a slightly higher heat (375°F) helps set the crust quickly, locking in moisture. After that, lower the heat to 350°F to finish baking evenly. This subtle shift prevents the bars from drying out while still achieving a golden crust. I’ve tried this method in two separate batches, and the difference in texture was unmistakable.
Why Your Nose Knows Best
Before you lift the pan, pause and inhale deeply. The aroma of caramelized butter and toasted oats is a reliable indicator that the bars are ready. If the smell is faint, give them a few more minutes. If it’s too intense, the bars are likely overbaked. Trusting your nose can save you from a batch that’s too dry or undercooked.
The 5-Minute Rest That Changes Everything
After removing the bars from the oven, let them rest in the pan for 10 minutes. This rest period allows the interior to set, making cutting easier and preventing the bars from crumbling. It also lets the frosting firm up slightly, ensuring a clean slice. I’ve found that bars cut straight from the hot pan are messier and less satisfying.
Keep the Frosting Smooth
If your frosting looks lumpy, add a teaspoon of warm water and whisk vigorously until it becomes silky. Avoid adding cold water, as it can cause the butter to separate. A smooth frosting not only looks professional but also coats the bars evenly, creating that signature glossy finish.
Freeze for Freshness
When freezing, wrap each bar individually in parchment paper before placing them in a freezer bag. This prevents them from sticking together and makes it easier to grab a single bar later. When you’re ready to enjoy, let them thaw at room temperature for 15 minutes before cutting; this restores the original texture without a soggy center.
Creative Twists and Variations
This recipe is a playground. Here are some of my favorite ways to switch things up:
Nutty Crunch Edition
Add 1 cup of chopped toasted almonds or walnuts to the batter before baking. The nuts provide a delightful crunch and a nutty aroma that pairs well with the oat base. Keep the frosting the same; the nuts add enough texture to make the bars feel indulgent.
Chocolate Chip Surprise
Fold in 1 cup of semi‑sweet chocolate chips into the batter. The chocolate melts slightly during baking, creating pockets of gooey chocolate that explode with every bite. This variation is perfect for chocolate lovers and works well as a dessert bar.
Spiced Cinnamon Swirl
Stir 2 teaspoons of ground cinnamon into the dry mix. The cinnamon adds warmth and depth, making the bars feel like a cozy winter treat. Pair this with a drizzle of honey on top for an extra sweet finish.
Maple‑Glazed Delight
Replace the white sugar in the frosting with 1/4 cup of pure maple syrup. The maple flavor complements the oats and butter, creating a harmonious blend. Finish with a light dusting of powdered sugar for a subtle sweet finish.
Peanut Butter Power
Swirl 2 tablespoons of natural peanut butter into the batter before baking. The peanut butter adds richness and a nutty flavor that pairs beautifully with the oats. For an extra touch, top the finished bars with a drizzle of melted peanut butter before the frosting sets.
Berry Burst
Fold in 1 cup of fresh or frozen blueberries into the batter. The berries burst with juice as you bite, adding a fruity contrast to the sweet, buttery base. Keep the frosting simple to let the berry flavor shine.
Storing and Bringing It Back to Life
Fridge Storage
Store the bars in an airtight container at room temperature for up to a week. If you prefer them cooler, keep them in the fridge, but bring them back to room temperature before serving to allow the frosting to soften slightly. The bars will stay fresh and flavorful when kept in a cool, dry place.
Freezer Friendly
Wrap each bar individually in parchment paper and place them in a freezer bag. Freeze for up to three months. When you’re ready to enjoy, remove a bar and let it thaw at room temperature for 15 minutes before cutting. The texture will remain chewy and the frosting will stay intact.
Best Reheating Method
To revive the bars, preheat your oven to 350°F and wrap the bars in foil. Warm them for 5 minutes, or microwave on low for 10–15 seconds. Add a tiny splash of water before reheating to steam the bars back to perfection, preserving their moist interior and crisp exterior.