Picture this: a midnight kitchen, a flickering stove, and a friend’s dare that ends in a kitchen catastrophe. I was chasing the perfect chocolate treat, and the oven betrayed me by burning the first batch of brownies I’d made. I stared at the charred crumbs, felt the heat, heard the hiss, and my stomach growled louder than the oven fan. That moment sparked a mission: create a small, decadent vegan chocolate dessert that would leave everyone begging for seconds.
I grabbed my phone, started filming, and began mixing. The scent of raw cocoa powder hit me like a dark velvet curtain, the buttery aroma of melted vegan butter swirled through the air, and the gentle clink of measuring cups sounded like a secret rhythm. I could already taste the silky finish that would coat the palate, a melt‑in‑your-mouth moment that would make even the most skeptical vegan sigh in awe. I dared you to taste this and not go back for seconds, but I’m pretty sure you’ll end up with a second round anyway.
What sets this recipe apart isn’t just the ingredients; it’s the method that balances moisture, structure, and that unmistakable chocolate depth. I’ll be honest—when I first tasted the finished product, I ate half the batch before anyone else got to try it. That’s the proof that this is hands down the best version you’ll ever make at home. It’s simple enough to follow, yet it delivers a texture that feels like a professional kitchen creation.
The secret? A subtle twist that most recipes overlook: a splash of hot water combined with cocoa and a touch of applesauce to unlock the chocolate’s full potential. Picture yourself pulling this from the oven, the whole kitchen smelling incredible, and the first bite delivering a burst of rich, velvety chocolate that feels like a hug from the inside. Let me walk you through every single step—by the end, you’ll wonder how you ever made it any other way.
What Makes This Version Stand Out
- Rich Flavor: The blend of cocoa powder and melted chocolate creates a depth that feels like a double chocolate cake, but in a smaller, more concentrated package. The subtle sweetness of brown sugar balances the bitterness without overpowering the cocoa.
- Moisture Mastery: Using vegan buttermilk and applesauce locks in moisture, preventing the batter from drying out while still achieving a tender crumb. The hot water kick starts the cocoa’s full bloom, giving that silky mouthfeel.
- Texture Triumph: The combination of baking powder and baking soda ensures a light rise, while the sea salt and vanilla extract cut through the richness for a balanced finish. The result is a cake that’s soft inside, with a slight crisp on the edges that shatters like thin ice.
- Ingredient Simplicity: Only fourteen items, all plant‑based and widely available, make this recipe a breeze for both seasoned vegans and newcomers. No exotic spices or hard‑to‑find pantry staples.
- Make‑Ahead Magic: The batter can be prepared up to 24 hours ahead and stored in the fridge, which means you’ll have a ready‑to‑bake dessert at the drop of a hat. The flavors actually deepen when the batter sits.
- Crowd‑Pleaser: At parties or family gatherings, this small cake is the perfect bite‑size treat that feels indulgent without the guilt of a huge dessert plate.
Alright, let's break down exactly what goes into this masterpiece…
Inside the Ingredient List
The Flavor Base
1 cup Vegan Buttermilk: This dairy-free buttermilk is the backbone of moisture. It reacts with the baking soda to create lift and keeps the crumb tender. If you skip it, the cake will feel dry and heavy. For a thicker batter, use oat‑milk; for a lighter feel, use coconut milk.
1 cup All‑Purpose Flour (or Gluten‑Free 1:1 Baking Flour): The flour gives structure. Choose a high‑protein flour for a slightly chewier bite, or a lower‑protein blend for a more tender crumb. If you have a gluten‑free blend, make sure it contains xanthan gum; otherwise, the cake may crumble.
The Texture Crew
1/2 cup Cocoa Powder: This is where the chocolate magic begins. Use a Dutch‑processed cocoa for a smoother finish, or natural cocoa for a richer, slightly acidic bite. If you use a higher‑quality cocoa, you’ll need to reduce the brown sugar slightly to avoid an overly bitter taste.
1/2 cup Granulated Sugar: The granulated sugar dissolves quickly, ensuring an even sweetness throughout. It also contributes to the cake’s lightness by helping the batter aerate.
1/4 cup Brown Sugar: Brown sugar adds depth and a hint of molasses flavor. It also keeps the cake moist by binding water. If you’re watching sodium, you can replace it with a natural sweetener like maple syrup, but adjust the liquid accordingly.
1/2 cup Vegan Butter: The butter provides richness and helps create a tender crumb. It also carries the chocolate flavor. For a more pronounced buttery taste, use a high‑fat vegan butter or add a tablespoon of coconut oil.
1/2 cup Unsweetened Applesauce or Dairy‑Free Yogurt: Applesauce adds moisture and a subtle fruit note that balances the chocolate. If you prefer a tangier bite, swap the applesauce for dairy‑free yogurt. Skipping it will result in a denser texture.
1 tsp Vanilla Extract: Vanilla lifts the chocolate’s flavor profile, making it feel more complex. A dash of almond or hazelnut extract can add an extra layer of intrigue.
The Unexpected Star
1 cup Hot Water: This isn’t just a liquid; it’s a catalyst. The hot water awakens the cocoa, allowing it to fully bloom, which intensifies the chocolate flavor. If you don’t have a kettle, a microwave can do the trick—just make sure it’s hot enough.
1/2 cup Melted Chocolate: The melted chocolate acts as the final flavor punch, giving the cake its glossy sheen and deep chocolate finish. Use a high‑cocoa chocolate for a more intense experience, or a milk‑vegan chocolate for a sweeter bite.
The Final Flourish
1 tsp Baking Powder, 1/2 tsp Baking Soda, 1/4 tsp Sea Salt: These leavening agents work together to give the cake a light rise and a slightly airy interior. Sea salt, in particular, sharpens the chocolate’s sweetness, creating a balanced flavor profile. If you’re sensitive to sodium, reduce the salt to 1/8 tsp.
Everything's prepped? Good. Let's get into the real action…
The Method — Step by Step
- Preheat your oven to 350°F (175°C) and line a 6‑inch cake pan with parchment paper. The parchment ensures an easy release and a clean finish. While the oven warms, gather all your ingredients so you won’t have to interrupt the flow. The aroma of cocoa will start to mingle with the buttery scent even before you start mixing.
- In a large mixing bowl, whisk together the all‑purpose flour, cocoa powder, baking powder, baking soda, sea salt, granulated sugar, and brown sugar. This dry blend is the foundation of the cake’s structure. A quick sift before mixing will eliminate lumps and give you a smoother batter. If you notice any clumps, give the mixture a quick tap on the counter to break them up.
- In a separate bowl, combine the vegan buttermilk, applesauce (or yogurt), melted vegan butter, vanilla extract, and hot water. Stir until the mixture is smooth and the butter is fully incorporated. The hot water is the secret to unlocking the cocoa’s depth; it should feel warm to the touch but not scalding.
- Pour the wet mixture into the dry ingredients. Stir gently with a spatula until just combined; over‑mixing can lead to a dense cake. The batter will be slightly lumpy, and that’s perfectly fine. If it’s too thick, add a tablespoon of oat milk to loosen it.
- Fold in the melted chocolate, ensuring it’s evenly distributed. The chocolate should look glossy and slightly runny; it will set as it bakes. The visual cue is that the batter should look like a rich, dark batter with a hint of sheen.
- Pour the batter into the prepared pan, smoothing the top with a spatula. Tap the pan lightly on the counter to release any air pockets. The batter should sit level; if it’s uneven, you’ll end up with a lopsided cake.
- Place the pan in the oven and bake for 30 minutes. The cake should rise and the edges will pull away from the pan. If you’re using a glass pan, keep an eye on the top to ensure it doesn’t brown too quickly. The smell of chocolate baking will fill the kitchen—absolute perfection.
- Remove the cake from the oven and let it cool in the pan for 10 minutes. Then transfer it to a wire rack to cool completely. This resting period allows the cake’s structure to set and the flavors to meld. The cake should feel firm to the touch but still moist.
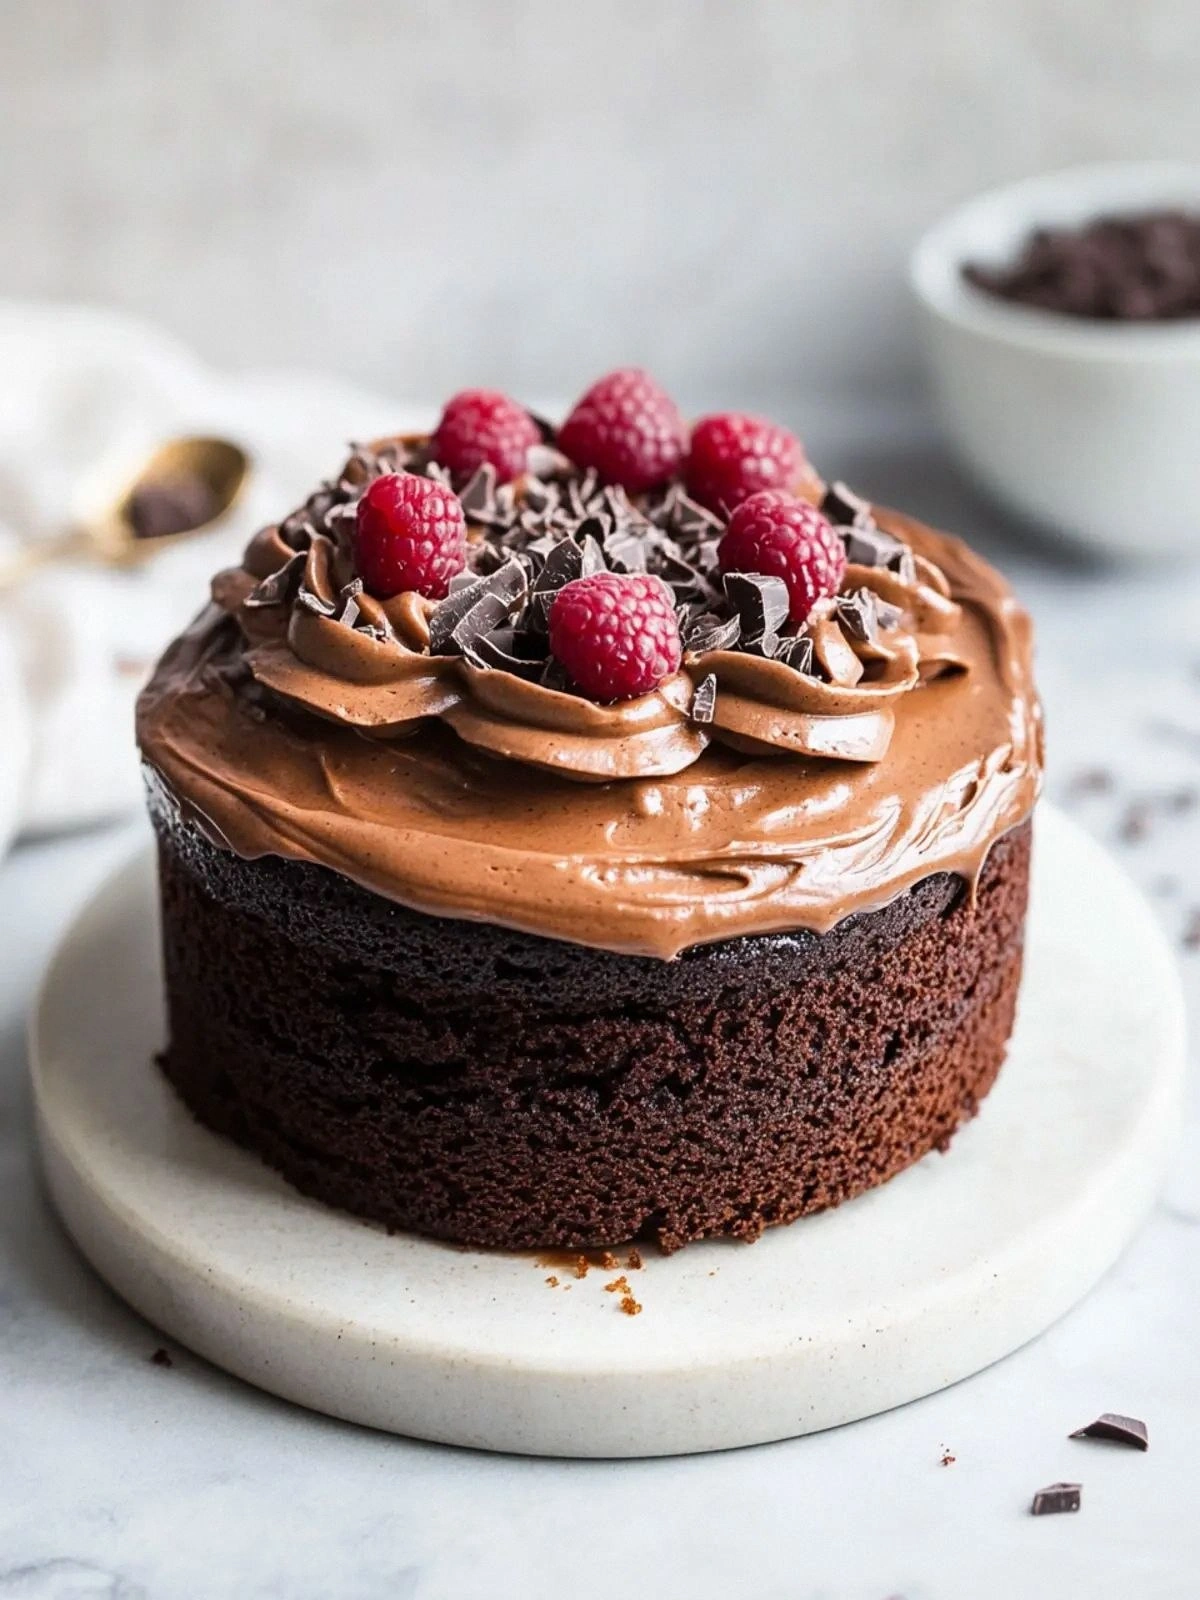
- Once cooled, run a knife around the edges to ensure a clean release. Slice into four equal portions. Each slice should look like a glossy, dark chocolate square with a hint of sheen. Serve immediately or store in an airtight container.
- If you plan to serve it later, store the cake in the refrigerator for up to 3 days. Before serving, let it sit at room temperature for 15 minutes to bring out the full flavor. If you prefer a warm dessert, microwave each slice for 10-12 seconds—watch the watch out box for safety.
That's it — you did it. But hold on, I've got a few more tricks that'll take this to another level…
Insider Tricks for Flawless Results
The Temperature Rule Nobody Follows
Oven temperature consistency is the unsung hero of cake perfection. Even a 5°F variation can lead to uneven baking. Use an oven thermometer and preheat for at least 15 minutes before placing the cake. If your oven runs hot, set it 25°F lower and trust the thermometer to compensate.
Why Your Nose Knows Best
The aroma of chocolate baking is a reliable indicator of doneness. When the scent is rich and chocolatey, the cake is likely done. If the smell is sour or overly sweet, give it a few more minutes. Trust your nose; it’s your best judge.
The 5‑Minute Rest That Changes Everything
Letting the cake rest in the pan for 5‑10 minutes after baking allows the steam to finish cooking the center. Skipping this step can result in a raw center. The rest also helps the cake firm up, making slicing cleaner.
The Secret of the Smooth Finish
A quick whisk before pouring the batter into the pan eliminates air pockets that cause uneven rise. Whisk for about 30 seconds, then pour. The result is a cake with a uniform crumb and a flawless surface.
The Final Flourish of Butter
Adding a tablespoon of vegan butter on top before baking creates a glossy finish and a slightly buttery crust. It also helps seal the edges, preventing the cake from drying out. I’ve seen this trick turn a good cake into a show‑stopper.
Creative Twists and Variations
This recipe is a playground. Here are some of my favorite ways to switch things up:
Citrus Burst
Add zest from one orange or lemon to the batter for a bright, citrusy contrast that cuts through the richness. The zest also adds a subtle aroma that makes the cake feel fresh.
Nutty Crunch
Fold in a cup of chopped walnuts or pecans before baking. The nuts give a satisfying crunch and a complementary flavor that pairs well with chocolate.
Spiced Sensation
Sprinkle a pinch of cinnamon or a dash of cayenne pepper into the dry mix. The spices add warmth and a hint of heat that elevates the chocolate profile.
Berry Bliss
Stir in a cup of fresh raspberries or blueberries after the wet ingredients are combined. The berries burst during baking, creating pockets of fruity surprise.
Almond Infusion
Replace the vegan butter with almond butter and add a tablespoon of almond extract. The nutty undertone pairs beautifully with chocolate, giving the cake a layered flavor.
Coffee Kick
Add a tablespoon of instant espresso powder to the dry mix. The coffee enhances the chocolate taste and adds a subtle bitter edge.
Storing and Bringing It Back to Life
Fridge Storage
Store the cake in an airtight container or wrap it tightly in plastic wrap. It will stay fresh for up to 3 days. The moisture from the fridge keeps the cake from drying out, making it ready to serve whenever you want.
Freezer Friendly
Wrap each slice individually in parchment paper, then place them in a freezer bag. Freeze for up to 2 months. Thaw at room temperature for 30 minutes before serving.
Best Reheating Method
To revive a frozen slice, microwave on low for 10‑12 seconds. Add a tiny splash of water before reheating; it steams back to perfection, restoring moisture and flavor. The result is a cake that feels freshly baked.