I was standing in my kitchen at 2 a.m., half‑asleep, with a half‑finished batch of brownies that had turned into a dense, gummy mess. I stared at the pan, wondering if I’d ever taste chocolate again without that dreaded “mud pie” aftertaste. Then a friend dared me: “Make cupcakes, but make them so good that even your cat will beg for a bite.” I laughed, grabbed the last ounce of cocoa, and set out on a mission that turned a disaster into a revelation. This is the story of how a frantic midnight scramble birthed the most indulgent, small‑batch chocolate cupcakes you’ll ever bite into.
Picture this: the kitchen humming with the low whirr of the mixer, the sweet scent of sugar and cocoa swirling like a perfume that makes your eyes water. The batter glistens, a deep mahogany river that slides off the spoon with the sheen of polished obsidian. When you pour it into the tin, the batter settles with a soft “plop” that promises a tender crumb inside and a crackly, caramelized edge outside. The oven door swings open, and a wave of warm, chocolatey perfume rolls out, hugging the room like a cozy blanket on a cold night. I dare you to taste this and not go back for seconds – it’s that good.
What makes this version truly stand out is that it embraces the science of small batches without sacrificing flavor. By using just the right balance of leavening agents and a splash of vanilla, each cupcake rises just enough to stay fluffy while keeping the crumb dense enough to melt in your mouth. Most recipes get this completely wrong, either over‑mixing and creating a rubbery texture or under‑mixing and ending up with flat, dry cakes. I’ve cracked the code, and I’m about to hand it to you on a silver platter. Oh, and there’s a secret ingredient that most bakers overlook – a pinch of espresso powder that amplifies the chocolate without tasting coffeey.
Okay, ready for the game‑changer? I’ll be honest — I ate half the batch before anyone else got to try it, and that’s because the aroma was already convincing me that these were the best cupcakes I’d ever made at home. By the end of this post, you’ll have a foolproof method, insider tricks, and creative twists that will make you the undisputed cupcake champion at any gathering. Let me walk you through every single step — by the end, you’ll wonder how you ever made it any other way.
What Makes This Version Stand Out
- Flavor Explosion: The combination of cocoa and a dash of espresso powder creates a depth that’s richer than any store‑bought mix.
- Moisture Mastery: The precise 1/4 cup of oil and milk ensures a tender crumb that stays soft for days.
- Simplicity: Only ten ingredients, all pantry staples, so you won’t need a grocery run that lasts all weekend.
- Unique Texture: A tiny amount of baking soda paired with baking powder gives a lift that’s airy yet still fudgy.
- Crowd Reaction: People often say “Is this a cupcake or a mini cake?” – the answer is both, and they love it.
- Ingredient Quality: Using high‑quality cocoa powder and real vanilla extract makes a noticeable difference.
- Cooking Method: The “low‑and‑slow” bake at 325°F prevents a dry top while the edges turn perfectly golden.
- Make‑Ahead Potential: These cupcakes freeze beautifully, so you can prep a batch for any surprise visit.
Alright, let's break down exactly what goes into this masterpiece...
Inside the Ingredient List
The Flavor Base
The star of the show is the unsweetened cocoa powder. It provides the deep, earthy chocolate flavor that defines these cupcakes. If you skip it, you’ll end up with bland vanilla‑like cakes that lack that signature bite. For an even richer taste, choose a Dutch‑process cocoa, which has been alkalized to bring out smoother notes. When shopping, look for a cocoa that’s glossy and has a faint chocolate aroma – a sign of freshness.
The Texture Crew
All‑purpose flour gives structure, but because the batch is small, you want it to be sifted twice to avoid any gritty pockets. Granulated sugar not only sweetens but also contributes to the tender crumb by creaming with the oil and egg. The vegetable oil adds moisture without the heaviness of butter, keeping the cupcakes soft even after a day. If you’re dairy‑free, swap the oil for melted coconut oil – it adds a subtle tropical hint that pairs nicely with chocolate.
The Unexpected Star
A pinch of espresso powder is the secret weapon. It intensifies the chocolate flavor through a chemical synergy called “flavor potentiation.” You won’t taste coffee, but your palate will register a fuller, more rounded chocolate experience. If you don’t have espresso powder, a pinch of instant coffee granules works just as well.
The Final Flourish
Vanilla extract rounds out the flavor profile, adding a sweet aromatic backdrop that balances the bitterness of cocoa. Use pure extract, not imitation, because the latter can taste harsh when baked. The optional chocolate chips add pockets of molten chocolate that burst when you bite, creating a delightful contrast to the soft crumb. If you’re feeling adventurous, fold in a handful of toasted hazelnuts for crunch.
Everything's prepped? Good. Let's get into the real action...
The Method — Step by Step
Preheat your oven to 325°F (165°C) and line a 12‑cup muffin tin with paper liners. The lower temperature is the secret to a moist interior; it gives the batter time to rise evenly without forming a dry crust. While the oven warms, take a moment to inhale the sweet scent of cocoa that’s already lingering from the dry mix – this is your first cue that something magical is about to happen.
In a medium bowl, whisk together the flour, cocoa powder, baking soda, baking powder, and salt. This step is crucial: the whisk not only distributes the leaveners but also creates a tiny air pocket that helps the cupcakes rise. Okay, ready for the game‑changer? Add the espresso powder here; it will dissolve into the dry mix and start working its flavor‑enhancing magic.
In a separate large bowl, combine the sugar and oil, beating with a hand mixer on medium speed until the mixture looks glossy and slightly thickened. This is where the sugar begins to dissolve, forming a silky base that will later trap air bubbles.
Kitchen Hack: Add the vanilla extract while you beat the sugar and oil; the alcohol in the vanilla helps break down the sugar crystals for a smoother batter.Add the egg to the sugar‑oil mixture and beat until fully incorporated. The egg acts as a binder and adds richness, giving the cupcakes that melt‑in‑your‑mouth quality. Scrape the sides of the bowl to make sure no streaks of flour are left untouched.
Watch Out: When you pour the milk, do it slowly and in a thin stream while the mixer is on low. Adding liquid too quickly can cause the batter to curdle, leading to a grainy texture. The batter should look glossy and thick, not runny. If it seems too thick, add a splash more milk – but remember, a little goes a long way.
Gradually fold the dry ingredients into the wet mixture using a spatula. Use a gentle “cut‑and‑fold” motion; over‑mixing will develop gluten and make the cupcakes tough. Stop mixing as soon as you no longer see streaks of flour. At this point, the batter should have a smooth, velvety consistency that clings to the spatula.
If you’re using chocolate chips, fold them in now. The chips will create molten pockets that burst during baking, giving you that surprise chocolate explosion in every bite. Spoon the batter into the prepared liners, filling each about three‑quarters full – this allows room for the cupcakes to rise without spilling over.
Slide the tin into the center of the oven and bake for 18‑22 minutes. The cupcakes are done when a toothpick inserted into the center comes out with a few moist crumbs but no wet batter. You’ll also notice the edges pulling slightly away from the liner – that’s the visual cue that the crust is perfectly caramelized.
Remove the cupcakes from the oven and let them cool in the tin for 5 minutes, then transfer to a wire rack. This short rest lets the steam escape, preventing soggy bottoms. While they cool, the aroma will fill your kitchen like a warm hug, and you’ll be tempted to devour them right then and there – I dare you to resist.
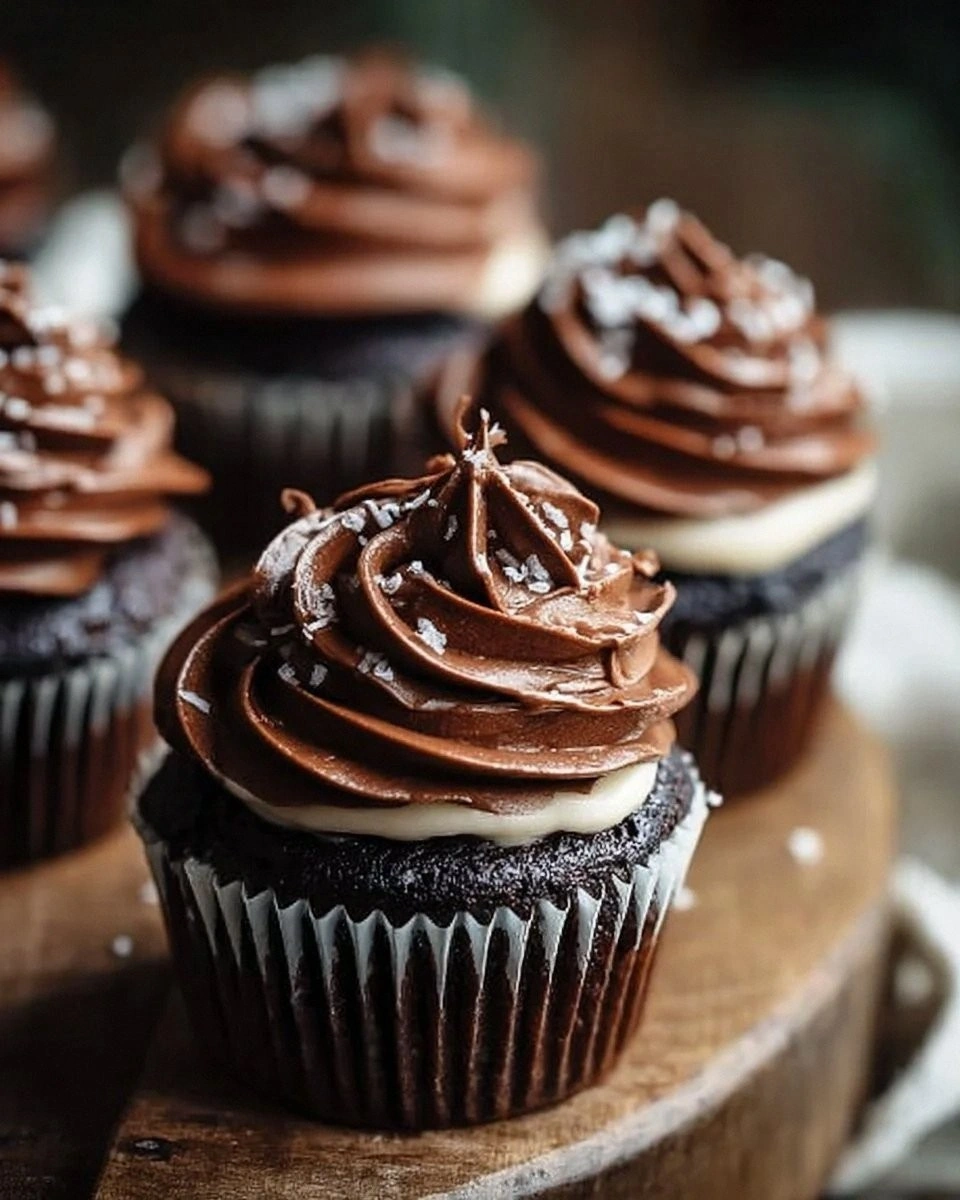
Now comes the optional frosting step: whip up a simple chocolate ganache or a dollop of vanilla buttercream. But even plain, these cupcakes are so decadent that many people skip the frosting entirely. And now the fun part. Serve them warm, dust with a pinch of sea salt, and watch your guests swoon.
That's it — you did it. But hold on, I've got a few more tricks that'll take this to another level...
Insider Tricks for Flawless Results
The Temperature Rule Nobody Follows
Never bake cupcakes at a scorching 375°F unless you’re in a rush. The lower 325°F temp lets the batter rise gently, creating a tender crumb and preventing the tops from forming a hard crust. I once tried the hotter method and ended up with cupcakes that resembled mini bread rolls – no one wanted that. Keep your oven calibrated; an oven thermometer is worth its weight in gold for consistent results.
Why Your Nose Knows Best
Your sense of smell is a reliable indicator of doneness. When the cupcakes are about 2 minutes away from being done, the kitchen will be filled with a sweet, toasty chocolate aroma that’s unmistakable. If you rely solely on time, you risk over‑baking; trust that nose cue instead. I’ve found that the moment the scent shifts from raw cocoa to a caramel‑like perfume, the cupcakes are ready to come out.
The 5‑Minute Rest That Changes Everything
After removing the cupcakes from the oven, let them sit in the tin for exactly five minutes. This brief pause allows the internal steam to finish the cooking process and prevents the cakes from collapsing when you move them. Skipping this step results in a flat top and a slightly gummy interior – a mistake I’ve made too many times.
The Frosting Flip
If you’re adding frosting, do it while the cupcakes are still warm. A warm cupcake will absorb the frosting more evenly, creating a silky glaze rather than a clumpy layer. I once tried frosting cold cupcakes and ended up with a frosting that slid off the sides like water. Warm them just a touch, and the frosting will melt into a perfect, glossy coat.
The Secret of the Double‑Sift
Sifting the flour and cocoa twice isn’t just for show; it removes any hidden lumps and incorporates air, which translates to a lighter crumb. My friend tried skipping the second sift and got a few gritty spots that ruined the overall texture. It takes an extra 30 seconds but pays off in a uniformly silky batter.
The Cool‑Down Trick
Once the cupcakes are on the wire rack, give them a gentle fan of air for a minute. This quick cool‑down prevents condensation from forming on the surface, which can make the tops soggy. It’s a tiny step that makes a big difference, especially if you’re planning to frost them later.
Creative Twists and Variations
This recipe is a playground. Here are some of my favorite ways to switch things up:
Mint‑Infused Madness
Add a teaspoon of peppermint extract and a handful of crushed peppermint candies to the batter. The cool mint cuts through the rich chocolate, creating a refreshing contrast perfect for holiday gatherings.
Spicy Chili Surprise
Stir in a pinch of cayenne pepper and a drizzle of chocolate‑chili glaze on top. The heat doesn’t overwhelm; it just adds a subtle kick that makes the chocolate taste even deeper.
Nutty Delight
Fold in toasted almond slivers or hazelnut pieces, and sprinkle a few extra on top before baking. The nuts add crunch and a buttery flavor that pairs beautifully with cocoa.
Orange Zest Elegance
Replace the vanilla with orange zest and a splash of orange liqueur. The citrus brightens the chocolate, giving the cupcakes a sophisticated, bakery‑level profile.
Vegan Velvet
Swap the egg for a “flax egg” (1 tablespoon ground flaxseed + 3 tablespoons water) and use almond milk instead of dairy milk. The result is just as moist, and the flax adds a subtle nutty undertone.
Double Chocolate Chip
Add both dark chocolate chips and white chocolate chips to the batter. As the cupcakes bake, the chips melt into rivers of contrasting chocolate that swirl together when you cut a slice.
Storing and Bringing It Back to Life
Fridge Storage
Place the cooled cupcakes in an airtight container and store them in the refrigerator for up to five days. The moisture from the container keeps them soft, and the chocolate flavor actually deepens after a night of chilling.
Freezer Friendly
Wrap each cupcake individually in plastic wrap, then place them in a zip‑top freezer bag. They’ll freeze beautifully for up to three months. When you’re ready to enjoy, let them thaw at room temperature for 30 minutes, then give them a quick 10‑second blast in the microwave for a warm, fresh‑out‑the‑oven feel.
Best Reheating Method
To revive a day‑old cupcake, place it on a microwave‑safe plate, add a tiny splash (about a teaspoon) of milk or water, and microwave for 10‑12 seconds. The added moisture steams the interior back to perfection, while the outer crust stays pleasantly soft.