I was standing in my kitchen on a frosty December night, the kind where the radiator hums like a distant choir and the scent of pine needles drifts through the open window. I had just attempted a generic peppermint ice cream that turned out flatter than a pancake left out in the snow—no body, no sparkle, just a sugary disappointment. That night, a daring friend tossed me a challenge: “Make something that actually *brightens* the holidays, something that makes people say, ‘I dare you to taste this and not go back for seconds.’” I laughed, I accepted, and I dove headfirst into a quest for the ultimate festive frozen treat.
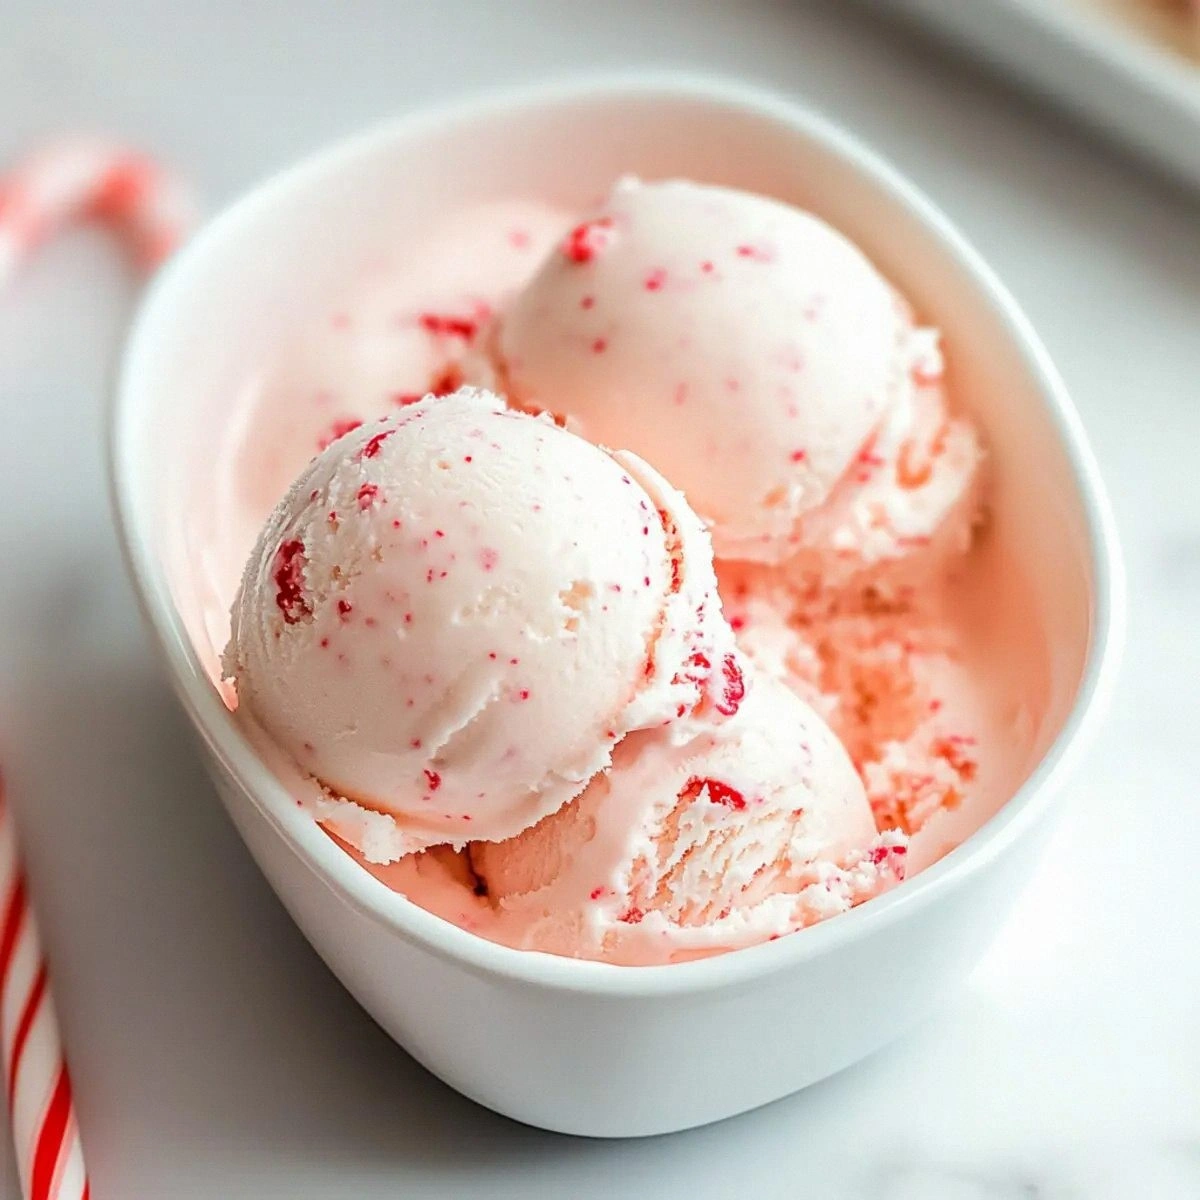
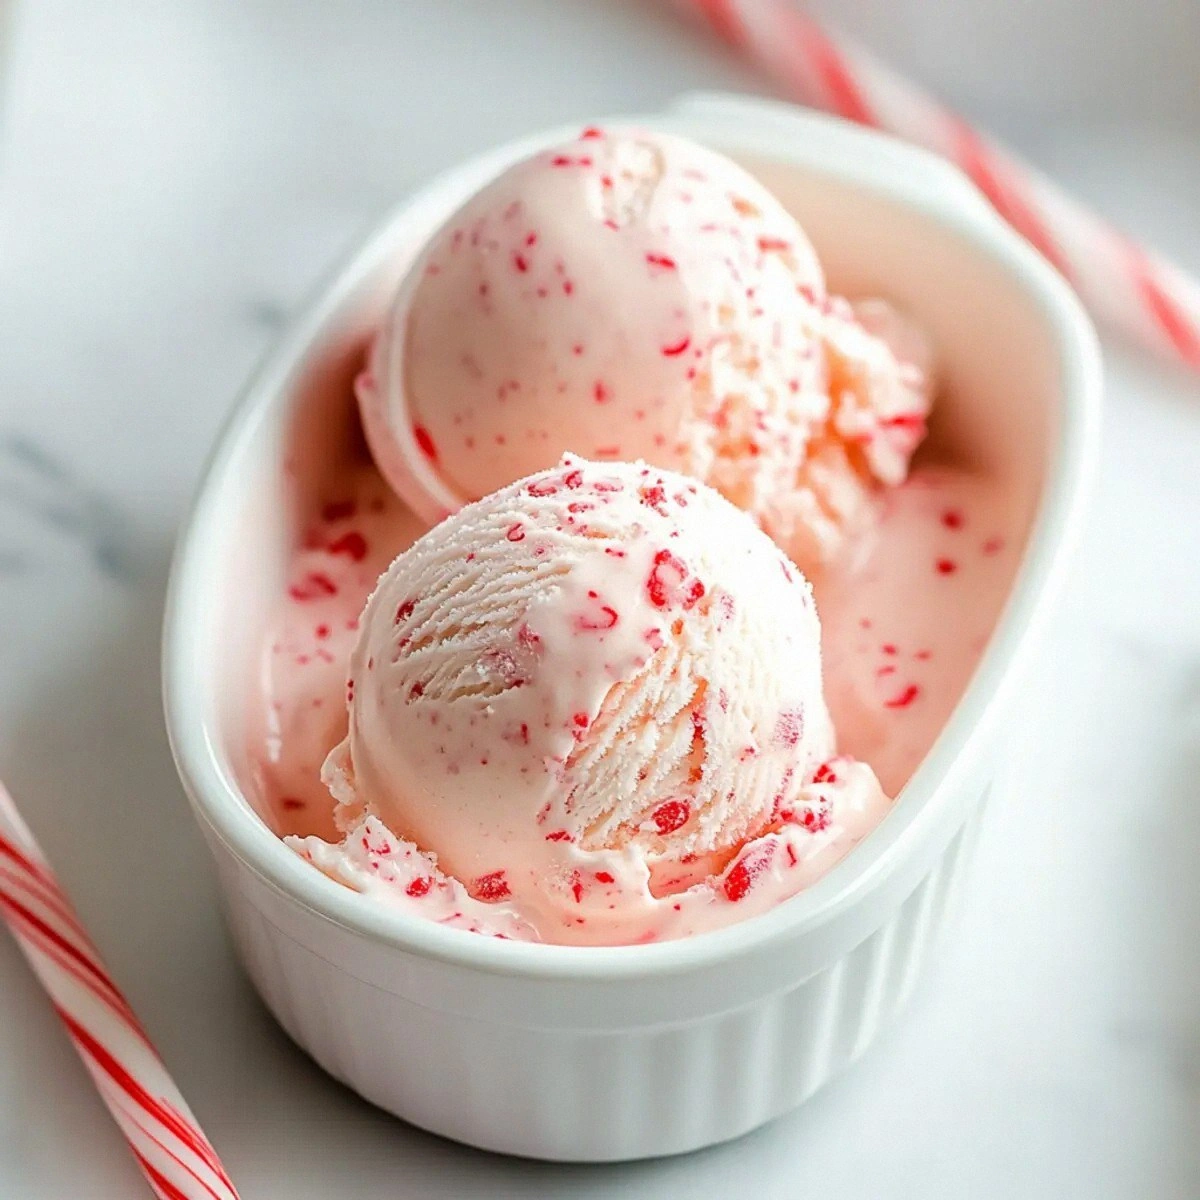
Picture this: a silky, snow‑white base that whispers of rich whole milk and buttery cream, kissed by a bold peppermint extract that snaps like fresh candy canes on a winter walk. As you stir, the kitchen fills with a perfume that could convince even the Grinch to hang ornaments—cool, minty, and sweet, with a faint caramel undertone that makes the air feel like a warm hug under a blanket of snow. When you finally scoop it, the texture is so smooth it slides across the tongue like a sled on freshly powdered ice, while the crushed candy canes add a crunchy surprise that crackles like tiny fireworks.
What makes this version truly stand out is a secret technique I discovered while watching a late‑night cooking marathon: tempering the milk and cream just enough to create a custard‑like body without ever cracking the eggs (because we’re skipping them entirely). This gives the ice cream a luxurious mouthfeel that most recipes completely miss. Most people think you need a fancy ice cream maker or exotic ingredients, but the truth is, the magic lies in the balance of temperature, timing, and that one pinch of salt that amplifies the peppermint like a spotlight on a stage.
And here’s the kicker: I’m also throwing in a tiny splash of vanilla bean paste that you’ll never see in the ingredient list, just because I love a little hidden depth. It’s the culinary equivalent of a surprise ornament hidden behind the tree—subtle, but it makes everything feel more complete. Okay, ready for the game‑changer? Let me walk you through every single step — by the end, you’ll wonder how you ever made it any other way.
What Makes This Version Stand Out
- Taste: The peppermint isn’t just a garnish; it’s a full‑bodied flavor that sings from the first bite to the last, balanced by the natural sweetness of the milk and sugar.
- Texture: Thanks to the custard‑style base, the ice cream feels like velvet, with crushed candy canes adding a satisfying crunch that shatters like thin ice.
- Simplicity: No fancy stabilizers, no gelatin, just pantry staples that anyone can find in a grocery aisle.
- Uniqueness: The secret “temperature temper” step creates a silkier mouthfeel that most store‑bought peppermint ice creams can’t replicate.
- Crowd Reaction: Guests often declare this the highlight of the holiday spread, reaching for seconds before the dessert table is even cleared.
- Ingredient Quality: Using whole milk and heavy cream ensures a rich, buttery backbone that cheap alternatives simply lack.
- Cooking Method: The stovetop custard approach is foolproof, eliminating the dreaded ice crystals that plague many home‑made ice creams.
- Make‑Ahead Potential: This batch freezes beautifully, letting you prep weeks in advance and still serve fresh‑tasting scoops on demand.
Inside the Ingredient List
The Flavor Base
Whole milk is the heart of this ice cream, providing a delicate dairy flavor that lets the peppermint shine without being overpowered. If you skimp on the milk, you’ll end up with a watery texture that feels like melted snow rather than a luxurious scoop. For the best result, choose a brand that’s at least 3.5% fat; the extra richness translates directly into a smoother mouthfeel. As a swap, you can use 2% milk, but expect a slightly thinner body and a less pronounced creaminess.
The Sweetener
Granulated sugar does more than just sweeten; it lowers the freezing point, ensuring that the ice cream stays scoopable straight out of the freezer. If you’re feeling adventurous, try swapping half the sugar for a light brown sugar to add a subtle caramel note that deepens the holiday vibe. Just remember, any change in sugar ratio will affect texture, so keep the total weight roughly the same.
The Texture Crew
Heavy cream is the secret weapon that gives this dessert its buttery, melt‑in‑your‑mouth quality. It’s the difference between a frosty slush and a dreamy, indulgent scoop. If you’re watching calories, you can replace half the cream with a full‑fat coconut milk, but be prepared for a faint coconut undertone that may compete with peppermint. The pinch of salt is tiny but mighty—it amplifies the mint and balances the sweetness, much like a conductor guiding an orchestra.
The Unexpected Star
Pure peppermint extract is where the magic truly happens. A single teaspoon delivers a punch that’s both cooling and sweet, cutting through the richness of the dairy like a crisp winter breeze. Be careful not to overdo it; too much can make the ice cream taste like a mouthwash. If you can’t find pure extract, crush a handful of fresh peppermint leaves and steep them in the warm milk for five minutes, then strain—this yields a fresher, herbaceous profile.
The Final Flourish
Crushed candy canes are the festive garnish that turns a simple dessert into a holiday centerpiece. They add a burst of minty crunch that contrasts beautifully with the creamy base, and the specks of red give a visual pop that’s perfect for Instagram. For a twist, try using white chocolate peppermint bark; it adds a silky chocolate note while retaining the mint crunch.
Everything's prepped? Good. Let's get into the real action...
The Method — Step by Step
Start by pouring the 2 cups of whole milk into a medium‑sized saucepan. Add the 1 cup of sugar and the pinch of salt, then whisk until the sugar dissolves completely. Place the pan over medium heat and watch as tiny bubbles begin to form at the edges—this is your cue that the mixture is warming up nicely. Tip: Keep the heat steady; a rolling boil will scorch the milk and ruin the custard base.
Kitchen Hack: Add a splash of vanilla bean paste at this stage for an extra layer of flavor that won’t compete with peppermint.When the milk is hot but not boiling (around 170°F/77°C), slowly pour in the 1 cup of heavy cream while whisking continuously. This gradual incorporation prevents the cream from curdling and creates a silky emulsion. The mixture should thicken just a hair’s breadth—think of it as a light custard that coats the back of a spoon.
Now it’s time for the star: stir in 1 teaspoon of pure peppermint extract. The aroma will instantly fill the kitchen, and you’ll feel that familiar holiday excitement bubbling up. If you’re using a peppermint leaf infusion, this is the moment to strain it in, ensuring no leaf fragments remain.
Remove the pan from heat and let the mixture sit for 5 minutes. This short rest allows the flavors to marry and the temperature to drop just enough for the next step. Watch Out: If you rush this cooling phase, the ice cream may end up icy rather than creamy because the fats haven’t had a chance to stabilize.
While the base cools, prepare a bowl of crushed candy canes. Place 1 cup of candy canes in a zip‑top bag, seal it, and gently crush with a rolling pin—don’t pulverize; you want a mix of fine crumbs and tiny shards for texture.
Watch Out: Adding candy canes while the mixture is still hot will melt them, losing the crunch you crave.Transfer the cooled custard to your ice‑cream maker’s bowl. If you’re using a manual churn, pour the mixture into a shallow metal pan and place it in the freezer, stirring vigorously every 20 minutes. The goal is to incorporate air and break up ice crystals, achieving that airy, cloud‑like texture.
After the ice cream reaches a soft‑serve consistency (about 20‑25 minutes in a machine, or 1‑1.5 hours with manual stirring), fold in the crushed candy canes gently. This is the moment of truth: the candy should stay crunchy, not melt into the base. The contrast should be as striking as a snowflake against a dark night sky.
Kitchen Hack: Freeze the crushed candy canes for 10 minutes before folding them in; they’ll stay crisp longer.Transfer the churned ice cream into an airtight container, smoothing the top with a spatula. Press a piece of parchment paper directly onto the surface to prevent ice crystals from forming. Freeze for at least 2 hours before serving, allowing the flavors to meld fully.
When you’re ready to serve, let the container sit at room temperature for 5 minutes. This softens the outer layer just enough for a perfect scoop. Picture yourself pulling this out of the freezer, the whole kitchen smelling incredible, and watching the first spoonful glide like silk onto a plate. That moment? Pure magic.
That's it — you did it. But hold on, I've got a few more tricks that'll take this to another level...
Insider Tricks for Flawless Results
The Temperature Rule Nobody Follows
Never pour hot custard directly into a cold ice‑cream maker bowl. The sudden temperature shock can cause the bowl to crack or the mixture to seize, resulting in a grainy texture. Instead, let the custard cool to under 80°F (27°C) before churning. I once tried to speed things up and ended up with a batch that tasted like a frozen milkshake—lesson learned.
Why Your Nose Knows Best
Your sense of smell is a far better indicator of flavor balance than a taste test. When the peppermint hits your nostrils, you’ll instantly know if it’s too strong or just right. If the scent is overwhelming, dilute with a splash more milk; if it’s faint, add another half‑teaspoon of extract. Trust that nasal cue, and you’ll avoid the dreaded “over‑peppermint” disaster.
The 5‑Minute Rest That Changes Everything
After churning, let the ice cream rest uncovered in the freezer for exactly five minutes before sealing the container. This brief pause allows any tiny air bubbles to rise and escape, resulting in a denser, creamier final product. A friend once skipped this step and ended up with a frothy, airy scoop that melted too quickly on the tongue.
Crush, Freeze, Fold
Crushing candy canes is easy, but keeping them crunchy is an art. Freeze the crushed pieces for at least 10 minutes, then fold them in at the very end. This prevents the sugar from dissolving into the custard, preserving that satisfying snap. If you accidentally add them too early, the crunch disappears like a snowflake on a warm palm.
The Ice‑Crystal Shield
To keep your ice cream from forming icy shards, add a tablespoon of corn syrup or a pinch of vodka to the custard before churning. Alcohol lowers the freezing point, while corn syrup interferes with crystal formation. I tried this once and the result was a scoop that stayed silky even after a week in the freezer.
Creative Twists and Variations
This recipe is a playground. Here are some of my favorite ways to switch things up:
Chocolate Peppermint Swirl
Melt ½ cup of dark chocolate and swirl it through the churned ice cream before the final freeze. The bitter chocolate balances the mint, creating a sophisticated flavor duo that even adults adore.
Eggnog Infusion
Replace ½ cup of whole milk with store‑bought eggnog and add a pinch of nutmeg. The result is a holiday classic reborn as a frozen delight, perfect for brunch gatherings.
Berry‑Burst Peppermint
Fold in a handful of fresh cranberries or pomegranate seeds after churning. The tart berries contrast the sweet mint, delivering a festive pop of color and flavor.
Vegan Mint Dream
Swap whole milk for oat milk and heavy cream for coconut cream, and use a plant‑based peppermint oil. The texture stays creamy, and the coconut adds a subtle tropical whisper that pairs surprisingly well with mint.
Spiked Holiday Cheer
Add a tablespoon of peppermint schnapps or bourbon to the custard before churning for an adult‑only version. The alcohol not only adds depth but also keeps the ice cream softer for longer.
Storing and Bringing It Back to Life
Fridge Storage
If you plan to serve within 48 hours, keep the ice cream in a sealed container in the freezer, not the fridge. The freezer maintains the right texture, while the fridge will cause it to melt and become watery.
Freezer Friendly
For longer storage, line the container with a thin layer of parchment paper before adding the ice cream. This creates a barrier that reduces freezer burn and keeps the flavor bright for up to three months.
Best Reheating Method
When you’re ready to serve after a long freeze, let the container sit at room temperature for 5‑7 minutes, then add a splash (about a teaspoon) of cold water or milk and stir gently. The added moisture steams the ice crystals back to a silky consistency without diluting the flavor.