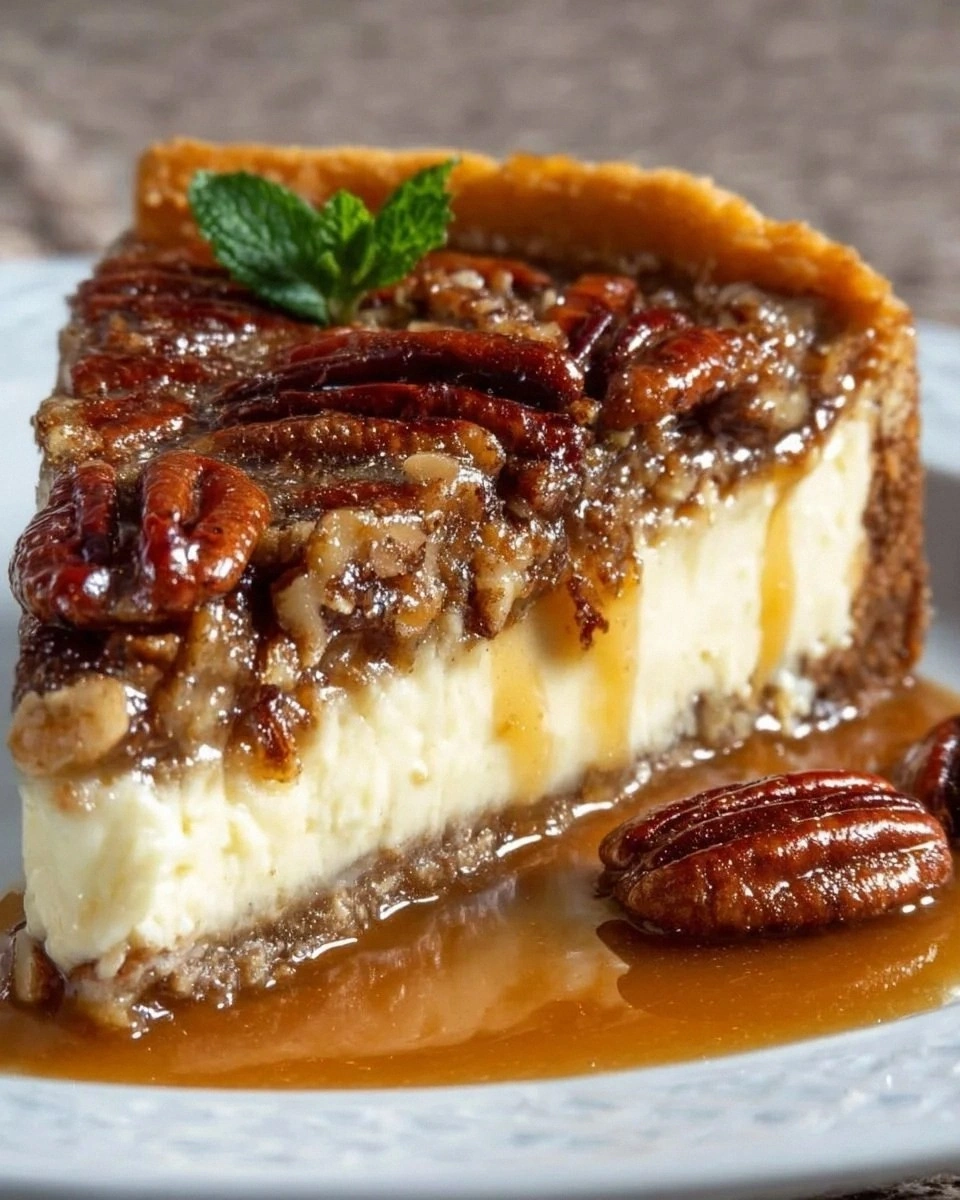
Picture this: it’s a rainy Sunday afternoon, the kind that makes you want to curl up with something that feels like a hug from the inside out. I was battling a half‑baked batch of plain cheesecake that turned out as flat as a pancake, while the kids downstairs were begging for the classic Boston cream pie they love from the bakery. I tossed the two ideas together in a moment of culinary desperation, and the result was a dessert that practically shouted, “I’m the best thing you’ve ever tasted.” This isn’t just a mash‑up; it’s a love child of two iconic desserts that somehow found perfect harmony in a single pan.
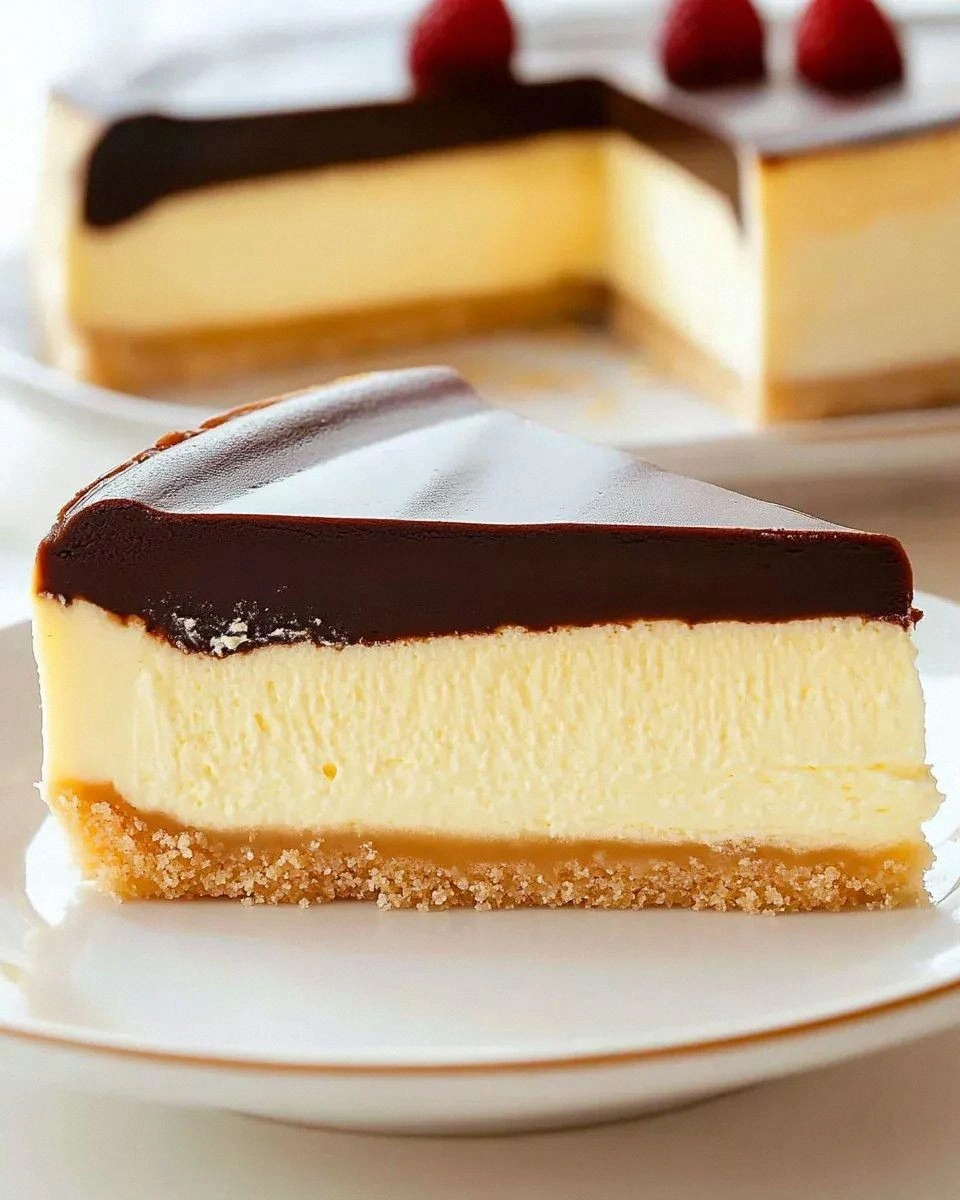
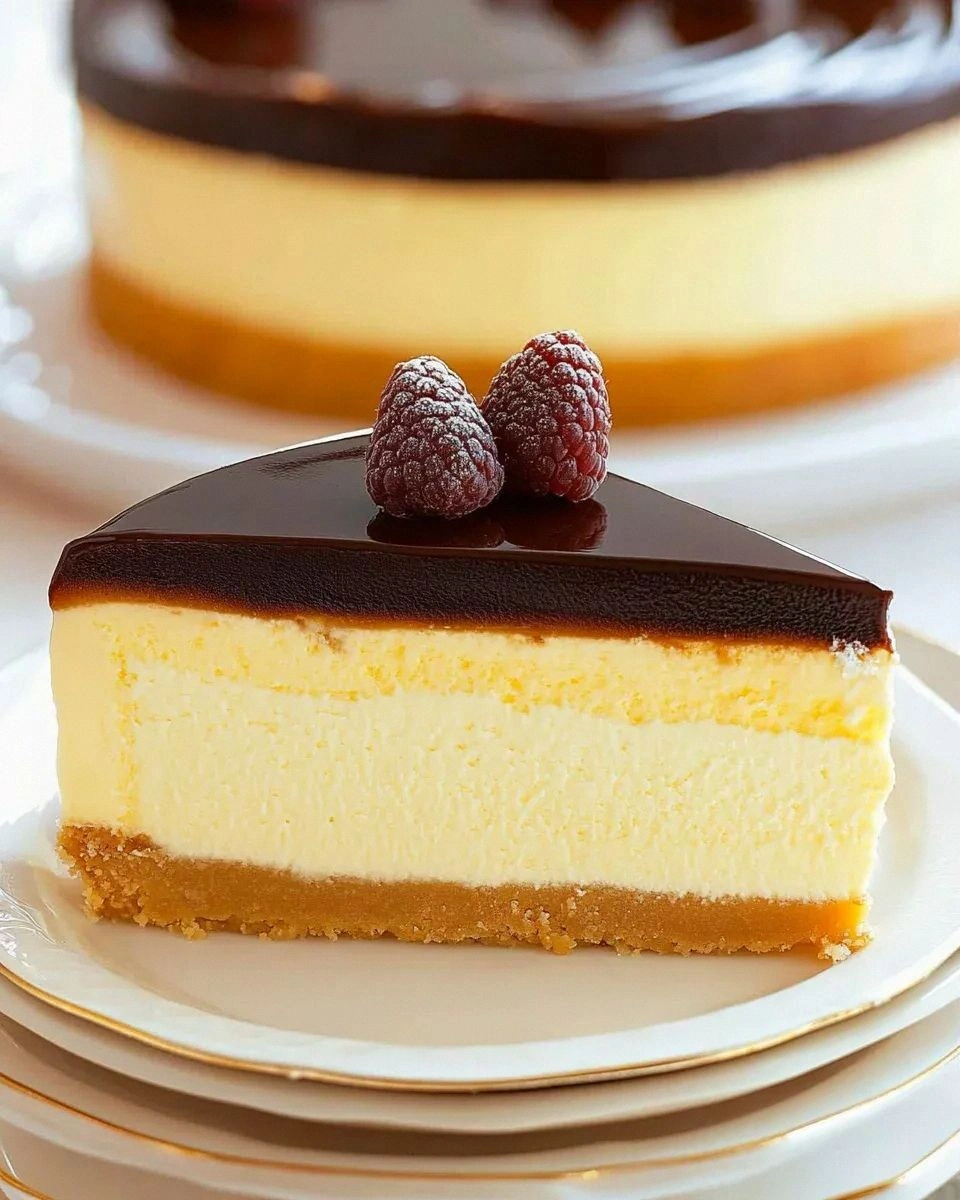
The moment the batter hit the bowl, I could hear the faint whisper of cake flour flirting with the buttery crust, while the cream cheese sighed in anticipation. The kitchen filled with a buttery, vanilla‑kissed aroma that made my stomach do a little jig. As the cheesecake baked, the top began to rise like a golden sunrise, and when the chocolate glaze finally hit the cooling surface, it sang a silky lullaby that made the whole house feel like a high‑end patisserie. The taste? Imagine the airy lightness of a Boston cream pie’s sponge, the velvety richness of a New York‑style cheesecake, and a glossy chocolate crown that adds just enough bitterness to keep things interesting.
Most recipes either overcomplicate the crust or skimp on the custard, leaving you with a dessert that’s either too dense or too soggy. I’ve tried dozens of “Boston Cream Cheesecake” variations, and most of them get the texture completely wrong – the crust crumbles like dry sand, and the filling either cracks or stays forever soft. This version, however, uses a precise balance of cake flour and a dash of baking powder to create a crust that’s buttery yet sturdy enough to hold the luscious filling without turning into a soggy mess. The secret? A split‑cream technique that layers lightened whipped cream with a vanilla pudding‑infused custard, giving you that iconic “pie‑like” bite while keeping the cheesecake’s signature creaminess.
Now, I’m not just bragging. I dare you to taste this and not go back for seconds. The moment you slice through the glossy chocolate top, you’ll see a swirl of golden custard that’s as smooth as satin and as airy as a cloud. I’ll be honest — I ate half the batch before anyone else got a chance to try it, and that’s a testament to how addictive this dessert truly is. The next part? Pure magic. Let me walk you through every single step — by the end, you’ll wonder how you ever made it any other way.
What Makes This Version Stand Out
- Texture: The crust is crisp on the edges yet tender beneath, while the filling is a flawless blend of light custard and rich cheesecake, creating a mouthfeel that’s both airy and indulgent.
- Flavor Balance: A subtle vanilla‑pudding backbone meets a hint of chocolate bitterness, delivering a sweet‑savory dance that never feels cloying.
- Simplicity: Despite the impressive result, the recipe uses pantry staples and only a handful of steps, making it accessible even for weekend bakers.
- Visual Impact: The glossy chocolate glaze and the golden custard swirl look as stunning as a bakery display, guaranteeing applause at any gathering.
- Crowd‑Pleaser: Whether it’s a birthday, a potluck, or a quiet night in, this dessert consistently earns rave reviews and empty plates.
- Make‑Ahead Potential: Assemble the night before, refrigerate, and the flavors will meld even more, giving you a stress‑free finish line on the day of serving.
Inside the Ingredient List
The Flavor Base
The backbone of this dessert is the vanilla‑infused custard, built from instant vanilla pudding, heavy cream, and a generous splash of pure vanilla extract. The pudding mix not only speeds up thickening but also adds a subtle, lingering vanilla note that you’ll taste in every bite. Skipping it would leave the filling thin and lacking that signature flavor depth, so keep it on the list. If you’re allergic to dairy, you can swap the heavy cream for a full‑fat coconut milk, but expect a faint coconut undertone.
The Texture Crew
Cream cheese is the star of the show, providing that luxurious, tangy richness we all love. Using four 8‑ounce blocks ensures the filling stays silky without becoming grainy. The combination of cake flour and a pinch of baking powder in the crust gives it a tender crumb that’s sturdy enough to support the weight of the filling. Should you run out of cake flour, substitute with an equal amount of all‑purpose flour, but the crust will be a tad denser.
The Unexpected Star
Chocolate may seem like a simple topping, yet the choice of semisweet chocolate paired with a tablespoon of light corn syrup creates a glaze that’s glossy, smooth, and just sweet enough to complement the custard without overwhelming it. The corn syrup prevents the chocolate from setting too hard, keeping it melt‑in‑your‑mouth. If you prefer a darker finish, use bittersweet chocolate and reduce the corn syrup by half.
The Final Flourish
The finishing touches—unsalted butter, cream of tartar, and a pinch of salt—are the tiny heroes that bring everything together. Butter enriches the crust, while cream of tartar stabilizes the egg whites in the custard, giving it that lofty rise. Salt, even just a pinch, amplifies the sweetness and balances the flavors. Forgetting any of these can result in a flat, bland dessert that lacks that signature “wow” factor.
Everything's prepped? Good. Let's get into the real action...
The Method — Step by Step
First, preheat your oven to 325°F (163°C). While the oven warms up, combine the cake flour, baking powder, and that tiny pinch of salt in a bowl; whisk until the mixture looks like fine sand. This dry blend will ensure the crust rises evenly and stays tender.
In a separate saucepan, melt 3 tablespoons of unsalted butter over low heat, then stir in the ½ cup of cake flour mixture, creating a roux that will become the base of our crust. Cook for about 2 minutes until it turns a light golden color—this is the moment you’ll hear a faint sizzle, a sign of perfection.
Remove the pan from heat and whisk in ⅓ cup + 2 tablespoons of sugar, 1 teaspoon of pure vanilla extract, and ¼ teaspoon of cream of tartar. The mixture will look glossy and thick; this is exactly how the crust should feel—like a thick batter that clings to the back of a spoon.
Press the crust mixture evenly into the bottom of a 9‑inch springform pan, using the back of a measuring cup to flatten it. Watch Out: If you press too hard, the edges will bake too quickly and become overly crunchy.
While the crust chills, beat 3 large eggs in a large bowl until they turn pale and fluffy, then add 4 ounces of softened cream cheese (half of the total) and continue beating until smooth. The mixture should be so creamy it slides off the whisk without leaving streaks.
In another bowl, whisk together the remaining 2 cups of cream cheese, 1 ⅔ cups of sugar, ¼ cup cornstarch, 1 tablespoon vanilla extract, and 2 large eggs. Add ¾ cup heavy whipping cream, 1 pint heavy cream, and ⅓ cup milk, then fold in the instant vanilla pudding mix. The batter will thicken instantly—this is the custard’s secret weapon.
Pour the custard‑cheesecake mixture over the chilled crust, smoothing the top with a spatula. Tap the pan lightly on the counter three times to release any trapped air bubbles; you’ll hear a gentle “pop” that tells you the batter is settled.
Slide the pan onto the middle rack and bake for 30‑35 minutes, or until the edges are set and the center still has a slight wobble—think of a Jell‑O that’s just about to set. The scent at this stage is intoxicating: a sweet vanilla perfume with a faint buttery undertone.
Turn off the oven, crack the door open, and let the cheesecake cool inside for an hour. This gradual cooling prevents cracks. Then, refrigerate for at least 4 hours, preferably overnight, to allow the flavors to meld and the texture to firm up.
When you’re ready to glaze, melt 4 ounces of semisweet chocolate with 1 tablespoon light corn syrup over a double boiler. Stir in 4 tablespoons butter until the mixture shines like a midnight lake. Pour the glaze over the chilled cheesecake, letting it cascade like a waterfall.
Let the glaze set for about 15 minutes at room temperature, then carefully remove the springform side. Slice with a hot knife (dip it in hot water, wipe dry) to get clean, glossy cuts that showcase the layered custard and chocolate.
That's it — you did it. But hold on, I've got a few more tricks that'll take this to another level...
Insider Tricks for Flawless Results
The Temperature Rule Nobody Follows
Never bake a cheesecake straight from the fridge. Let the filling sit at room temperature for 20 minutes before it goes into the oven; this ensures even baking and eliminates the dreaded “crack” that shows up when the batter is too cold. I once tried skipping this step and ended up with a cheesecake that looked like a cracked desert floor—trust me, you don’t want that.
Why Your Nose Knows Best
When the crust is done, you’ll notice a faint nutty aroma rising from the pan. That scent is your cue that the crust is perfectly golden. If you rely solely on color, you might over‑bake and end up with a bitter edge. So keep that nose handy; it’s the secret sensor most bakers overlook.
The 5‑Minute Rest That Changes Everything
After the cheesecake has cooled in the oven, let it rest on the counter for exactly five minutes before moving it to the fridge. This short pause allows the internal steam to settle, preventing condensation that could make the crust soggy. I’ve seen friends skip this and end up with a soggy bottom—don’t be that person.
Chocolate Glaze Mastery
When melting chocolate, use a double boiler instead of the microwave; the gentle heat prevents scorching and keeps the glaze glossy. Add a splash of butter right at the end; it creates a glossy finish that reflects light like a mirror. If the glaze thickens too much, a teaspoon of warm water will bring it back to a pourable consistency.
Egg‑White Stabilizer
Adding ¼ teaspoon of cream of tartar to the egg whites in the custard stabilizes them, giving the filling that lofty, airy texture. Without it, the custard can collapse during baking, resulting in a dense, heavy bite. This tiny ingredient is a game‑changer and costs almost nothing.
Creative Twists and Variations
This recipe is a playground. Here are some of my favorite ways to switch things up:
Berry Burst
Swirl in a cup of fresh raspberry puree into the custard before baking. The tartness of the berries cuts through the sweetness, adding a vibrant pink hue that’s as pretty as it is delicious. Perfect for spring gatherings.
Mocha Madness
Replace half of the semisweet chocolate with dark espresso‑infused chocolate, and add a teaspoon of instant coffee to the custard. The result is a sophisticated mocha flavor that pairs beautifully with a cup of black coffee.
Salted Caramel Drizzle
Swap the chocolate glaze for a silky salted caramel sauce, and sprinkle flaky sea salt on top. The sweet‑salty contrast elevates the dessert to a gourmet level, ideal for special occasions.
Nutty Crunch
Fold in ½ cup toasted chopped pecans into the crust mixture before baking. The nuts add a delightful crunch that contrasts the creamy filling, and they bring a warm, buttery flavor that’s irresistible.
Vegan Version
Use a plant‑based cream cheese, coconut cream instead of heavy cream, and a vegan chocolate melt. While the texture shifts slightly, the overall experience remains indulgent, making it a great option for dairy‑free guests.
Storing and Bringing It Back to Life
Fridge Storage
Cover the cheesecake loosely with plastic wrap and store it in the refrigerator for up to 5 days. The glaze will stay glossy, and the custard will continue to set, becoming even smoother with each passing hour.
Freezer Friendly
Wrap the entire cheesecake (springform pan included) in a double layer of foil, then place it in a freezer‑safe bag. It will keep for up to 2 months. When you’re ready to serve, move it to the fridge overnight to thaw slowly.
Best Reheating Method
To revive the chocolate glaze after freezing, place the cheesecake on a microwave‑safe plate, add a tiny splash of water (about a teaspoon) around the edges, and microwave on low for 10‑15 seconds. The steam will melt the glaze back to its original sheen without melting the custard.